From this page, you can provide the necessary consents to a set of permissions and create the service accounts CoreView requires to import data from your tenant.

Integration App
In this section, you can provide consent to a set of permissions that are required for using the Graph API and the Office 365 Management API to collect reporting data from your tenant.
Please be aware that the number of CoreView app integrations may vary. We assess your tenant and, based on its size and transaction volume, we dynamically generate the necessary number of apps to manage the load CoreView requires.
Instructions to provide consent
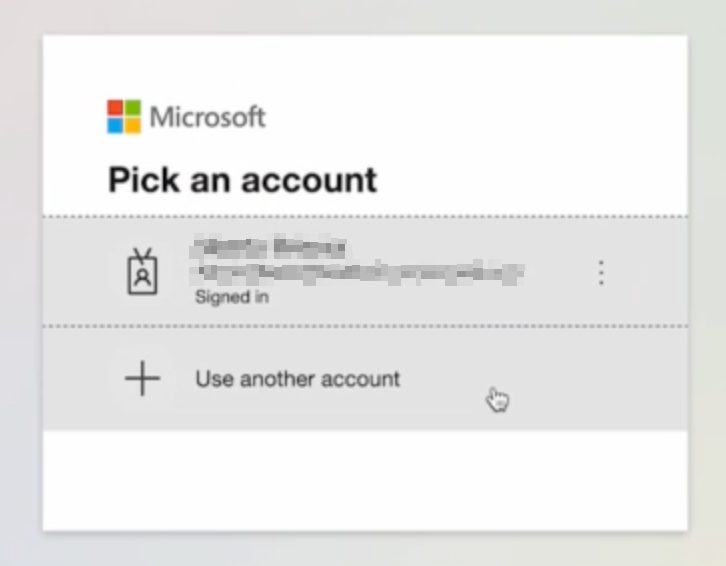
Click on “Review requested permissions” to proceed. You will encounter the standard Microsoft “Pick an account” interface. Select the Microsoft 365 account to which Global Admin role has been assigned, the same account you used to log in.
Next, a screen is shown displaying the requested permissions. This set of permissions is required to give consent to use the Microsoft Graph and Office 365 Management API. Consent for Microsoft Graph and Office 365 Management API grants read-only access.

You can find the detailed list of permissions requested by the CoreView API Integration app to authorize in this step in the article credentials and permissions list.
After confirming, you'll be redirected to a temporary page. Within 5 seconds, you'll be taken back to the consent page. If everything went well, you will see the following screen:
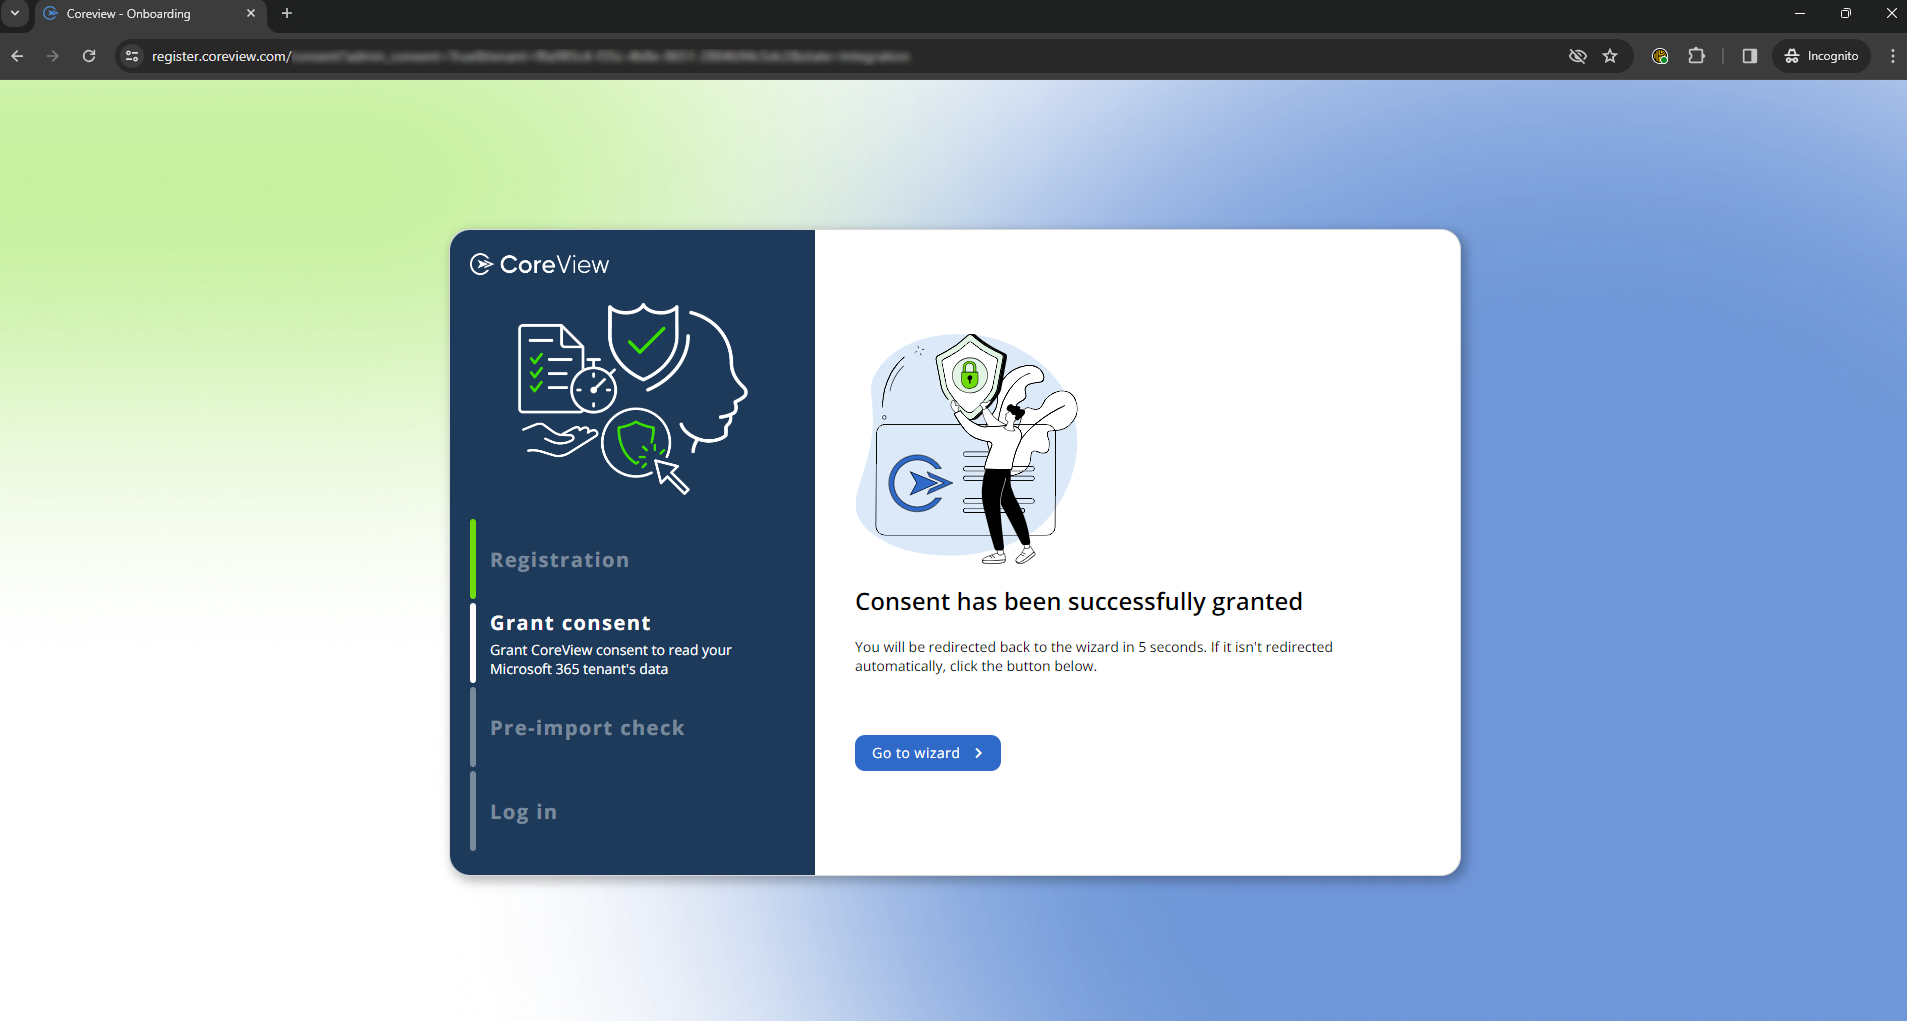
Now, click on “Go to wizard”.
Registration App and creation of service accounts
In this step you should create service accounts. These accounts are used to connect to your tenant and collect reporting data. You can create them:
Automatically with the Registration App
You can create them automatically through the Registration App, by granting the necessary consents.
- If you completed onboarding after august 2024, the Registration App will be automatically removed once the process is finished.
- If, however, you completed onboarding before august 2024, you can manually remove the app directly from Azure after onboarding is complete.
Manually from the Admin Center
By adding manually custom service accounts, that you should have previously created on the Microsoft 365 Admin Center
Remember that once you have created service accounts automatically through the Registration App, you can't turn back and create custom service accounts manually.
Understanding service accounts
What are service accounts?
According to Microsoft, service accounts are non-interactive accounts that aren't tied to any particular user. They're normally used by back-end services allowing programmatic access to applications, but are also used to sign in to systems for administrative purposes.
What is the purpose of service accounts for CoreView's onboarding?
During the import procedure, CoreView creates two read-only accounts for your Microsoft 365 tenant.
These accounts are exclusively used for connecting to your tenant and importing reporting data; they are not authorized to make any changes within your environment.
What characteristics do the created service accounts have?
- These accounts do not require Office 365 licensing.
- They are used only during this import procedure to gather reporting data.
- They are assigned the Global Reader and Reports Reader permissions.
- After the onboarding process is completed, you have the option to remove the granted permissions for the CoreView Registration App.
You can find the detailed list of permissions requested by the CoreView Registration App to authorize in this step in the article credentials and permissions list.
Remember not to delete the service accounts after onboarding, or the import of data into CoreView will stop working.
Please be aware that removing permissions will affect CoreView's ability to import data.
How can I identify the service accounts created on Entra ID?
The service accounts created can be found on your Azure Active Directory tenant with the following naming convention:

If needed, you could assign them a different name than the “Admin Read Only XY” for better recognition when searching.
Remember not to change the User Principal Name assigned to service accounts.
How to create service accounts
How do you want to create your service accounts? (Click the buttons below to read the instructions)
Instructions to create service accounts automatically via Registration App
You can automatically create read-only service accounts by consenting to the required set of permissions in the Registration App. Click on the button “Review requested permissions”.

You will encounter the standard Microsoft “Pick an account” appears. Select the Microsoft 365 account to which Global Admin role has been assigned, the same account you used to log in.

Next, a screen is shown displaying the requested permissions that are required to create service accounts.

You can find the detailed list of permissions requested by the CoreView Registration App to authorize in this step in the article credentials and permissions list.
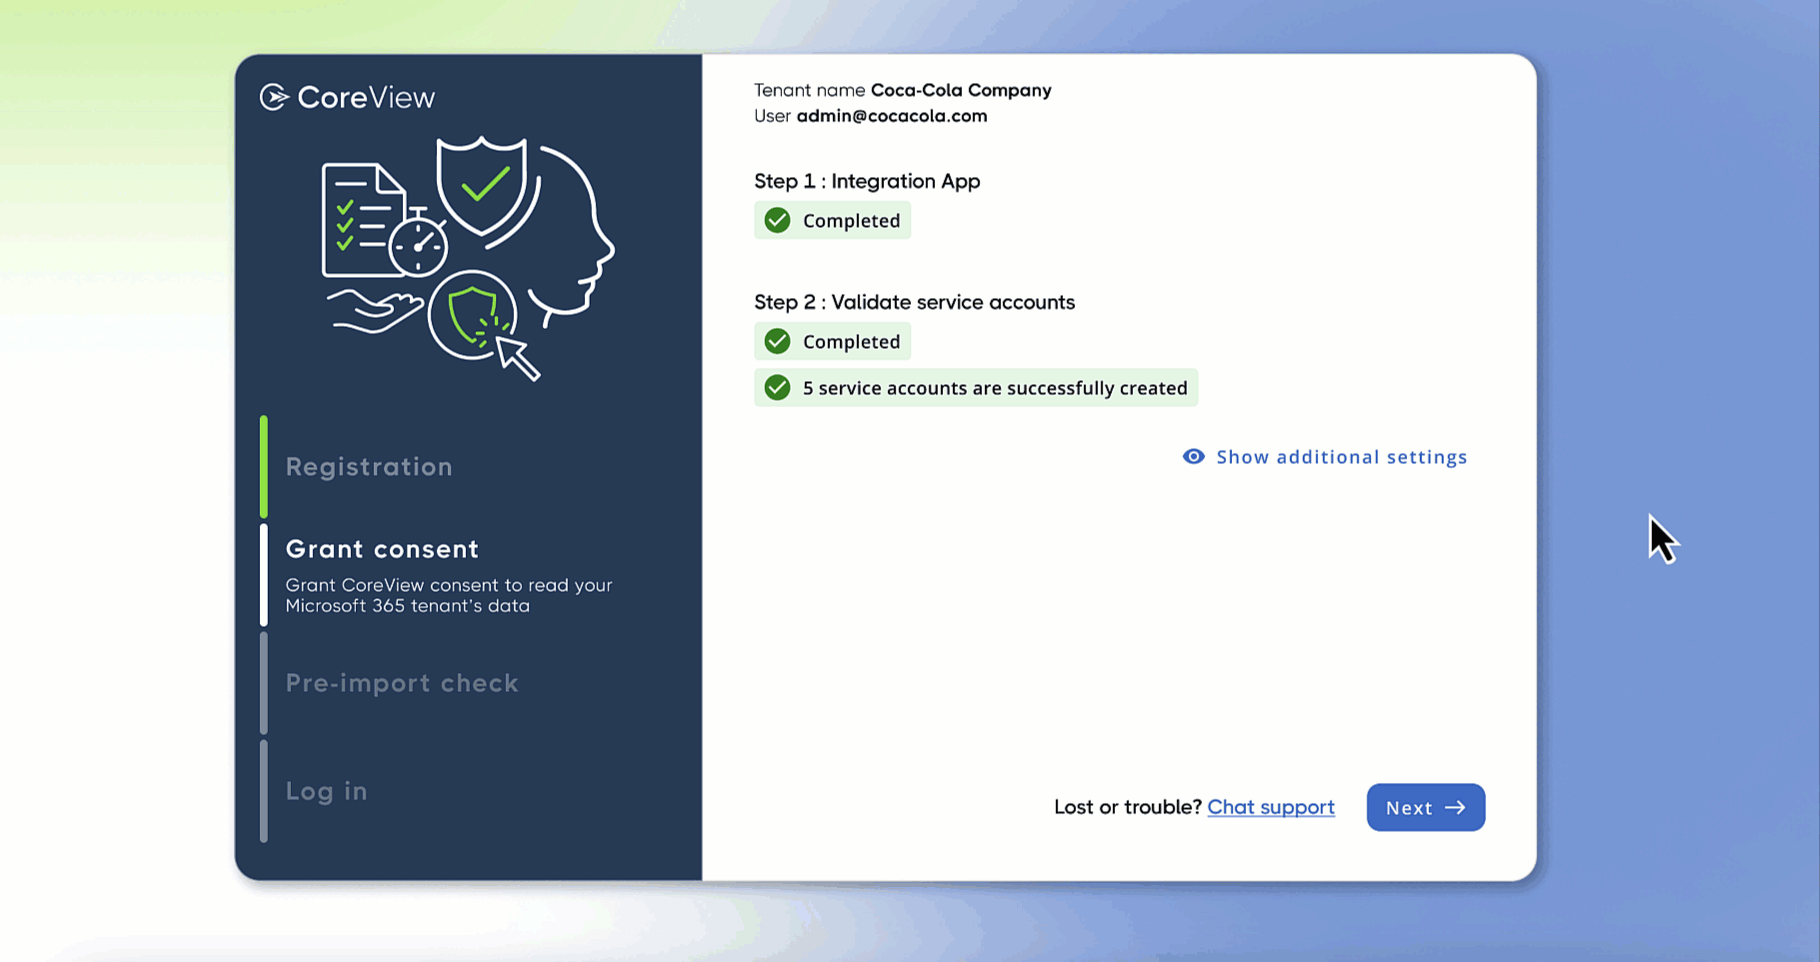
After giving consent, the process of creating service accounts is starting. Stay on this page without closing it until you receive confirmation that the accounts have been successfully created.

Instructions to create custom service accounts manually
You can manually enter previously created service accounts in the Microsoft 365 Admin Center, without granting CoreView any extra permissions. Click on the link “More about service account creation”.
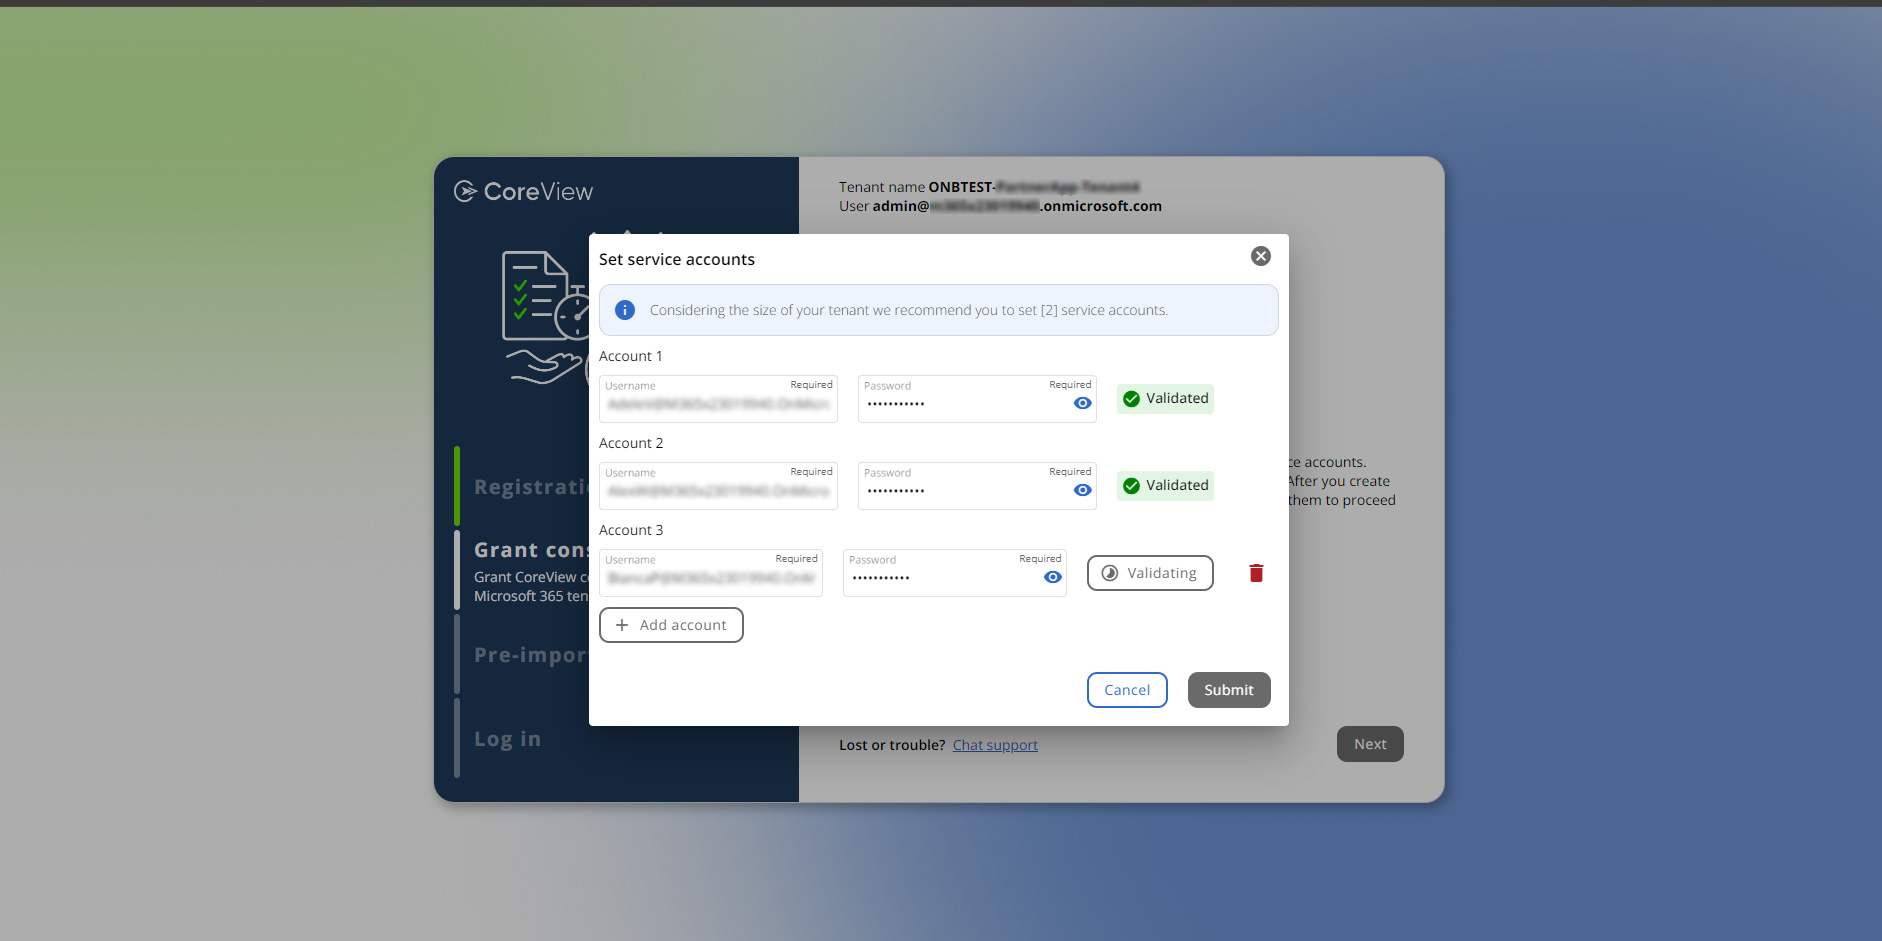
From the pop-up that appears, click on “Create custom service accounts”.

In the panel that will open enter the credentials for the service accounts. Based on your tenant size we recommend creating a number of service accounts between 2 and 10. All the service accounts require the admin role “Global reader and ”Reports Reader" permissions.
If needed, read instructions on how to create service accounts in Microsoft 365 Admin Center and check how to grant the correct permissions.
Once the information is filled in, click on “Validate” to check if the credentials are correct and the service accounts have the correct permissions. Once all the service accounts have been validated, you can click on “Submit” to proceed.
After giving consent, the process of creating service accounts is starting. Stay on this page without closing it until you receive confirmation that the accounts have been successfully created.
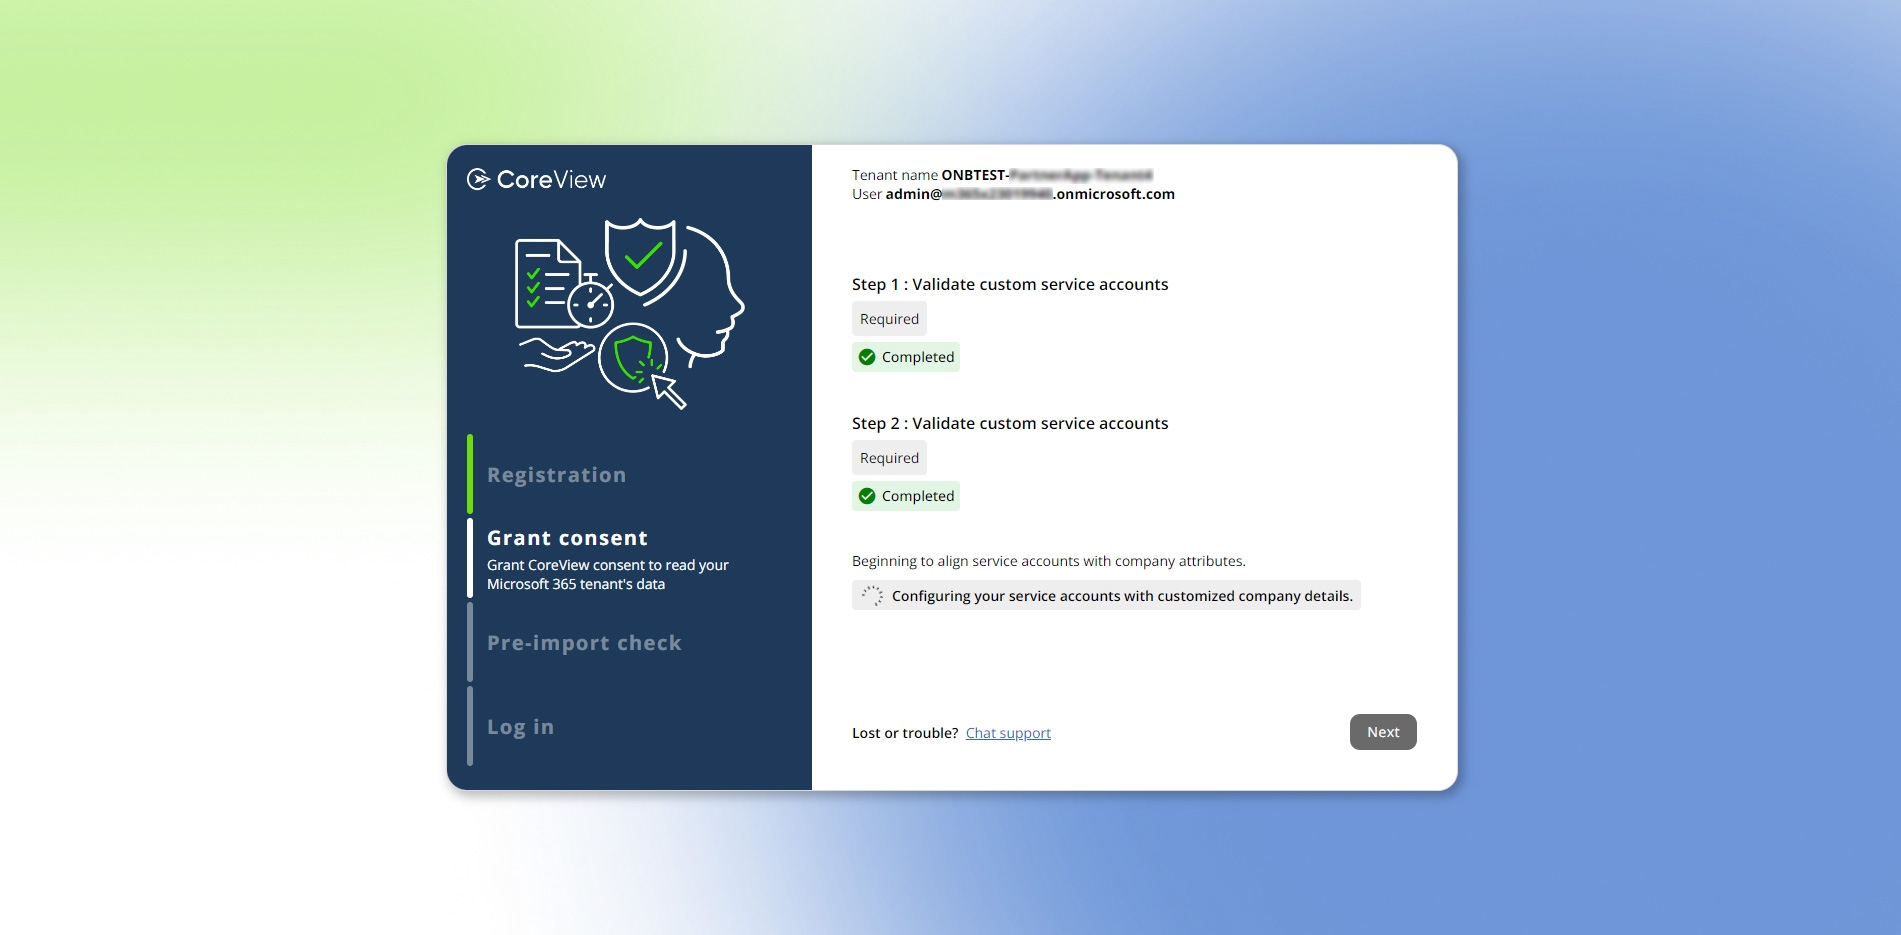
If everything has been successful, you can proceed to the checkpoint and then to the next step.

Configuration Manager Management App
In this step, enable and grant consent to the Configuration Manager Management App to onboard Configuration Manager and provide all necessary permissions for its operation within the tenant.

Creation of management service account
During this step, you can create management service accounts that give you immediate access to management actions, custom actions, and workflows within your tenant platform through CoreView, without any additional configuration.
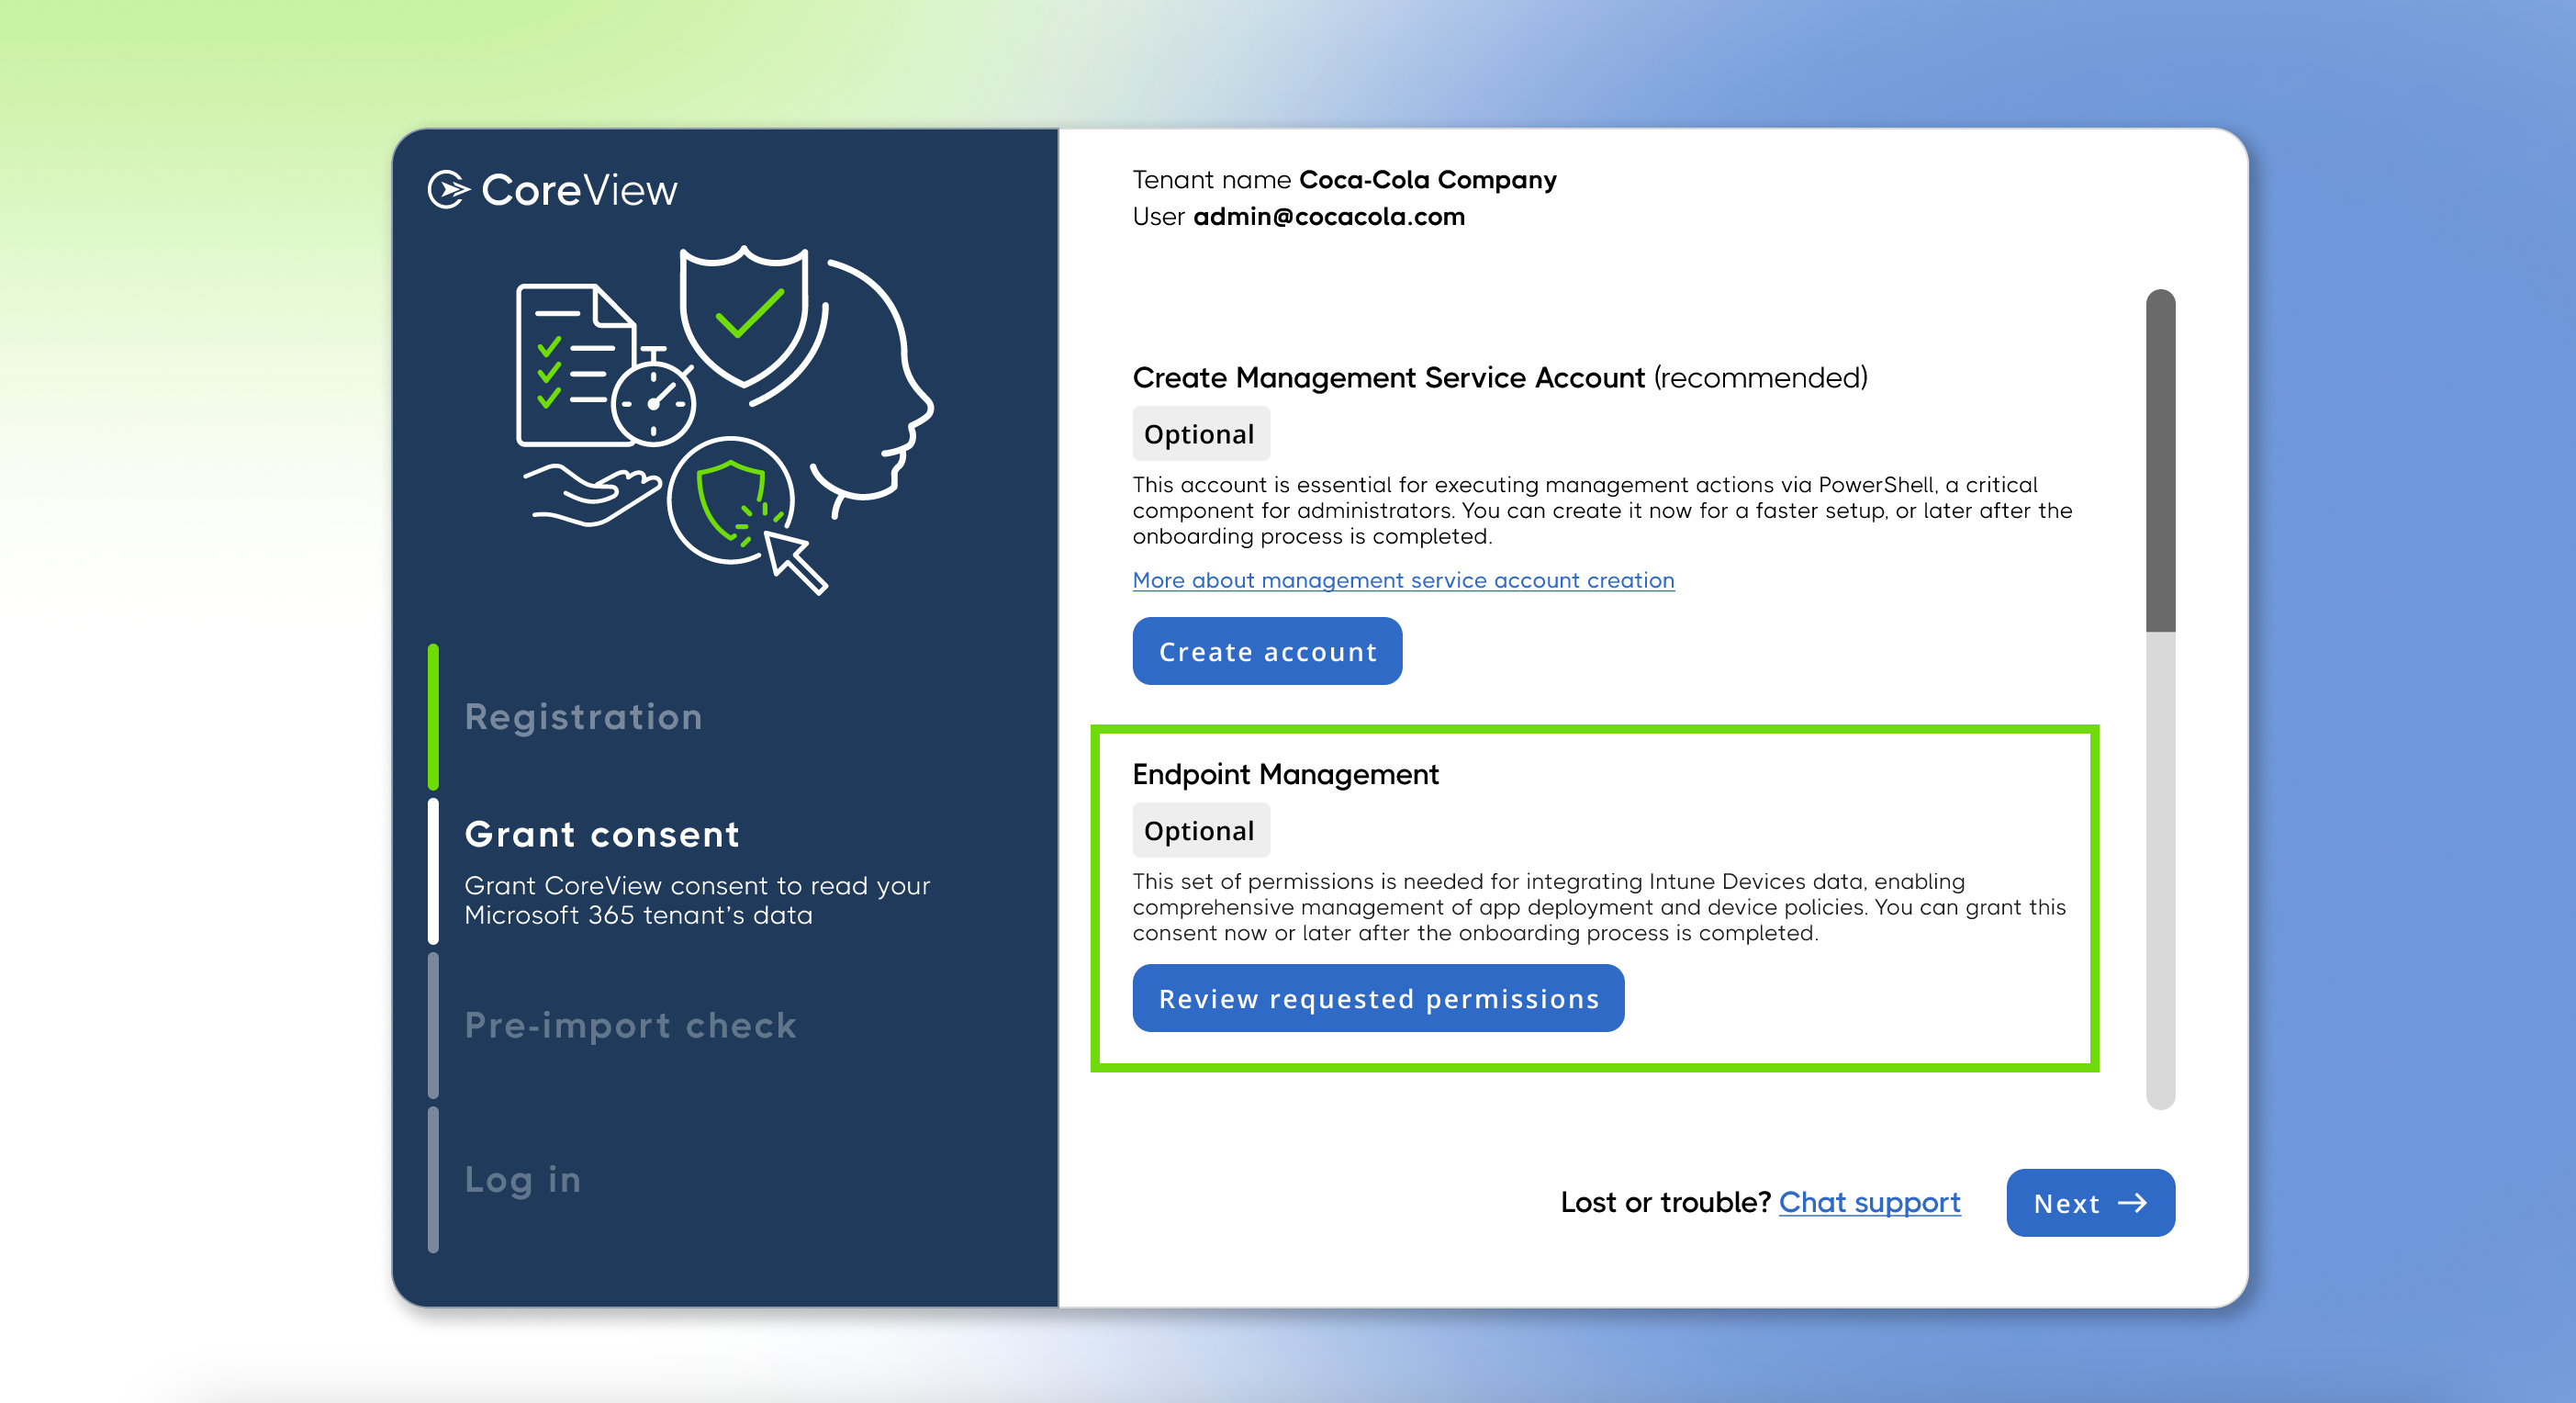
Endpoint Management
Granting Endpoint Management consent enables immediate integration with Intune. This ensures a smoother setup process, allowing for comprehensive management of devices and applications from day one.
Teams Voice
If you've purchased the Teams Voice add-on, you'll need to grant the required permissions to import Teams Voice data at this stage. This ensures you won't need to provide any further permissions in the future.

Integrations
Navigate to the “Integrations” section to conveniently grant permissions for SharePoint, OneDrive, and BitLocker simultaneously.
Next step
Click on “Proceed” to move forward to the configuration.