“Manual” actions are native CoreView actions that, together with “Miscellaneous” actions are specifically dedicated to workflows. They can only be accessed from the “Manage workflow” section.
This article will examine in detail the capabilities of each of these workflow management actions.
Multichoice
This action sends an email to a designated recipient, asking them to determine the next steps in the workflow. It is typically designed to work in conjunction with the “Filter” function. Let's view how to configure it:
Step 1: Configuration
- Options: enter all the choices the e-mail recipient/owner can choose from.
- Owner can choose: sSelect “Yes” to give yourself the option to decide in case the e-mail recipient fails to provide an answer.
- Email recipient can choose: enter the input or the email address of the person who must make a decision.
- E-mail: type in the subject and body of the e-mail that will be delivered to the recipient.
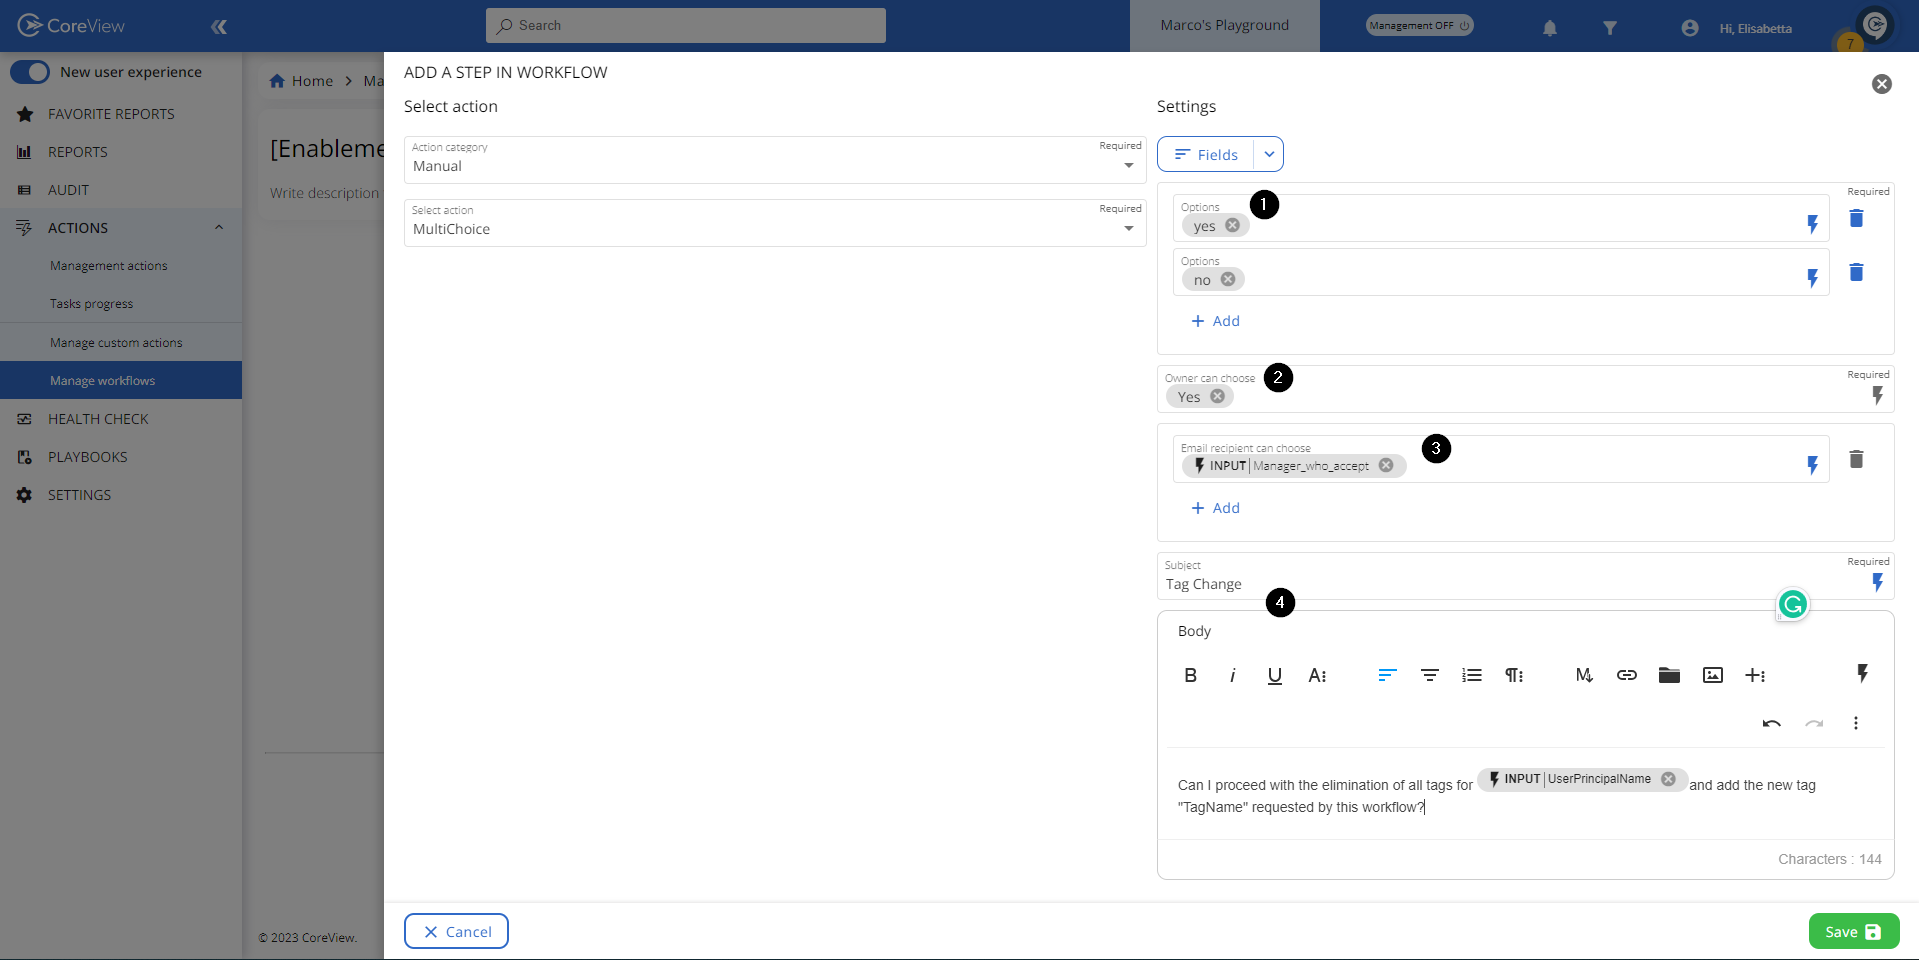
In the example above, the workflow asks the recipient for permission to remove all tags from a user and add a new tag. Since a filter has been also configured, the workflow will proceed to perform these actions only if the recipient answers “yes”. The owner can also make the decision if necessary.
Step 2: Attestation
Upon workflow execution, the recipient will get an email containing the multiple-choice options.

If the recipient approves it by clicking on “yes”, the workflow will proceed.

Step 3: Review progress
Refresh the “Execution detail” panel to view your workflow progress.
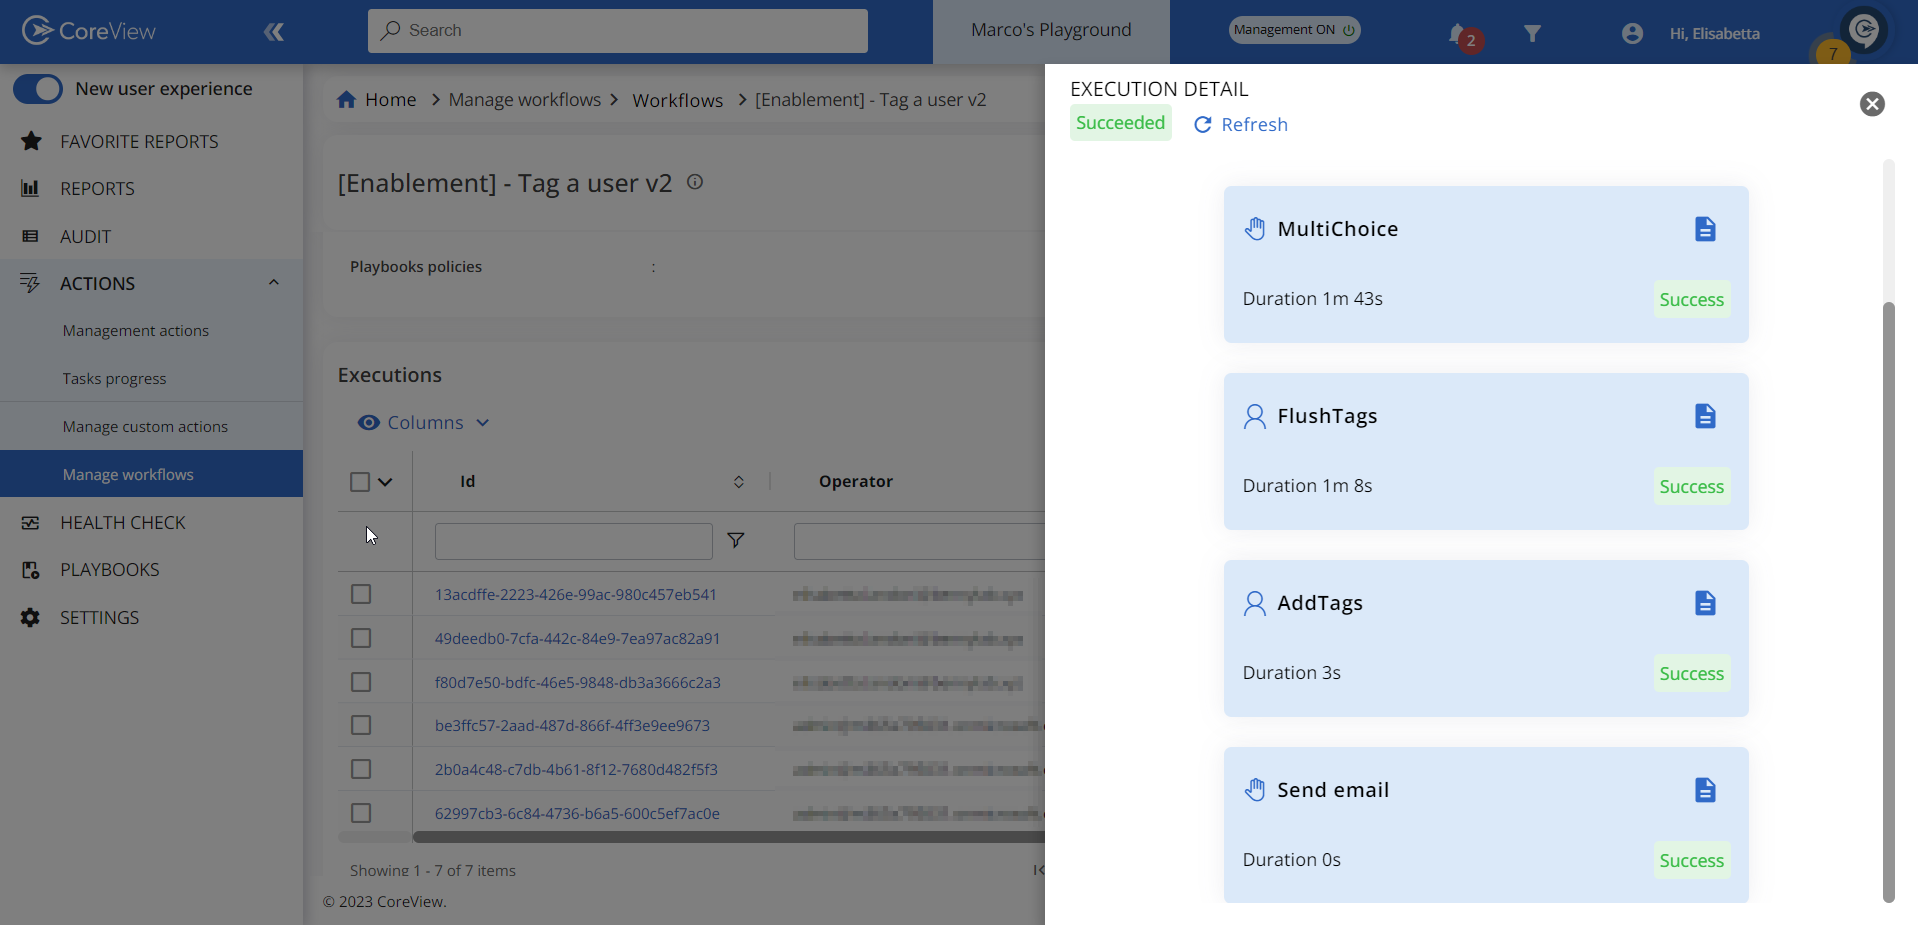
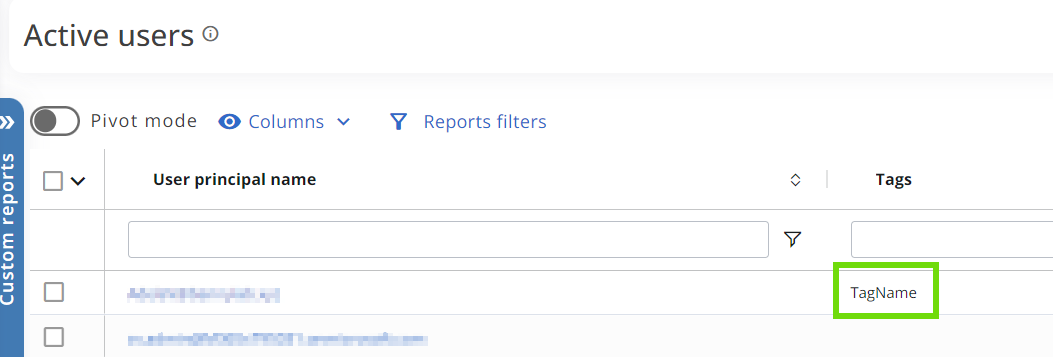
Workflow success! The previous tags have been deleted and the new “TagName” tag has been successfully added to the user.
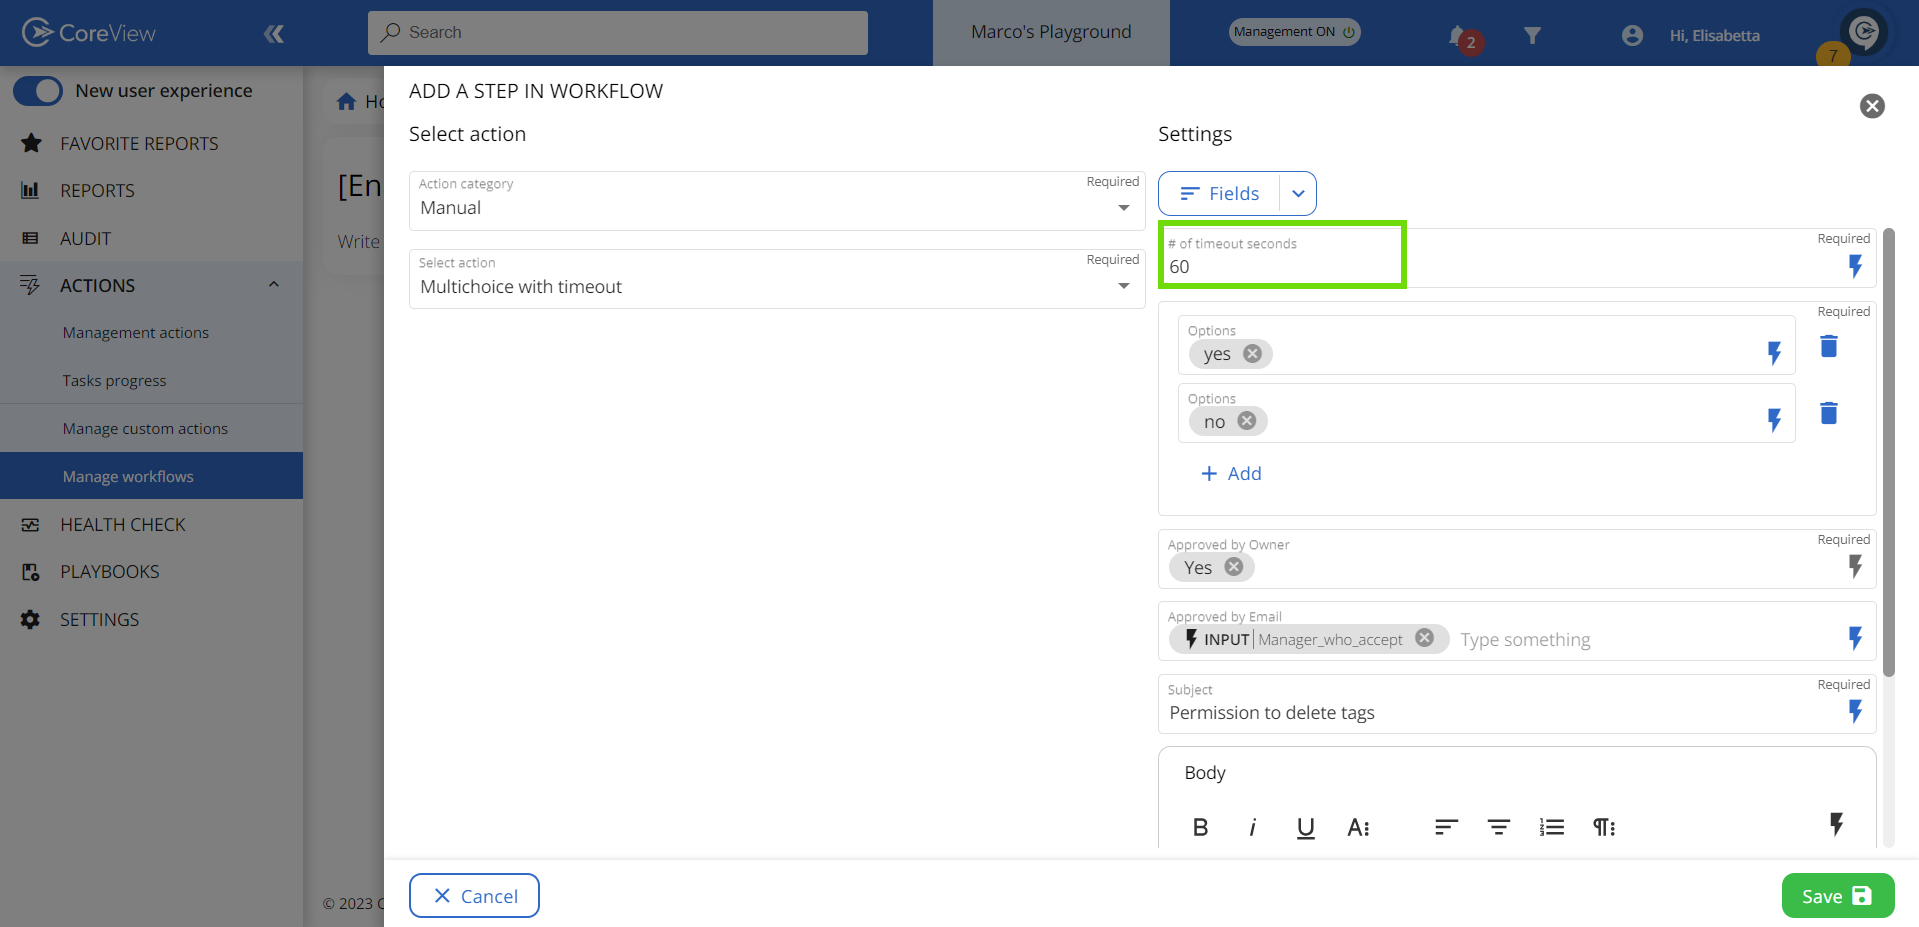
Multichoice with Timeout
This action is similar to the previous one but features a configurable timeout (in seconds). If no answer is provided within the specified time frame, the action will be executed automatically.
Step 1: Configuration
In the example below, the workflow is requesting permission to remove the previous tag before adding a new tag, “Hello”. The email specifies that if no answer is provided within 60 seconds, the workflow will not remove the previous tag, as a filter has been configured to skip this action.
Step 2: Attestation
In this example, let's see what happens if the attestation recipient takes no action.
Step 3: Review progress
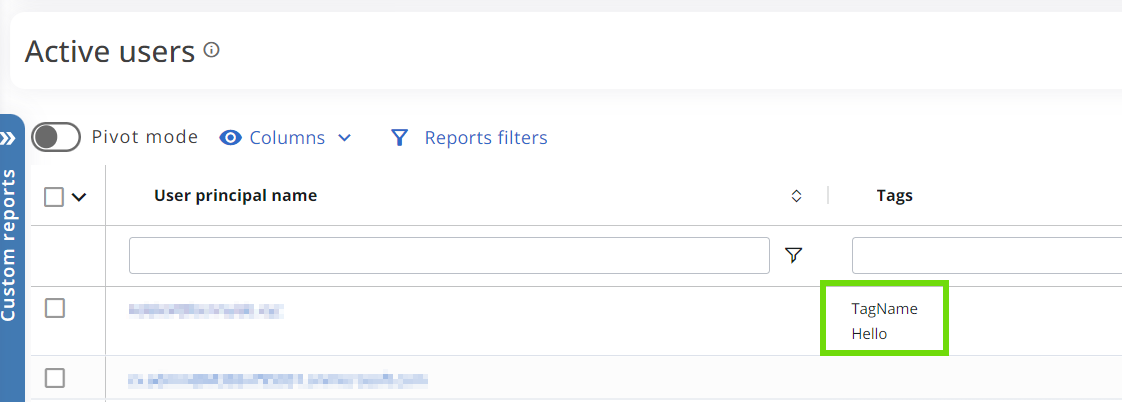
From the “Execution detail” panel, you can observe that the email timed out, and therefore the filter skipped the action that would have removed other tags.

As a result, both the old tag and the new tag “Hello” are displayed for the user.
Operator approval with policy exception
This action can solely be integrated into workflows associated with the remediation of a custom policy.
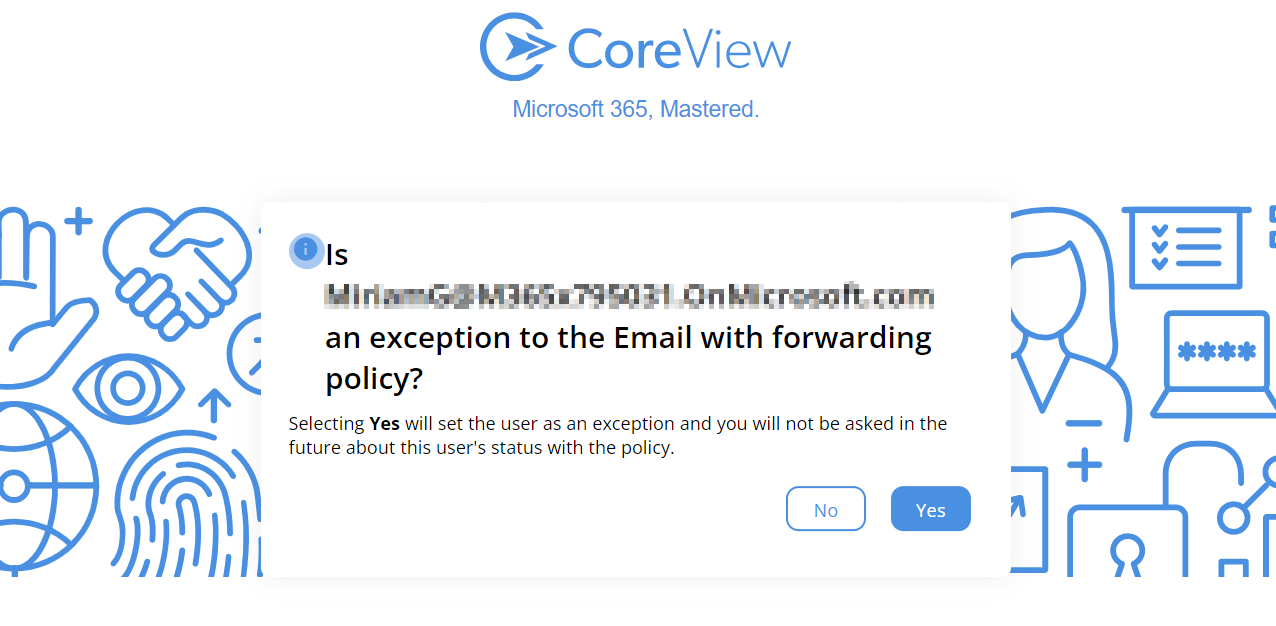
The purpose of this action is to send an attestation email to a designated account. For each matched item detected by the custom policy, the recipient is asked to either approve the subsequent remediation action(s) or set an exception.
In the example below, the attestation action is requesting permission to remove the forwarding from the user accounts that have been detected by our “Email with forwarding” custom policy.
Step 1: Configuration
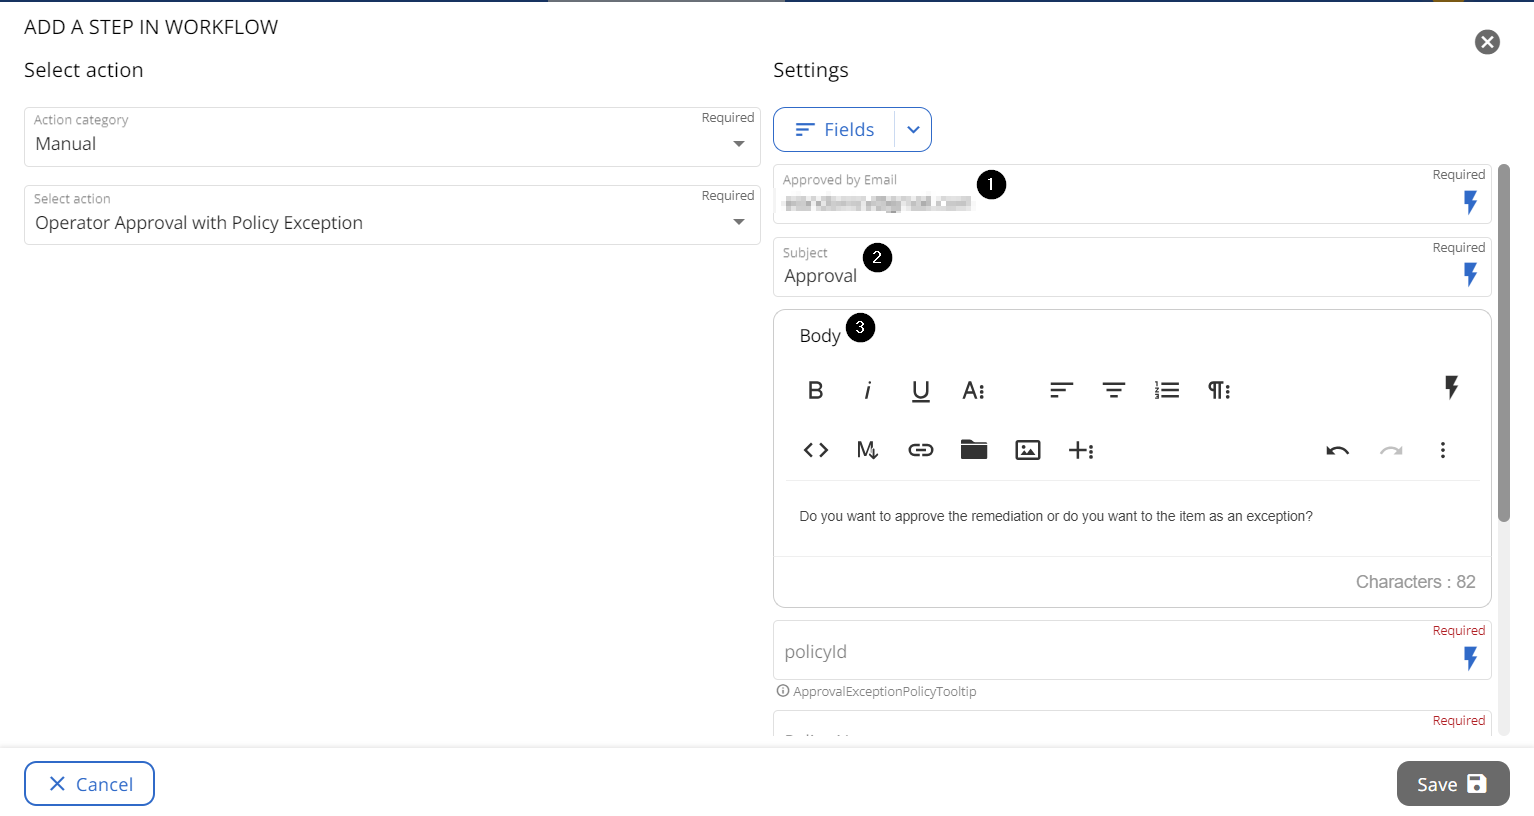
Start by adding the “Operator approval with policy exception” action to the workflow that you will associate with your custom policy as remediation. Fill out the following fields:
- Approved by Email: enter the email address of the person who will receive the attestation.
- Subject: provide the subject of the email.
- Body: Compose your email, detailing what actions the recipient is expected to take.
Next, provide the recipient with the following information:
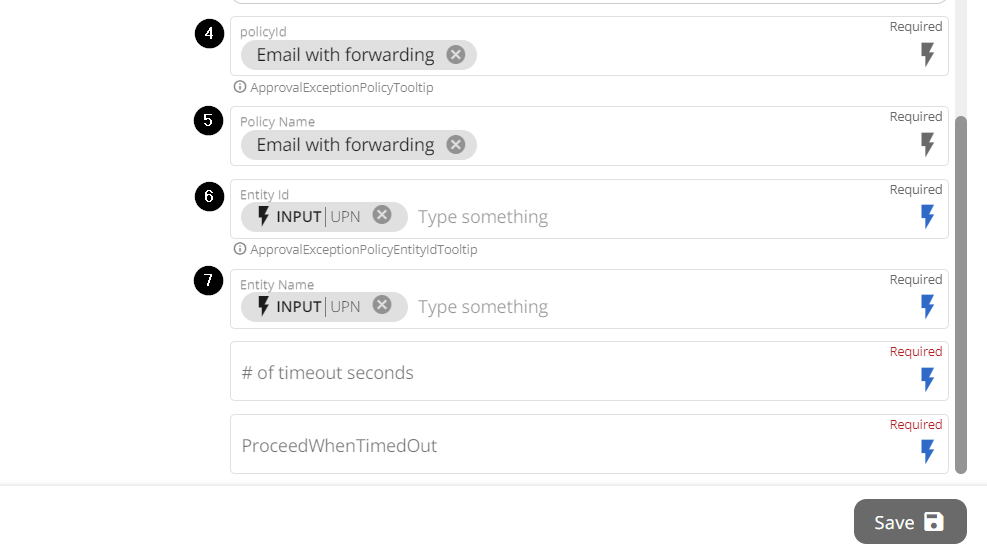
- Policy Id: select the name of the desired custom policy from the dropdown menu.
- Policy Name: enter the name of the policy that the recipient will see on their screen during the approval process.
- Entity Id: this indicates the item any exception will be associated with. In the example below, it's the User Principal Name, as forwardings are managed via UPN.
- Entity Name: enter the name of the entity that the recipient will see on their screen during the approval process.
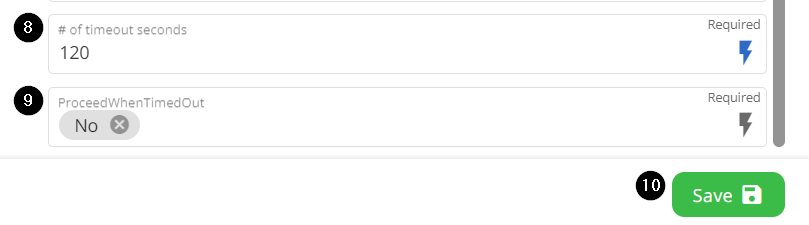
Finally, configure the attestation timeout and define whether the workflow should proceed with the action if the recipient doesn’t provide an answer before the timeout.
- # of timeout seconds: specify the amount of time (in seconds) the recipient will have to provide a response.
- Proceed when timed out: if “Yes” is selected, the workflow will continue after the timeout. If “No” is selected, the workflow will stop after the timeout.
- Press “Save” and confirm your changes.
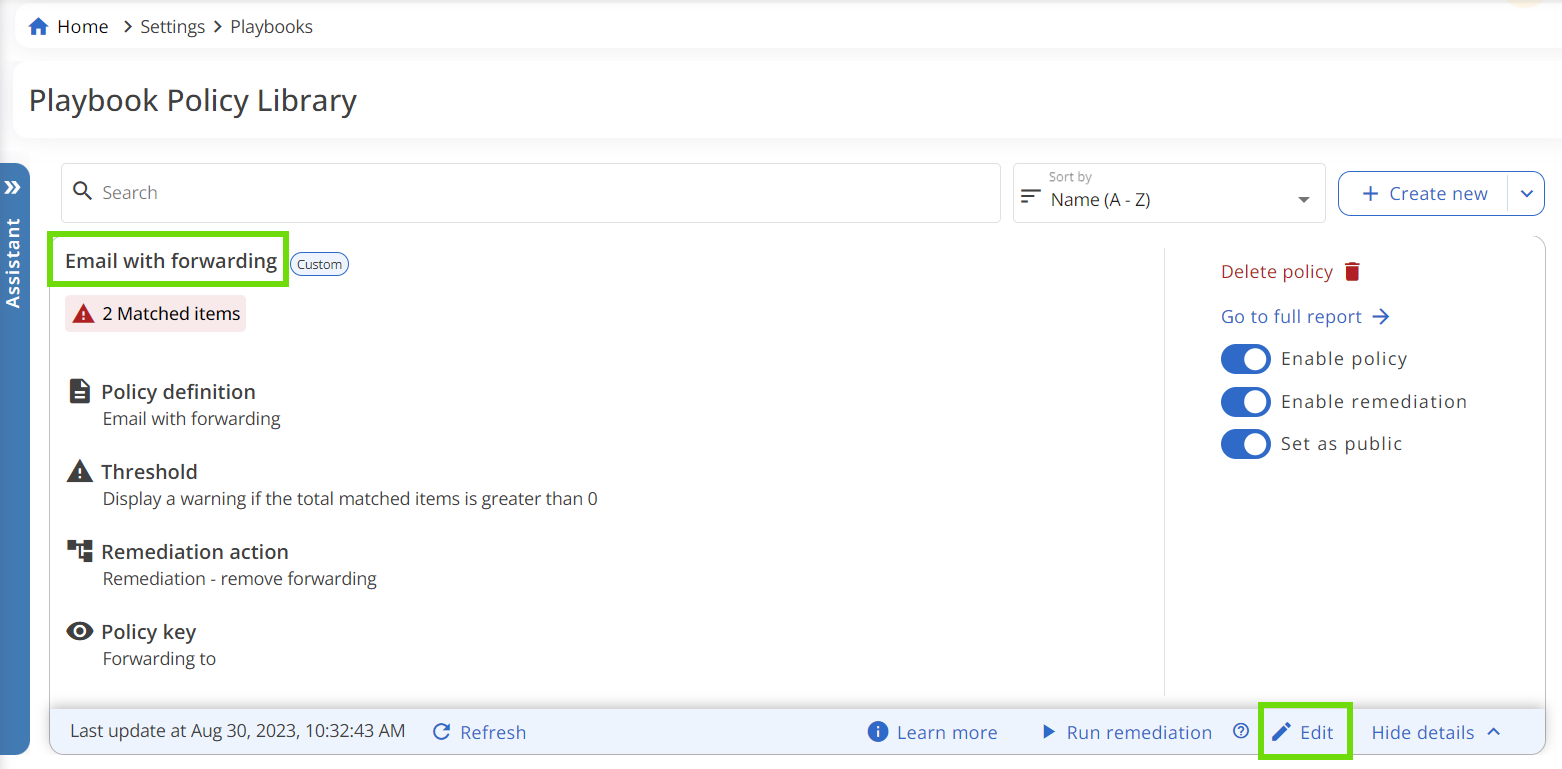
Step 2: Associate the remediation with the custom policy
- Go to SETTINGS > Playbooks
- Locate the custom policy that you want to associate the workflow with.
- Within the policy box, select See details > Edit.
In the policy wizard, navigate to the “Remediation action” tab and configure the following settings:
- Activate the “Enable remediation” toggle.
- Choose “Run workflow” as the remediation method.
- Select the appropriate workflow.
- Click on “Automap” to select the execution input.
- Define whether you want to schedule your remediaton or not.

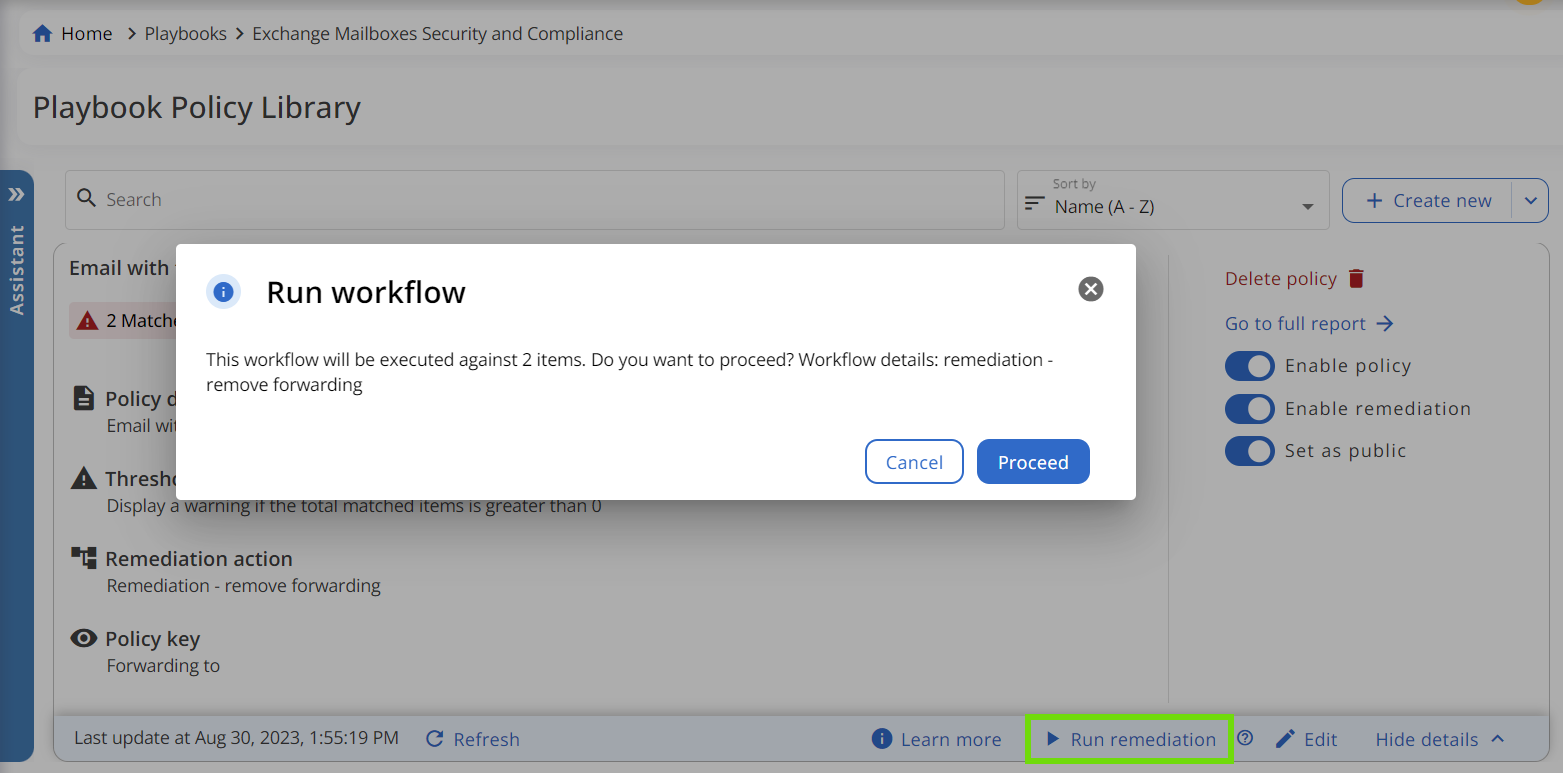
After saving your changes, return to the policy box and select “Run remediation”. In the example below, the remediation will be applied to two matched items. This means that two attestation emails, one for each matched item, should be sent to the recipient.
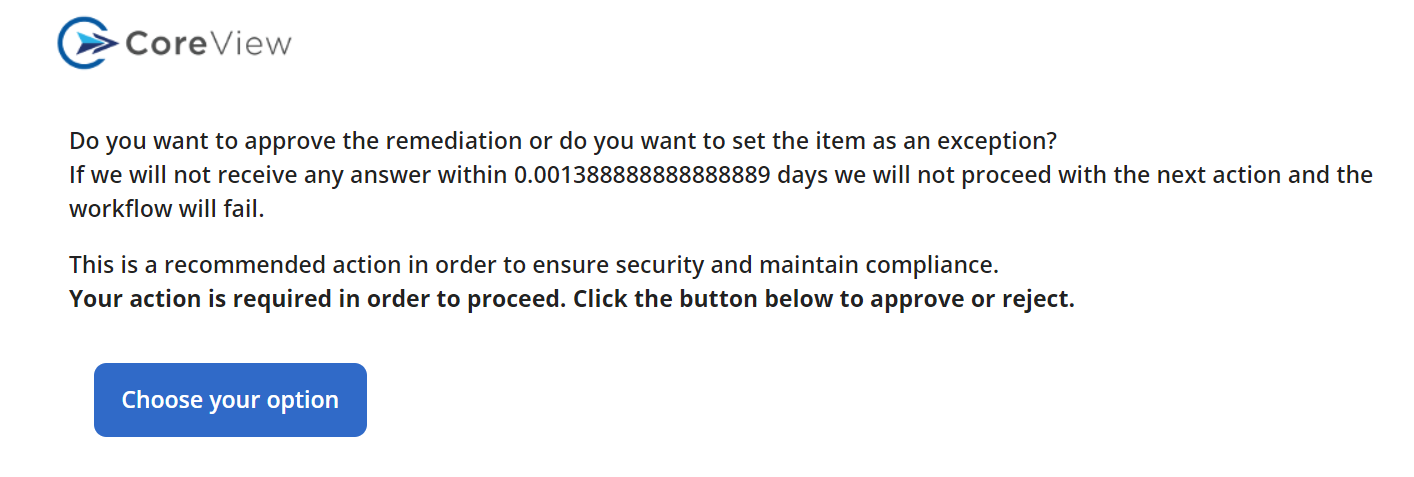
Step 3: Attestation
The attestation recipient will now receive a message similar to the one below for every matched item detected by the policy:
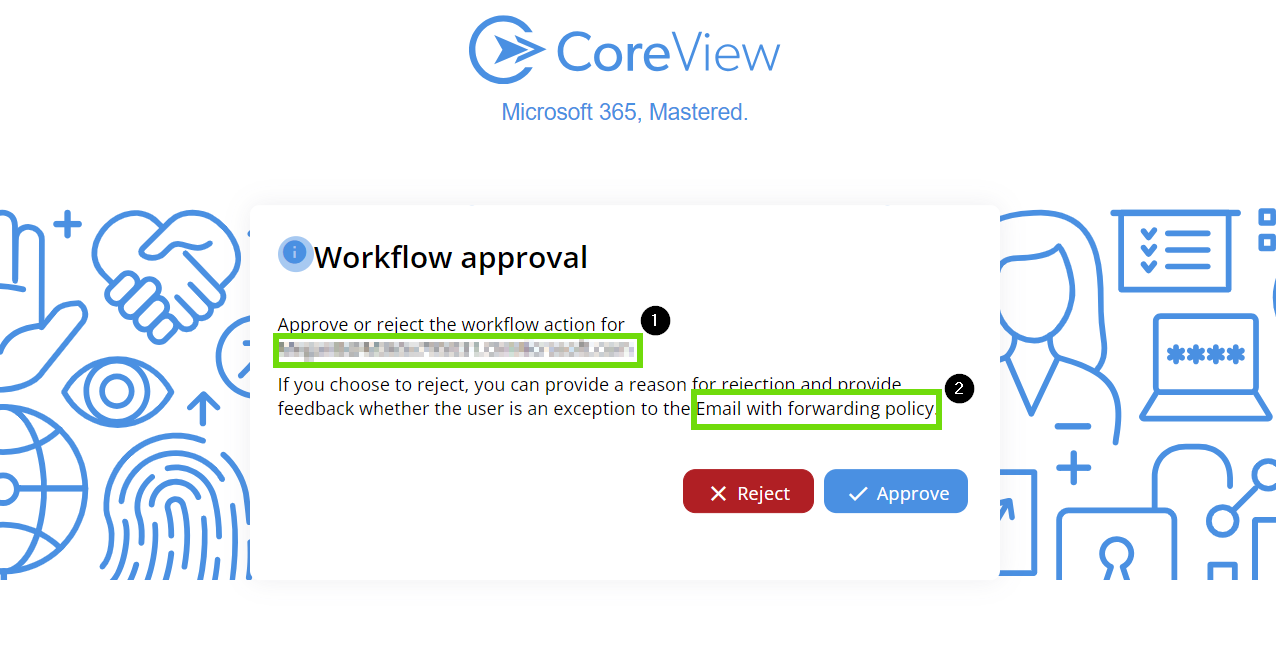
By clicking on the blue button, they will be redirected to a screen reporting both the “Entity Name” (1) and the “Policy Name” (2):
If the recipient clicks on “Approve”, the following message will be displayed:

If the recipient clicks on “Reject”, the following message will be displayed:
Choosing “Yes” will prompt the recipient to send a note and, optionally, set an expiration date for the policy.


After clicking “Submit”, the following message will be displayed:

Step 4: Review progress
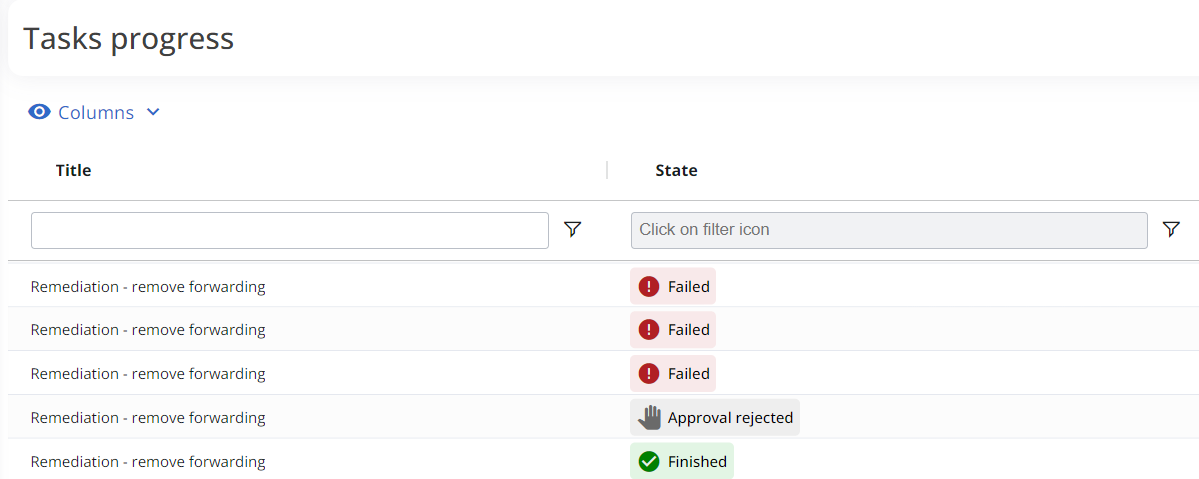
From the “Task progress” section, we can observe that:
- Approved workflows are marked as “Finished”.
- Rejected workflows are marked as “Approval rejected”.
- Timed-out workflows configured to stop if no answer is provided (9) are marked as “Failed”.
- Timed-out workflows configured to proceed if no answer is provided (9) are marked as “Finished”.
In our example, as a result of the actions taken above, one of the two matched items should appear as an exception.
Exceptions may not be immediately visible within the policy box. There might be a slight delay due to system processing times.
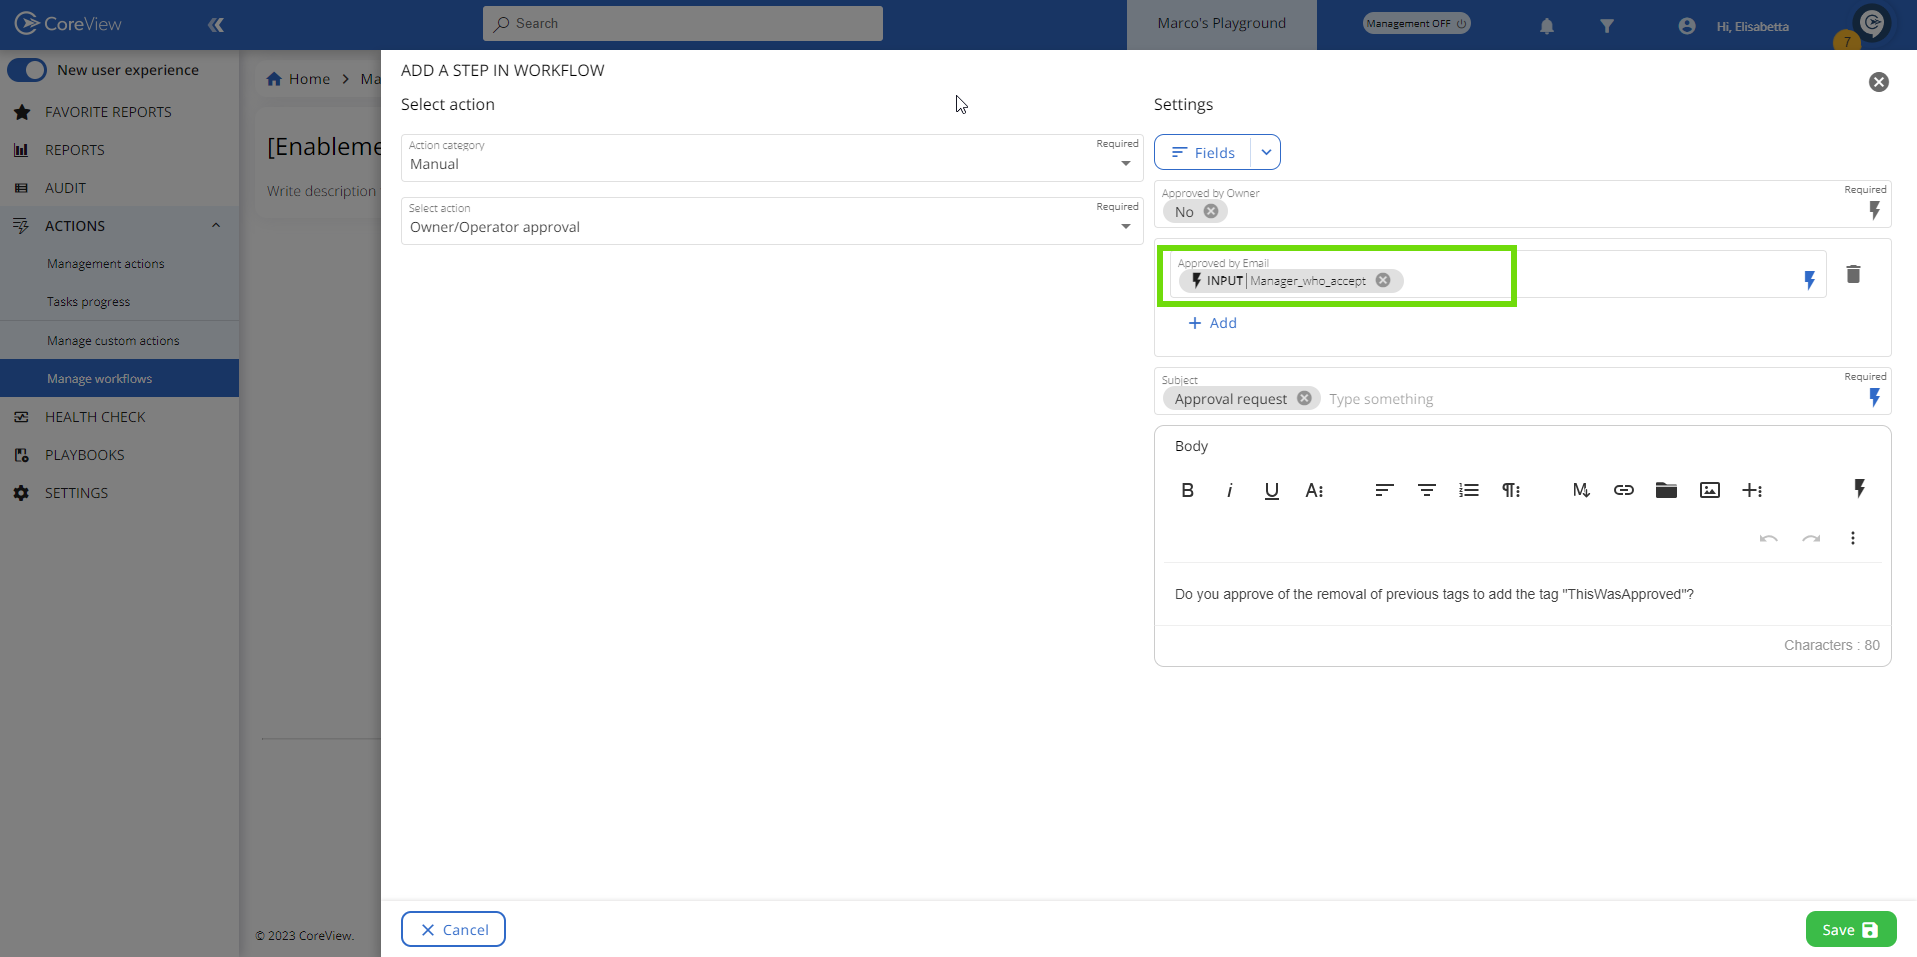
Owner/Operator approval
This action sends an email to a designated account, requesting approval for the upcoming workflow action(s). To set this up, select the “Approved by Email” field from the dropdown menu and add the input or the email address of the user responsible for making the decision.
If you, as the workflow owner, would also like the ability to approve the request, choose “Yes” for the “Approved by Owner” field.
The workflow owner is the user who runs the workflow.
Step 1: Configuration
In the example below, the selected user will receive an email asking if they approve of the removal of previous tags to add the tag “ThisWasApproved” instead.
Step 2: Attestation
By clicking on “Choose your option”, the email recipient will be redirected to a page where they can make a decision.
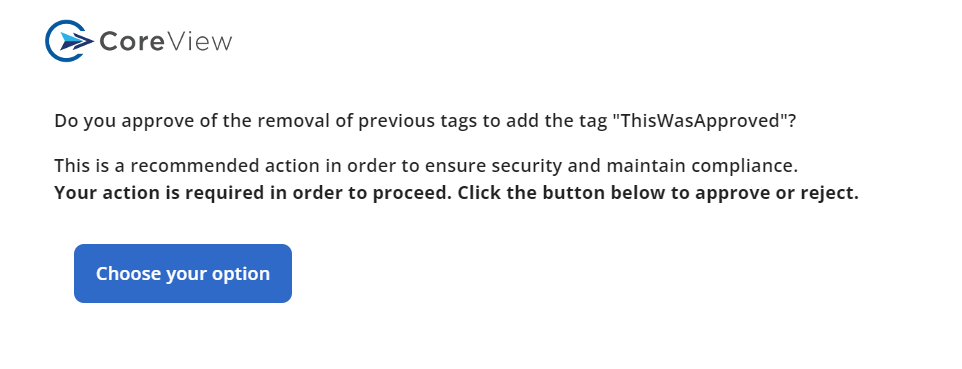
Here the user can either reject or approve the workflow action(s). In this case, we are going to approve.

Step 3: Review progress
Refresh the “Execution detail” panel to view your workflow progress.
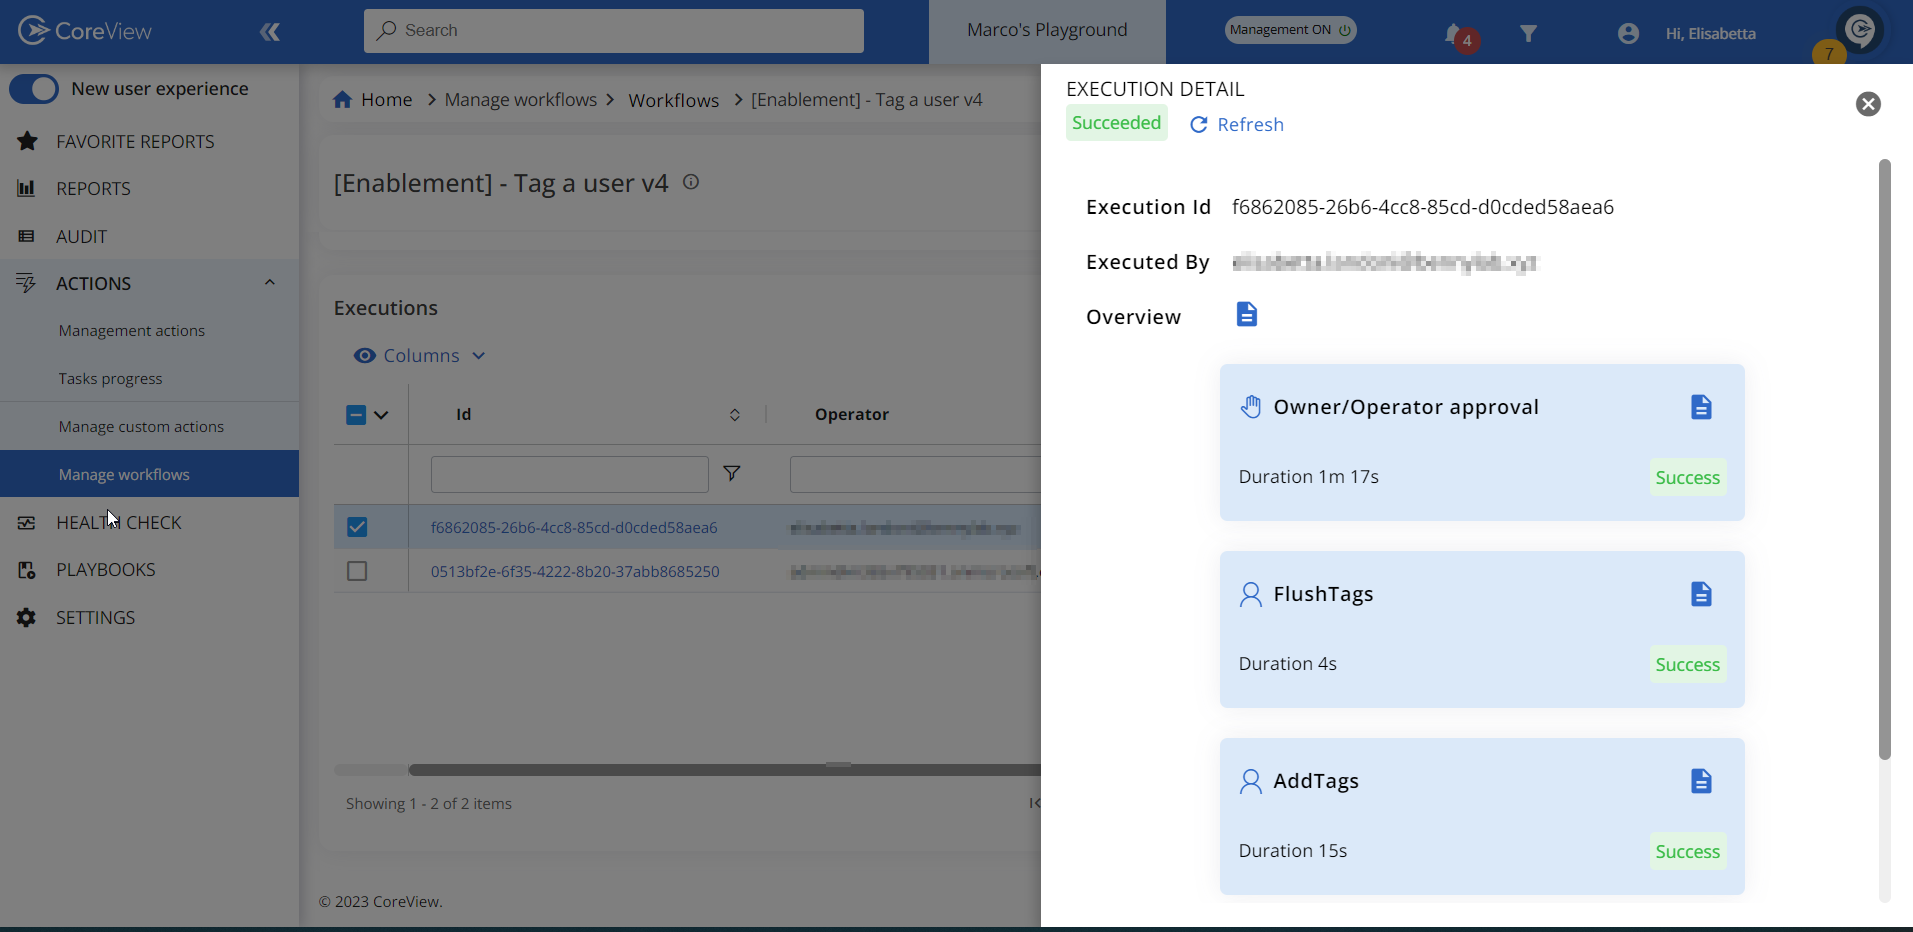
Workflow success! The previous tags have been removed and the new tag “ThisWasApproved” has been successfully added to the user.

Owner/Operator timeout approval
This action is similar to the previous one but features a configurable timeout (in seconds). If no answer is provided within the specified time, the action will be executed automatically.
Step 1: Configuration
In the example above, we ask the email recipient to approve the following workflow actions:
- Flush previous tags;
- Add the new tag “You were slow”;
- Send a confirmation email.
We also configured a timeout of 60 seconds, after which the workflow will proceed as planned.

Step 2: Attestation
In this example, let's see what happens if the attestation recipient takes no action.
Step 3: Review progress
From the “Execution detail” panel, we can observe that the email timed out, and therefore the workflow is proceeding with the following actions.
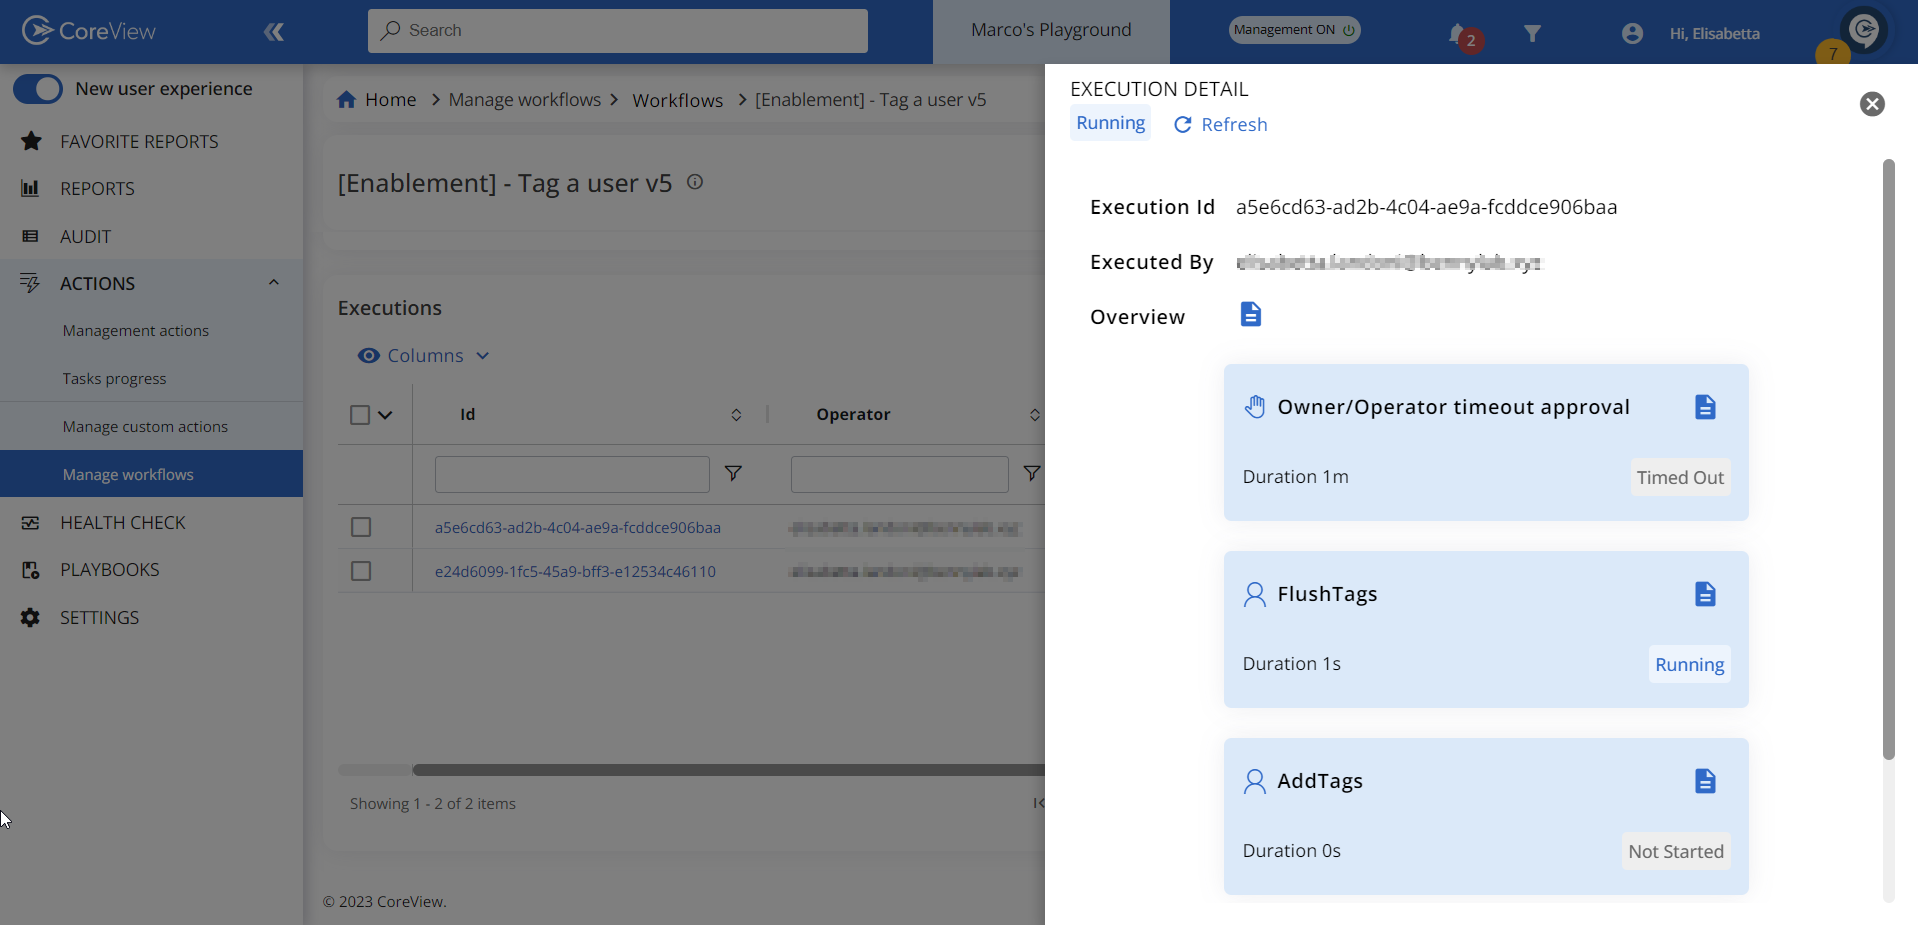
Workflow completed! The previous tags have been deleted and the new “You were slow” tag has been successfully added to the user.
Send email
This action sends an email to the preconfigured user(s). In the example below, it is set up as a confirmation email to be sent upon the completion of the workflow.
Step 1: Add action
In this example, we add a “Send email” action at the end of the workflow sequence to deliver a confirmation email to the owner.

Step 2: Configuration
First of all, select the recipient and type in the body of the email.

Step 3: Check mailbox
If the workflow is successful, the recipient will receive the confirmation email.

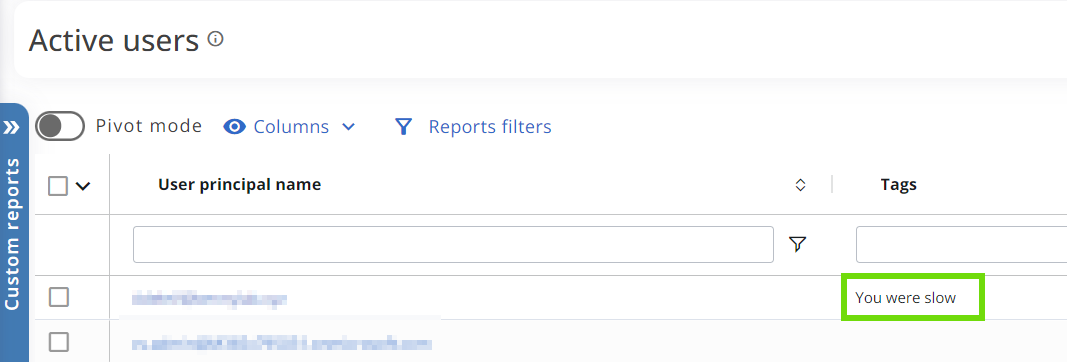
Let's check the changes made by the workflow: the new tag “You were slow!!!” has been successfully added to the user.
