This article guides you to check and authorize the use of the Microsoft Graph module, necessary for utilizing all custom management actions.
View permissions list
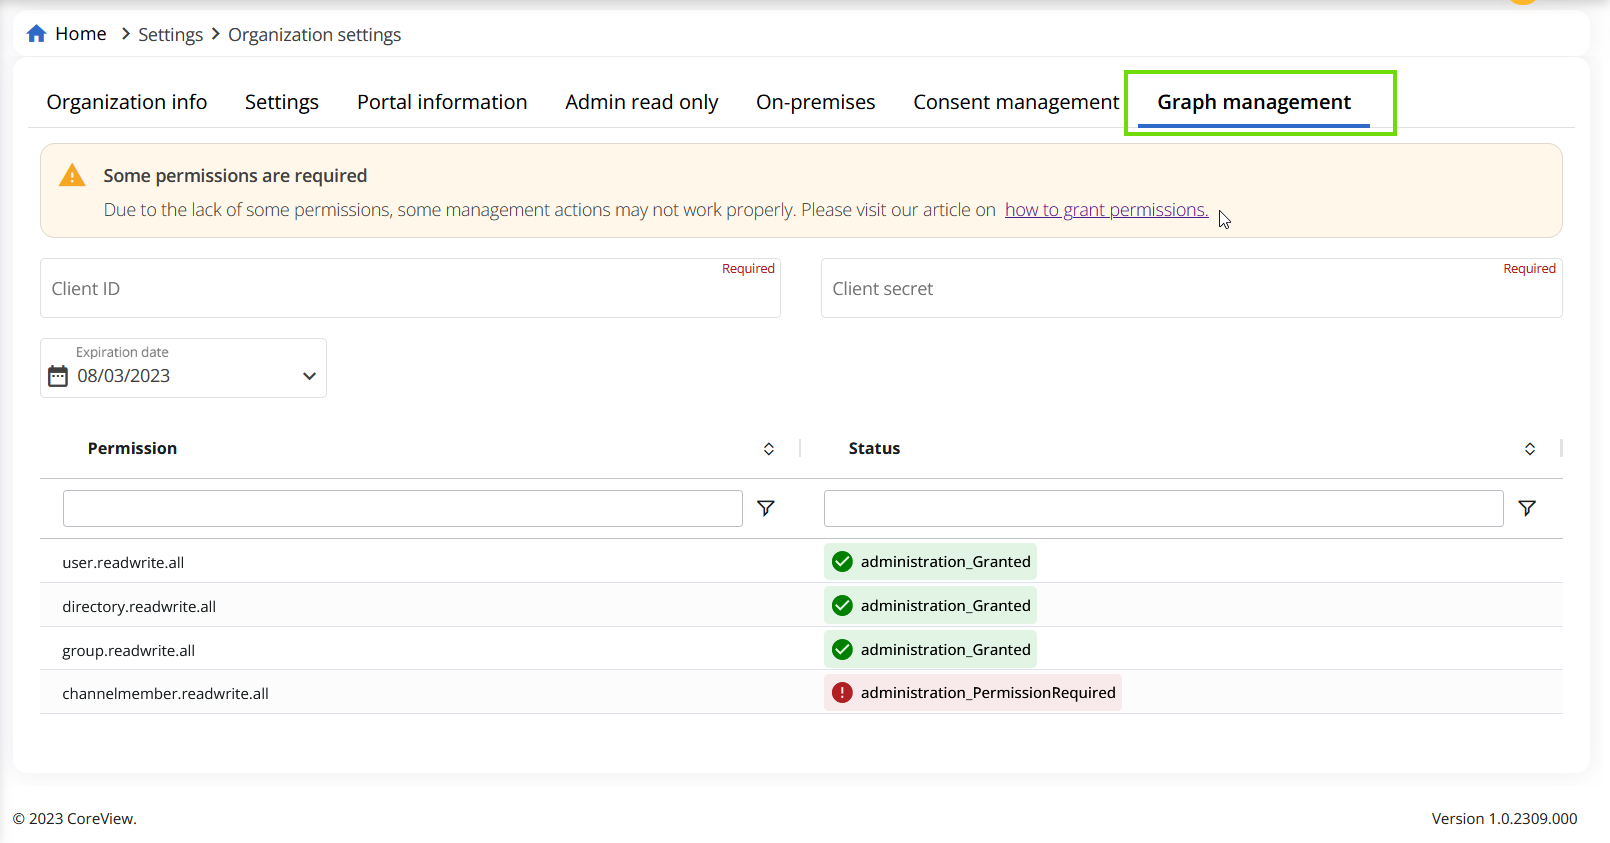
To check if you have granted the permissions, go to: to “Settings” > “My organization” > “Graph management”.
Initially, this section appears empty, but once configured, you'll be able to view the relevant details. Additionally, you will be informed as to whether some permissions are required: as illustrated in the image below, the red box with the text “administration_PermissionRequired” indicates that some permissions are yet to be granted.
For guidance on how to grant permissions and set up your tenant for the switch to “Microsoft Graph API” follow the guide below.
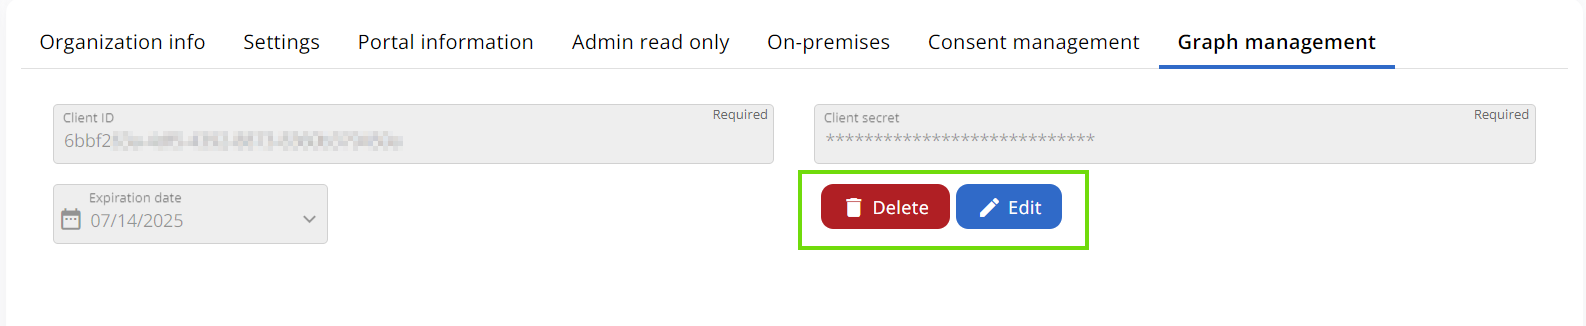
When you click “Delete”, you will not be asked for confirmation, and the “Client secret” and “Client ID” will be permanently deleted. As it is not possible to retrieve it, you will have to recreate it.
Grant permissions
Step 1: getting a Client ID and Client Secret
If you do not already have a client ID and client secret, there are two main ways you can create one:
- Via the Entra ID (aka Azure Active Directory) admin center.
- Via the PowerShell with the script provided.
Using the Entra ID (aka Azure Active Directory) admin center
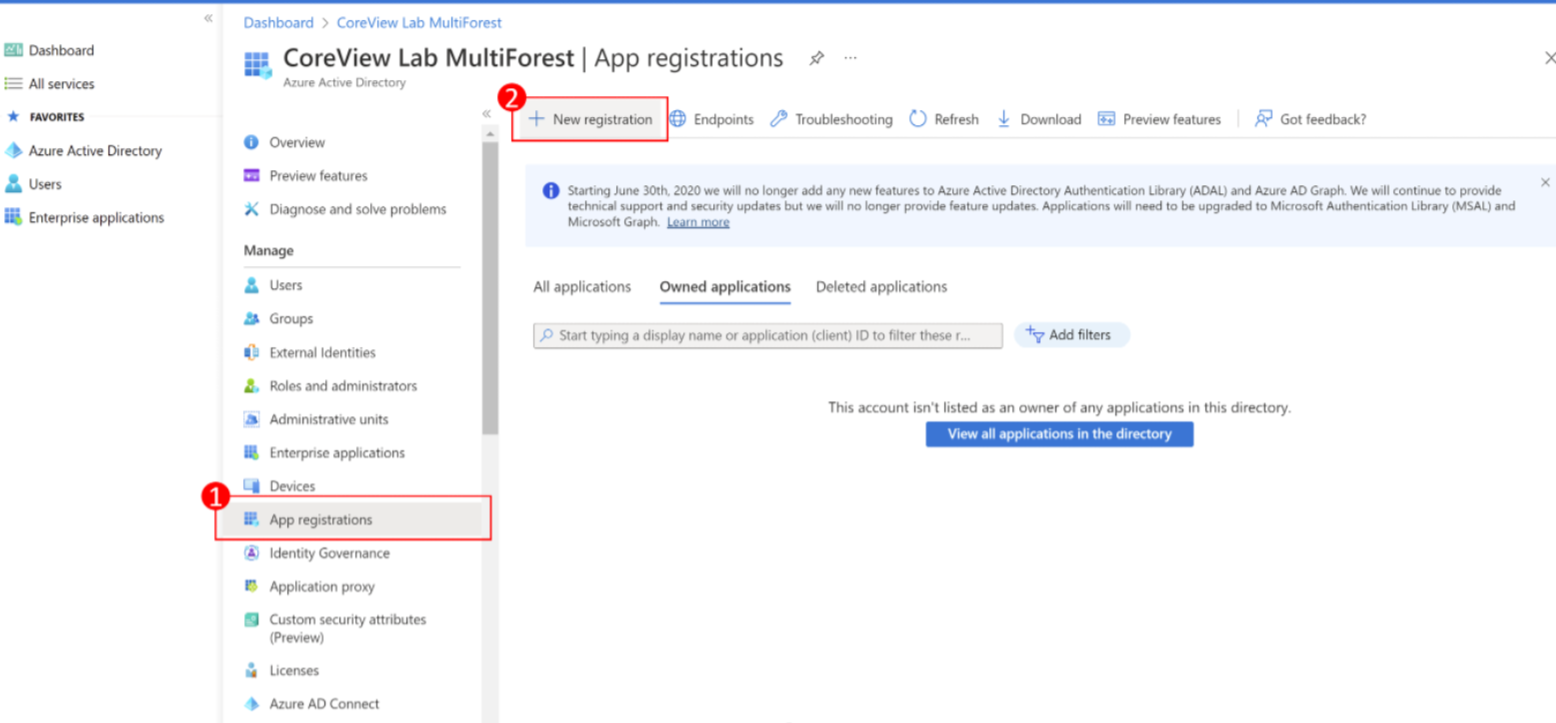
Step 1: new registration
Select “App registrations” > “New registration”
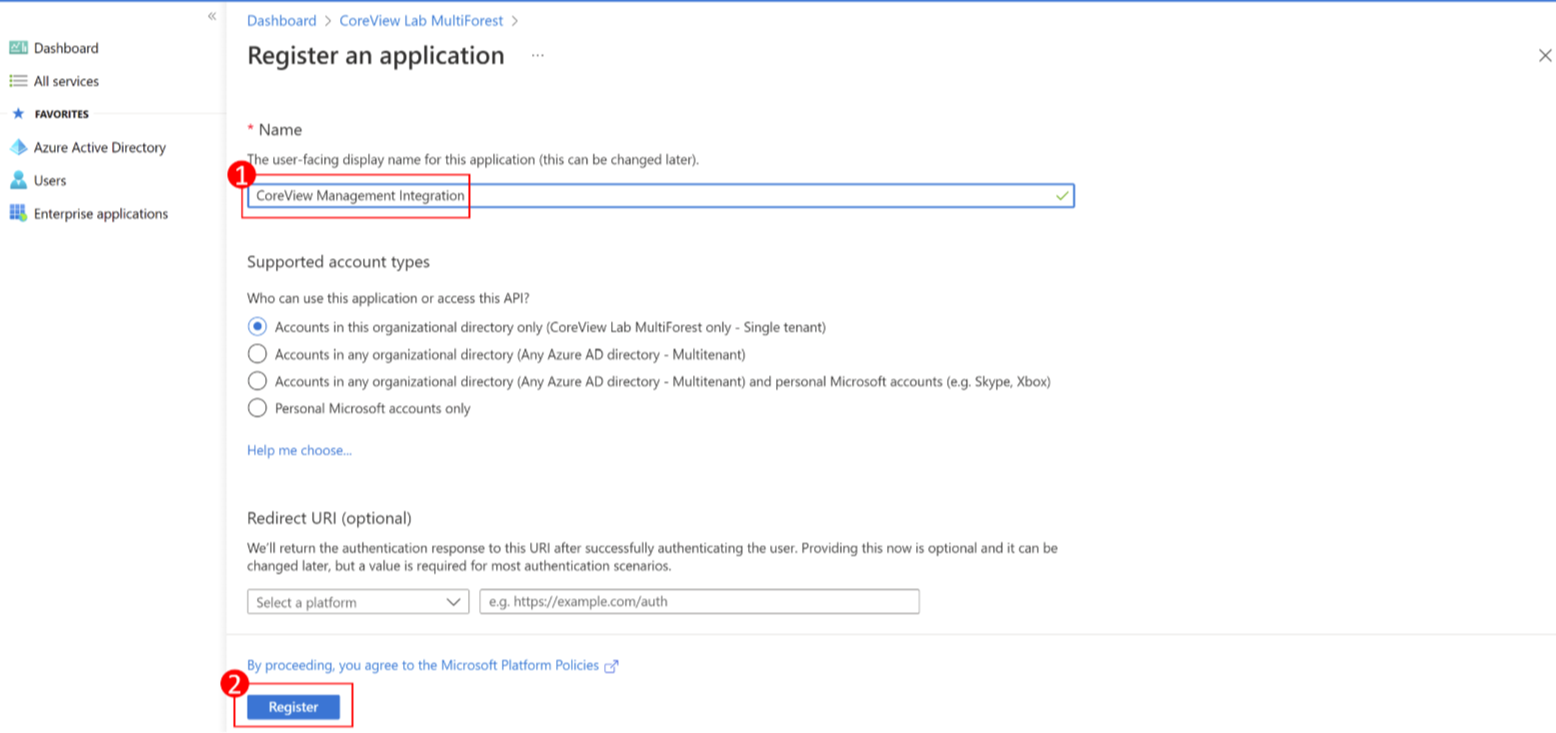
Step 2: application name
Give your application a name (i.e., CoreView Integration) and click “Register” .
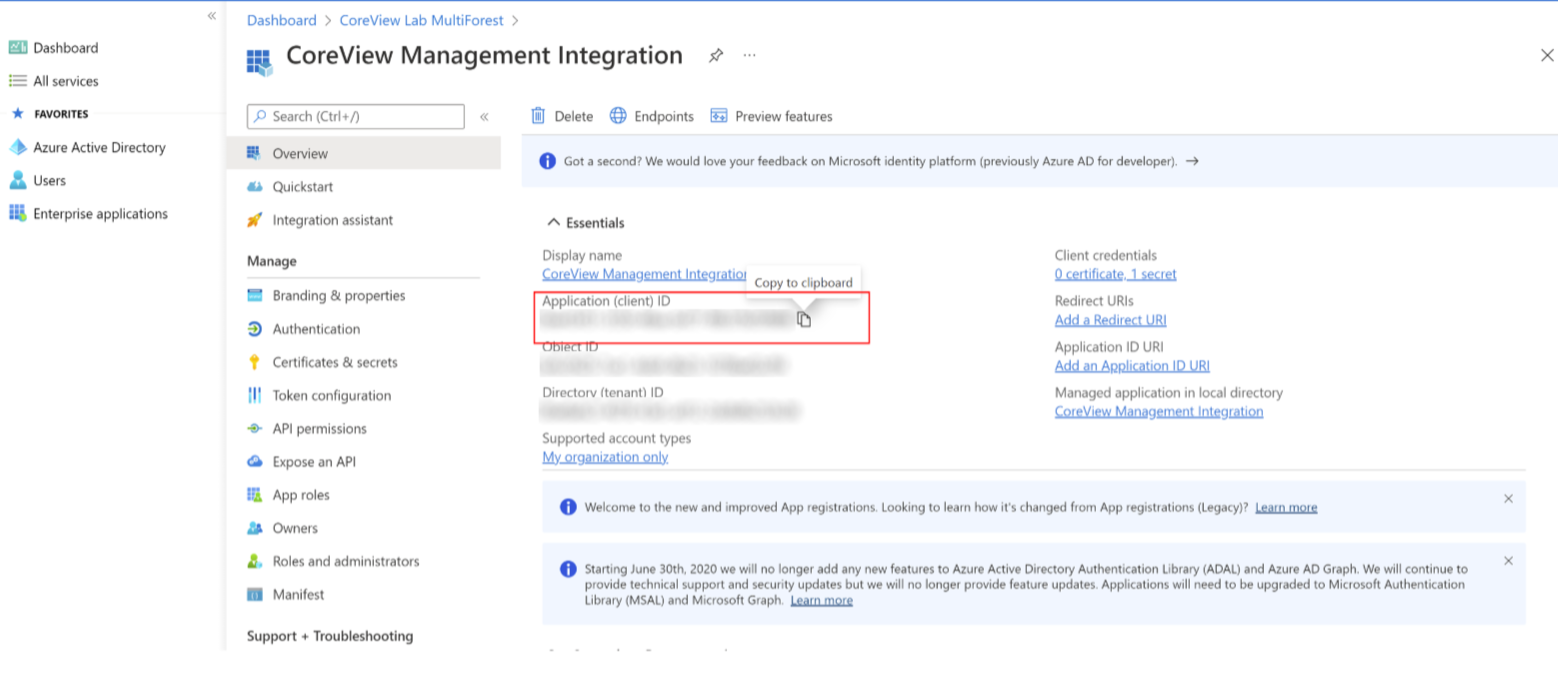
Step 3: copy and store
You have now registered the application. Please copy and store the application ID. You will need to upload this information to CoreView’s portal at a later time.
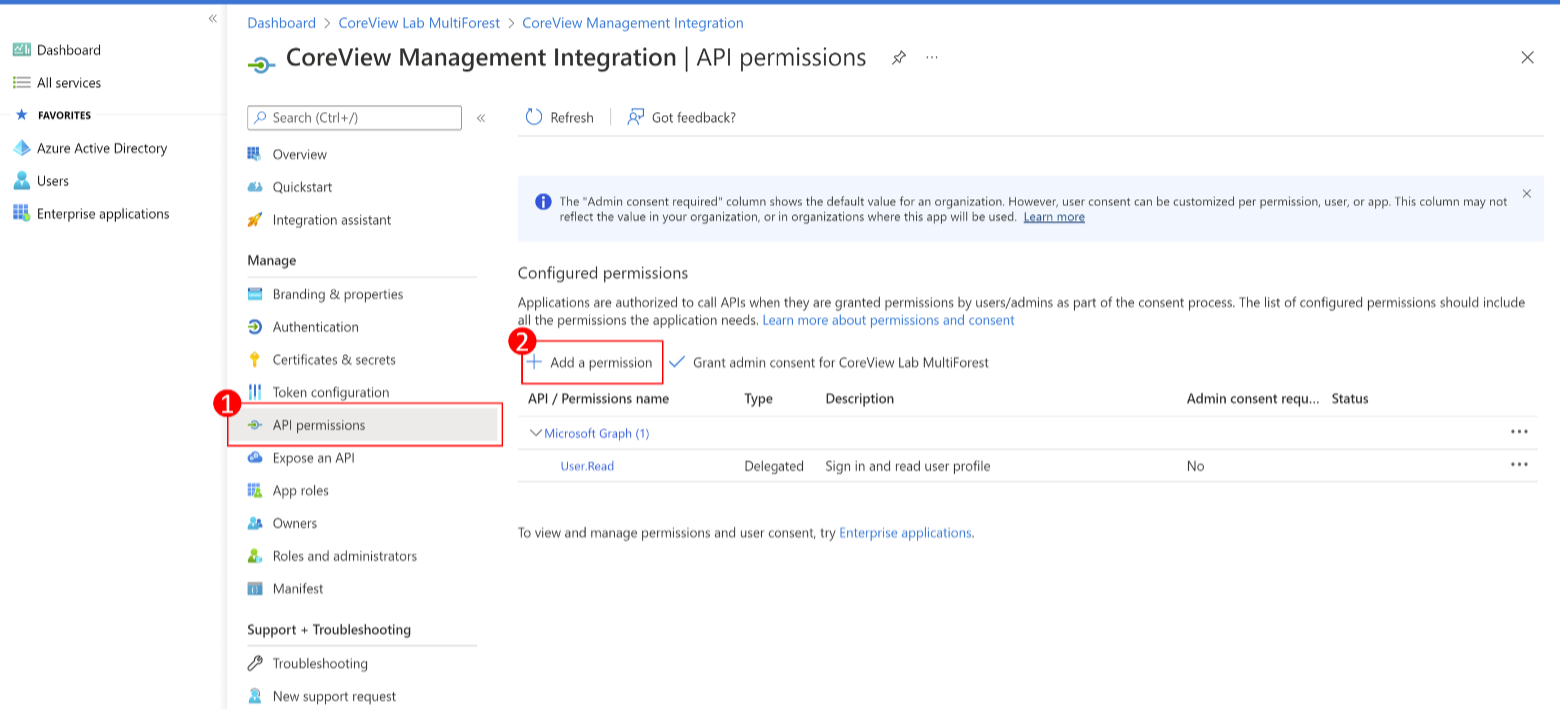
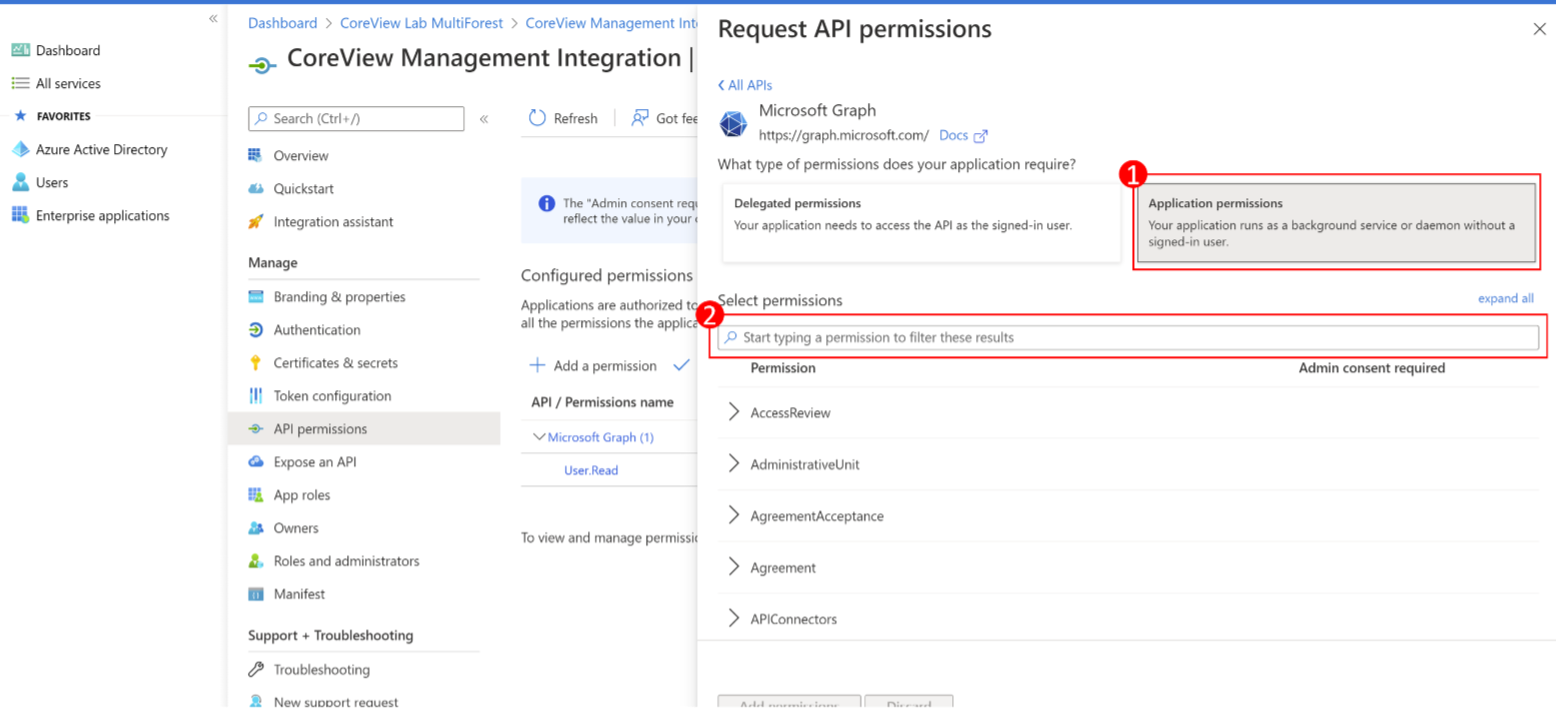
Step 4: add permission
From the registered application, click “API permissions” and then “Add a permission”.
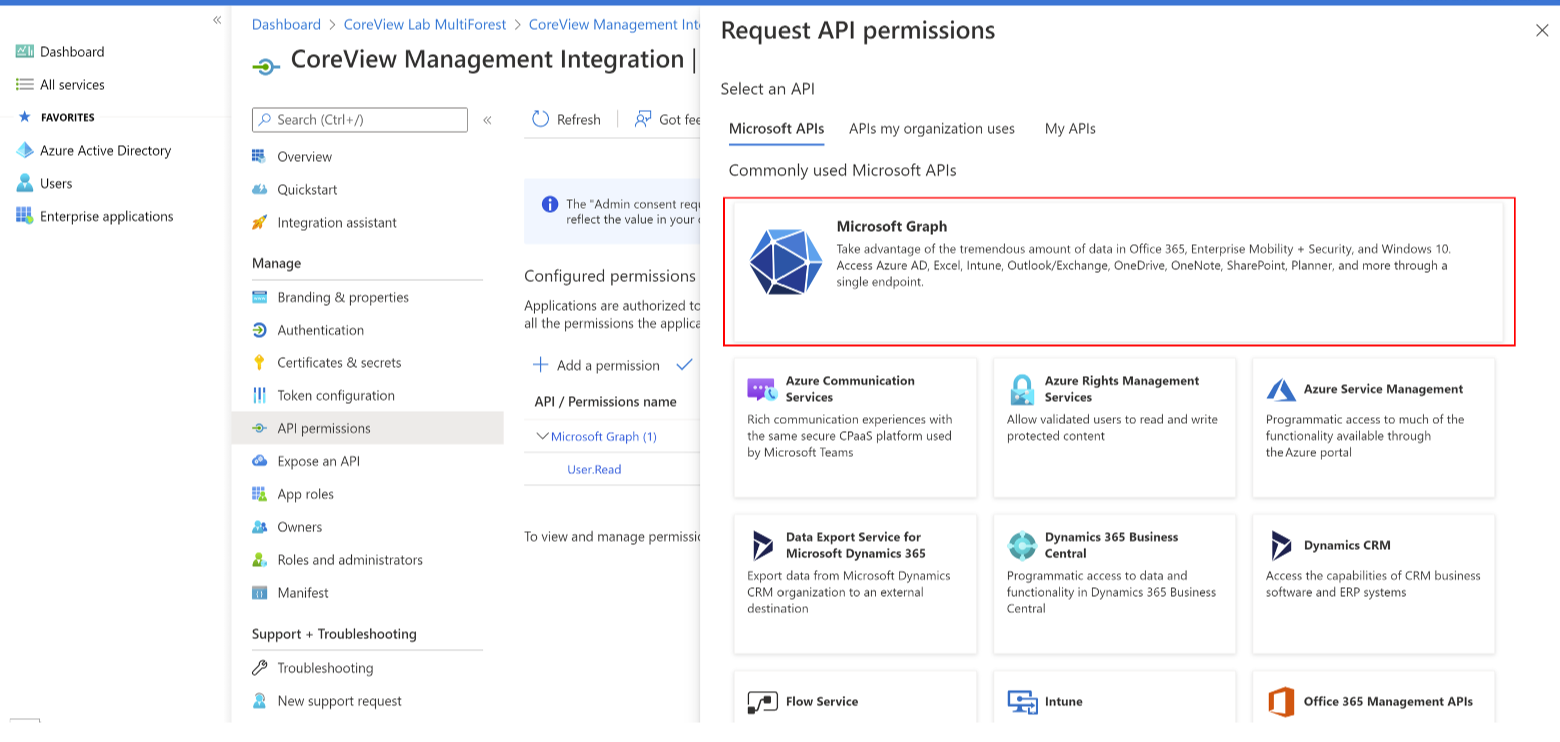
Step 5: select the service
Select “Microsoft Graph” from the list of services.
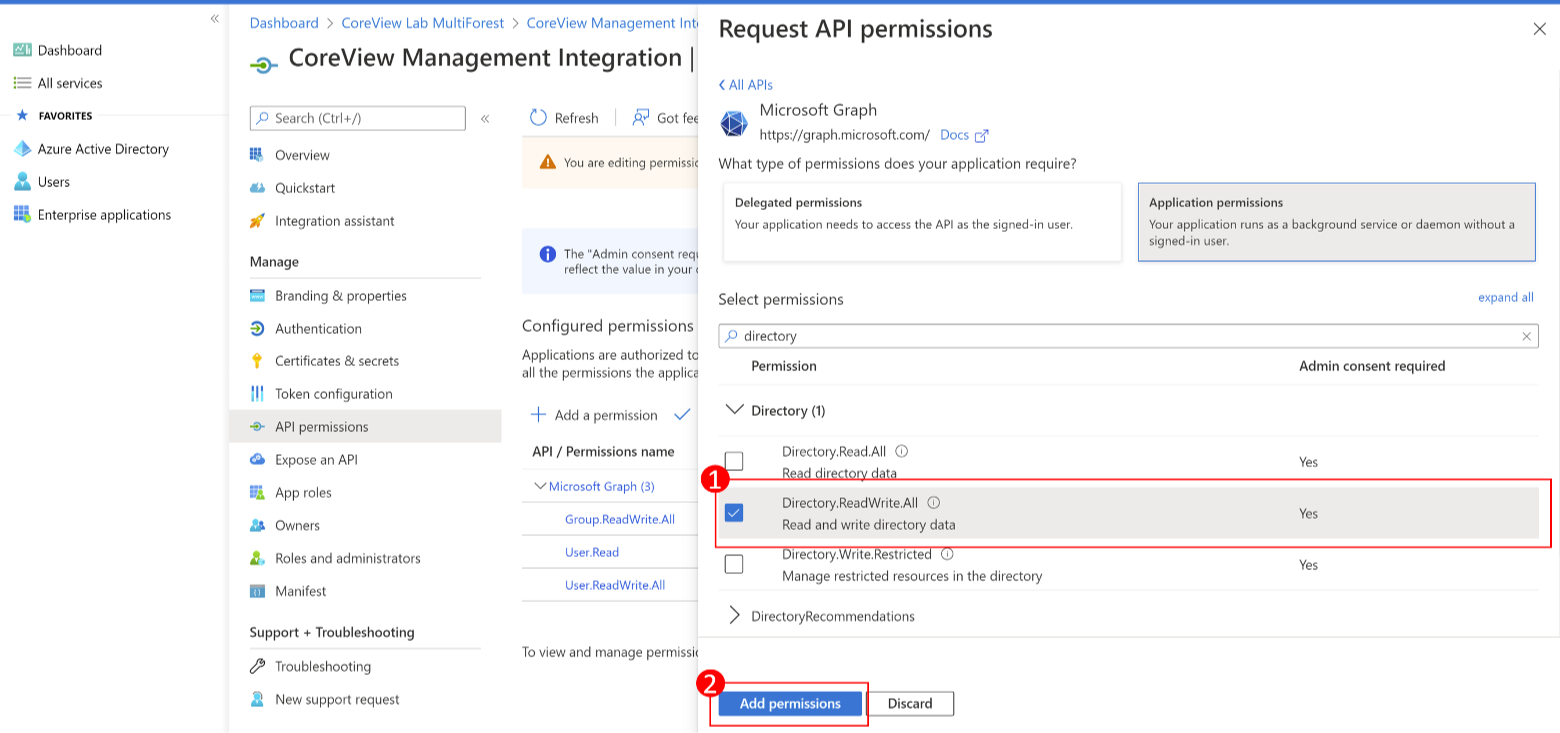
Step 6: select permissions
Select “Application permissions” and add the “User.ReadWrite.All”, “Directory.ReadWrite.All” and “Group.ReadWrite.All” permissions.
- If you need to perform the action “Remove Channel User”, the following permission is required: “
ChannelMember.ReadWriteAll”. -
If you need to manage authentication methods for users, the following permission is required: “
UserAuthenticationMethod.ReadWrite.All”. -
If you need to manage Entra ID applications, the following permission is required:
“Application.ReadWrite.All”.
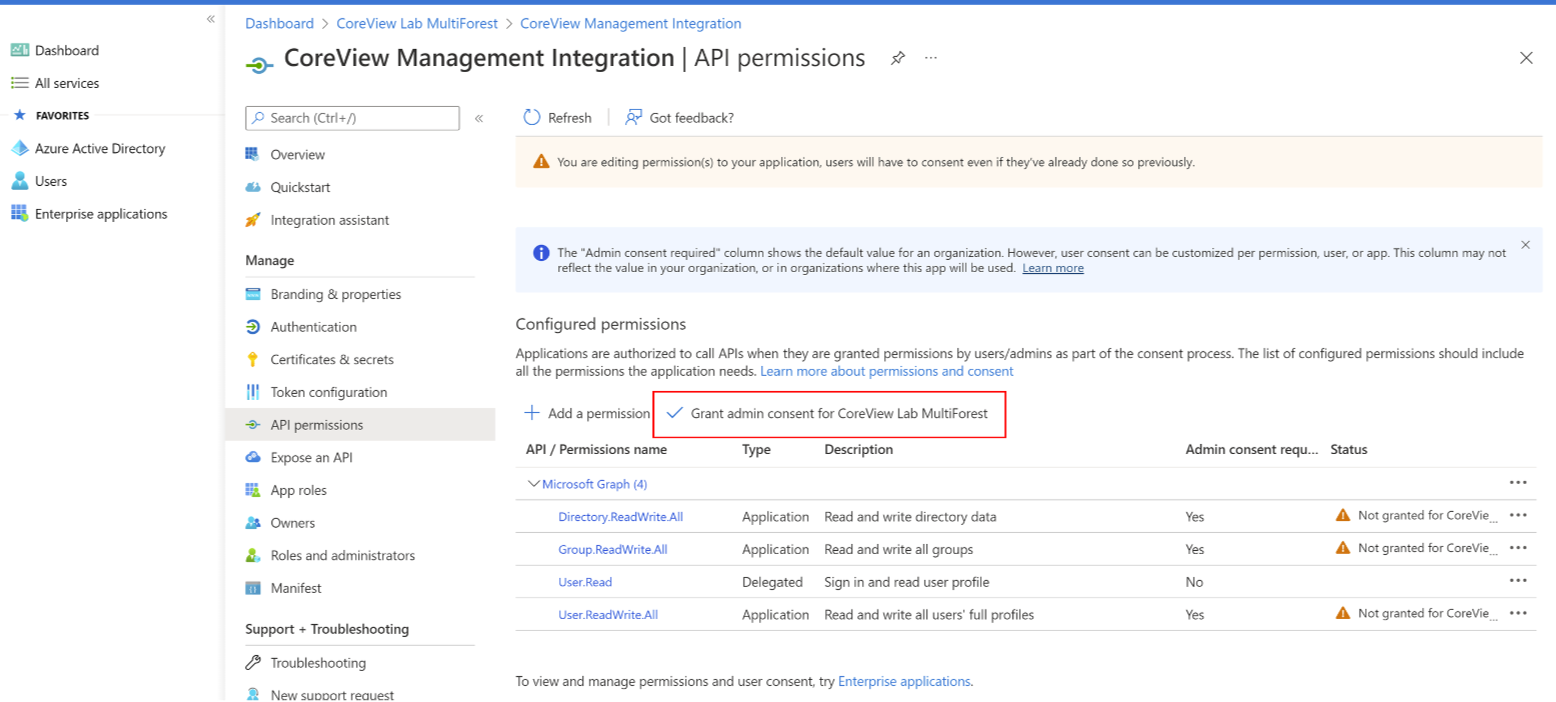
Step 7: grant admin consent
Once you have added the permissions, check the box “Grant admin consent for…”.
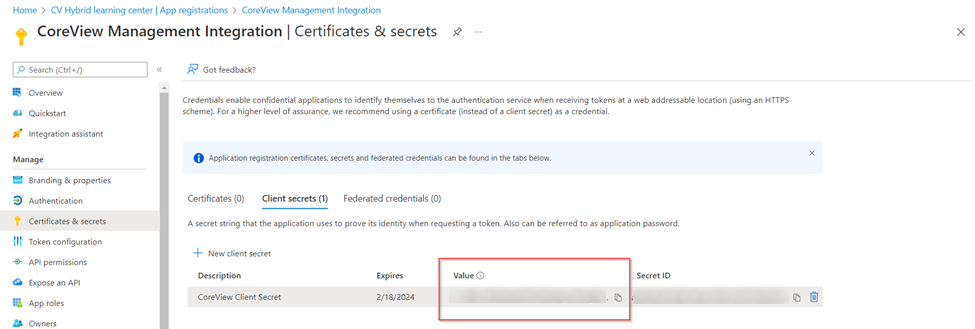
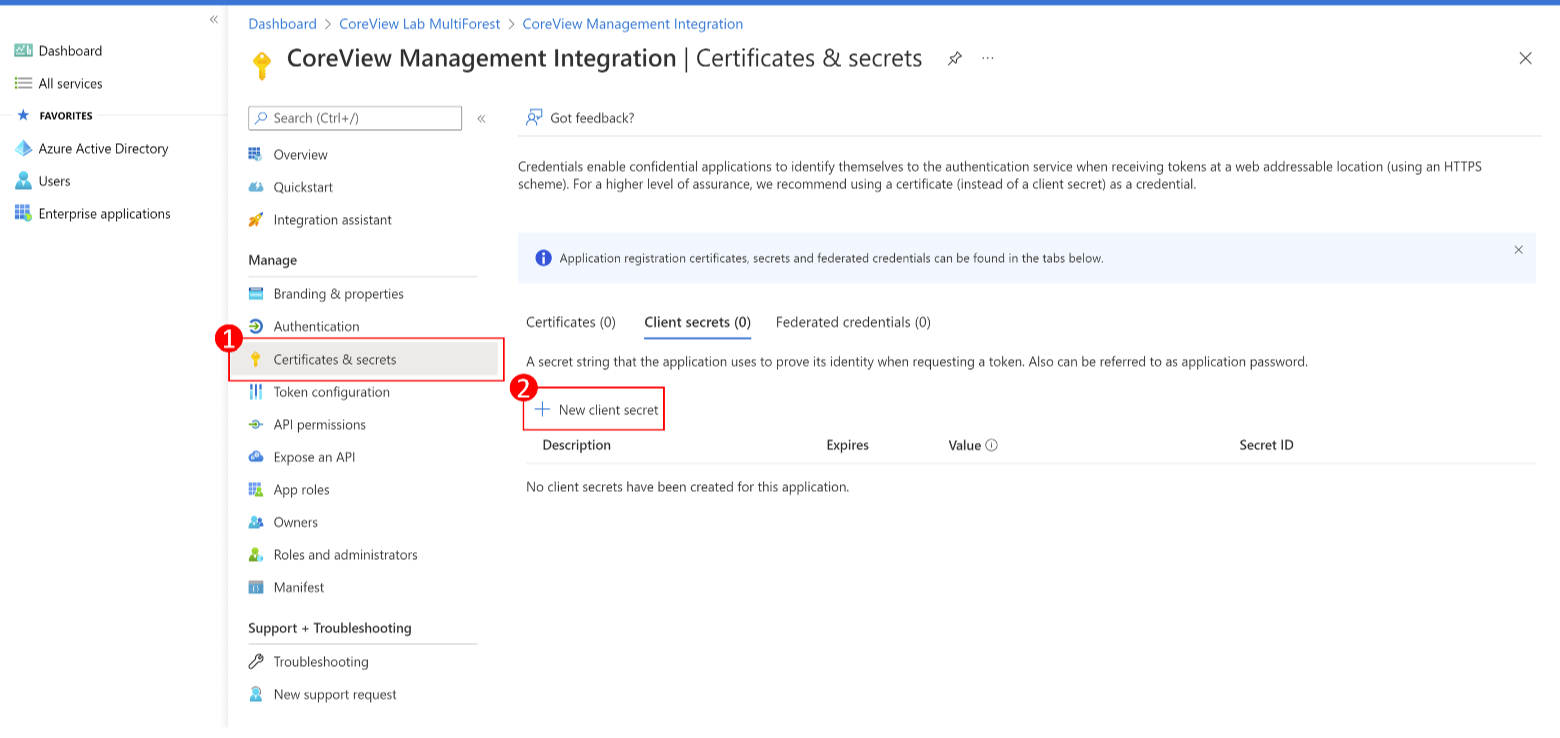
Step 8: create new secret
Select “Certificates & secrets”, then “New client secret”.
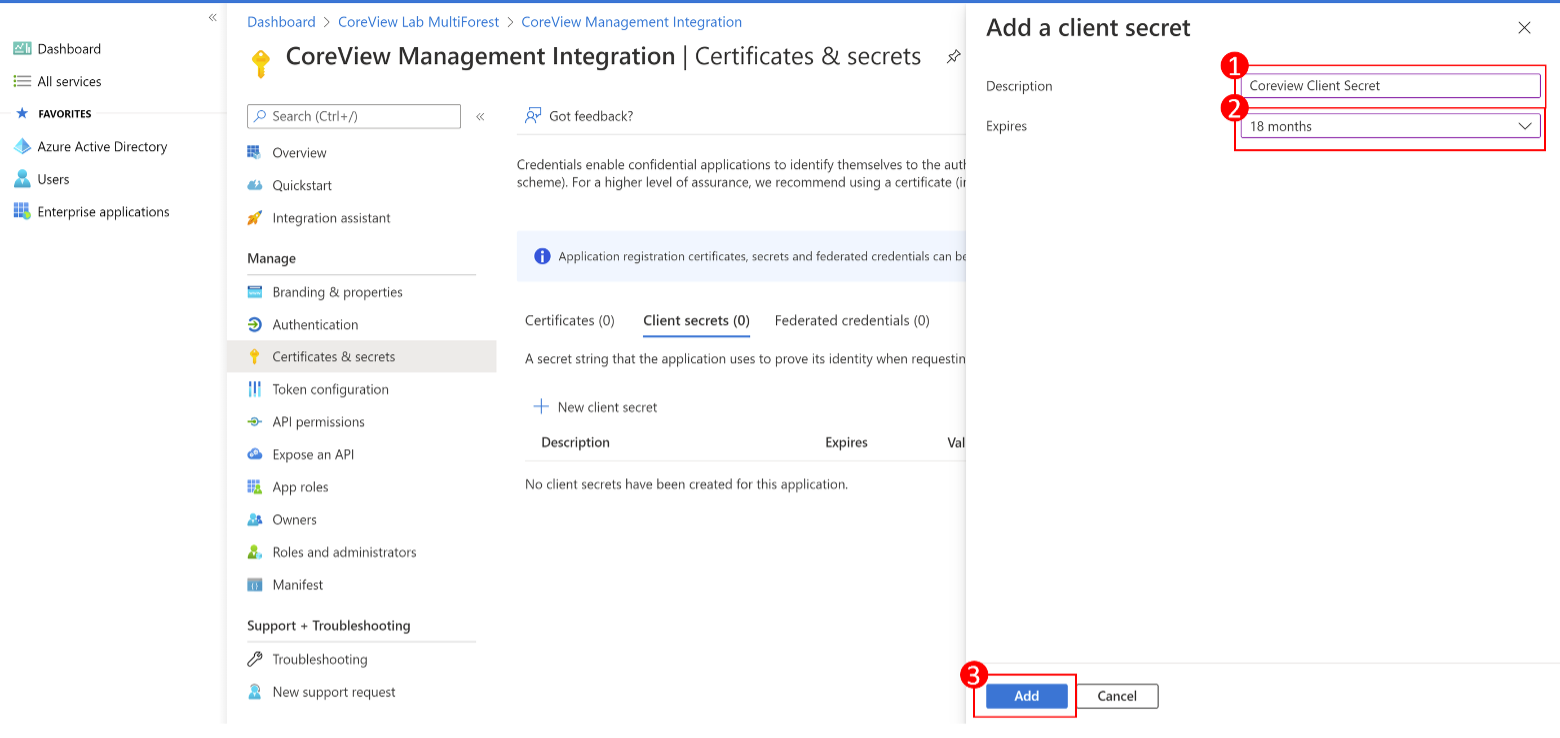
Step 9: add description and expiration date
Enter a description and expiration date for the client secret, then select “Add”. We suggest an expiration date of 18 months from the creation of the secret in order to avoid having to go through the creation and update of the secret too often.
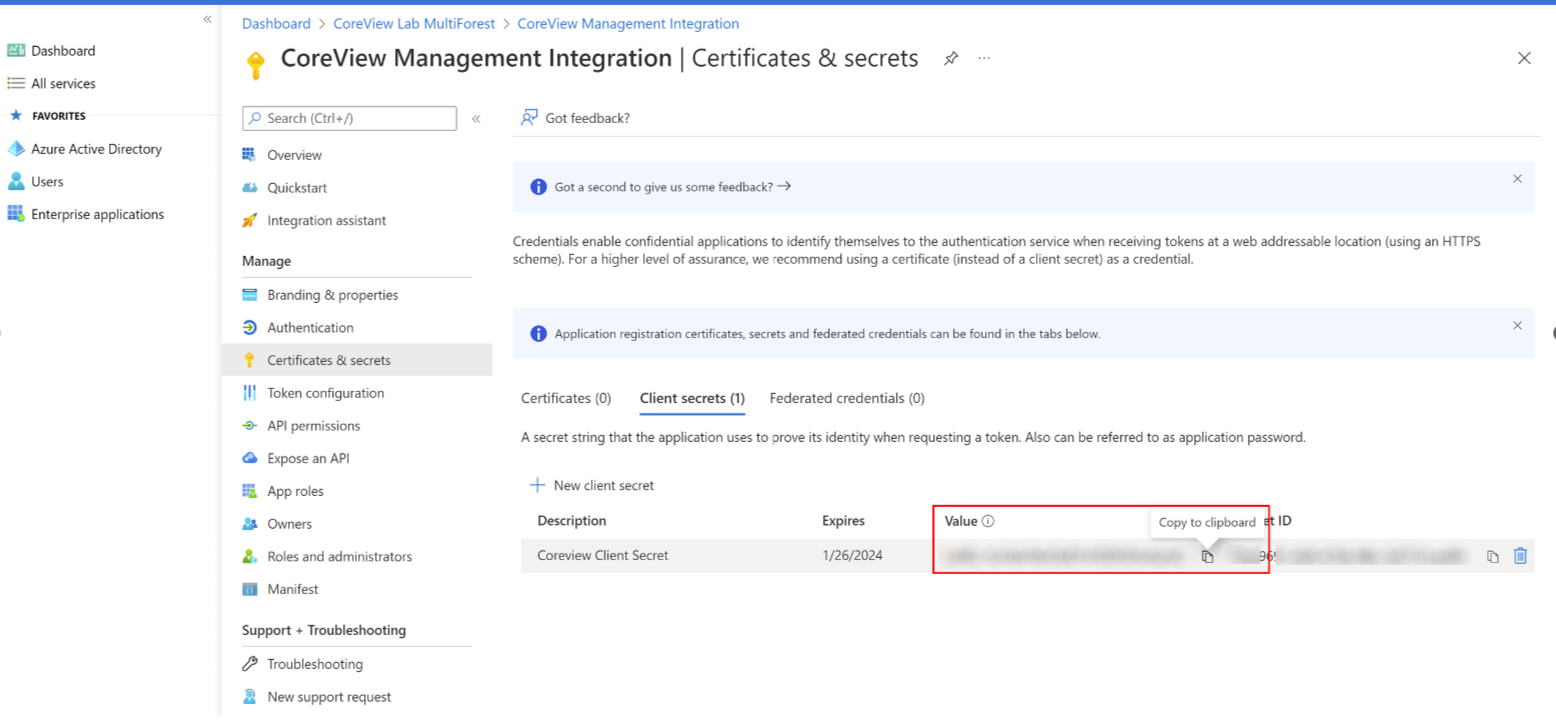
Step 10: add description and expiration date
You have now created your secret. Copy the value of the secret immediately after creation, as it will be encrypted the moment you leave the page.
Using PowerShell
- Copy the following code and paste it into a file named “RegisterAzureAdApp.ps1”:
function Register-AzureADApp{
    [CmdletBinding()]
    param(
        [Parameter(Mandatory, HelpMessage="Display name for this application", Position=0)][string]$Name,
        [Parameter(Mandatory,ValueFromPipeline=$true, ValueFromPipelineByPropertyName=$true, HelpMessage="List of permission.", Position=1)][string[]]$permissions,
        [Parameter(HelpMessage="Expires Client Secret in the following format: MM/dd/yyyy", Position=2)][string]$ExpiresClientSecret,
        [Parameter(HelpMessage="The URIs we will accept as destinations when returning authentication responses (tokens) after successfully authenticating or signing out users", Position=3)][string]$UrlRedirect
    )
    $summary = @{}
    Connect-AzureAD | Out-Null
    if( [string]::IsNullOrWhiteSpace( $ExpiresClientSecret)){
        $ExpiresClientSecret = Get-Date -Date (((Get-date).AddYears(1))) -Format "MM/dd/yyyy"
    }
    $tenantId = (Get-AzureADTenantDetail).objectId
    $app = Get-AzureADApplication -Filter "DisplayName eq '$Name'"
    if( $null -ne $app){
        Write-Warning -Message "App: $Name already exists"
    }

    try{
        $endDate = [datetime]::ParseExact($ExpiresClientSecret, 'MM/dd/yyyy', [CultureInfo]::InvariantCulture)
        if( [string]::IsNullOrWhiteSpace( $UrlRedirect)){
            $UrlRedirect = https://www.coreview.com/
        }
        #new application
        $newApp = New-AzureADApplication -DisplayName $Name -ReplyUrls $UrlRedirect
        $summary.Add( "Application (client) ID", $newApp.AppId) > $null
        #add owner
        $currentUser = (Get-AzureADUser -ObjectId (Get-AzureADCurrentSessionInfo).Account.Id)
        Add-AzureADApplicationOwner -ObjectId $newApp.ObjectId -RefObjectId $currentUser.ObjectId
        #generate a secret key
        $appPassword = New-AzureADApplicationPasswordCredential -ObjectId $newApp.ObjectId -CustomKeyIdentifier "AppAccessKey" -EndDate $endDate
        $summary.Add("Secret key value", $appPassword.value) > $null
        $summary.Add("Url granting consent", [string]::Format(https://login.microsoftonline.com/{0}/adminconsent?client_id={1}, $tenantId, $newApp.AppId)) > $null
        #define API permissions
        $graphSP = Get-AzureADServicePrincipal -Filter "DisplayName eq 'Microsoft Graph'"
        $graphPermissions = New-Object Microsoft.Open.AzureAD.Model.RequiredResourceAccess
        $graphPermissions.ResourceAppId = $graphSP.AppId
        $graphPermissions.ResourceAccess = New-Object System.Collections.Generic.List[Microsoft.Open.AzureAD.Model.ResourceAccess]
        foreach( $permission in $permissions){
            $checkPermission = $graphSP.AppRoles | Where-Object {$_.Value -eq $permission}
            if( $checkPermission){
                $resourceAccess = New-Object Microsoft.Open.AzureAD.Model.ResourceAccess
                $resourceAccess.Type = "Role"
                $resourceAccess.Id = $checkPermission.Id
                $graphPermissions.ResourceAccess.Add($resourceAccess) > $null
            }
            else{
                Write-Warning "$permission not found"
            }
        }
        if( $graphPermissions.ResourceAccess.Count -gt 0){
            Set-AzureADApplication -ObjectId $newApp.ObjectId -RequiredResourceAccess $graphPermissions
        }
    }
    catch{
        Write-Error -Message $_.Exception.Message -ErrorAction Stop
    }
    finally{
        Disconnect-AzureAD
    }
    $summary | Format-Table -AutoSize | Out-String -Width 1200
}- Run a command as administrator
- Type PowerShell
- Make sure that you have installed the module Azure AD, otherwise run the following:
Install-Module -Name AzureAD -RequiredVersion 2.0.2.137 -Confirm:$false -Scope AllUsers -Force - Retrieve the data as below using the location of the folder where it was copied:
. "path\RegisterAzureAdApp.ps1"- Call the function as below:
Register-AzureadApp -Name "CoreView Management Integration" -permissions "User.ReadWrite.All", "Directory.ReadWrite.All", "Group.ReadWrite.All"If you need to perform the action Remove Channel User it is required also the additional permission:
"ChannelMember.ReadWrite.All"If you need to manage authentication methods for users, it is required the additional permission:
"UserAuthenticationMethod.ReadWrite.All"If you need to manage membership for role assignable groups, it is required the additional permission:
"RoleManagement.ReadWrite.Directory"- By default, the expiration date of the Client Secret is one year from the moment the script is executed. We suggest adding the parameter to extend the expiration date to 18 months.
ExpiresClientSecret "12/31/2023"- The script will generate the Client ID, the Client Secret, and the URL that you need to use to provide the consent on Azure AD.

- You can add the below optional parameter
-Urlredirect "myurl"The URLs will be accepted as destinations when returning authentication responses (tokens) after successfully authenticating or signing out users. If not specified, by default it will be set to: https://coreview.com
- Copy and paste the URL into a web browser and provide the consent using a user with global admin rights.
Step 2: configure Graph Management on CoreView
Now it’s time to copy the Application ID, client secret, and expiration date to CoreView’s portal.
Go to Graph Management
You can do it by clicking on “SETTINGS” > “My organization”, then “Graph Management”.
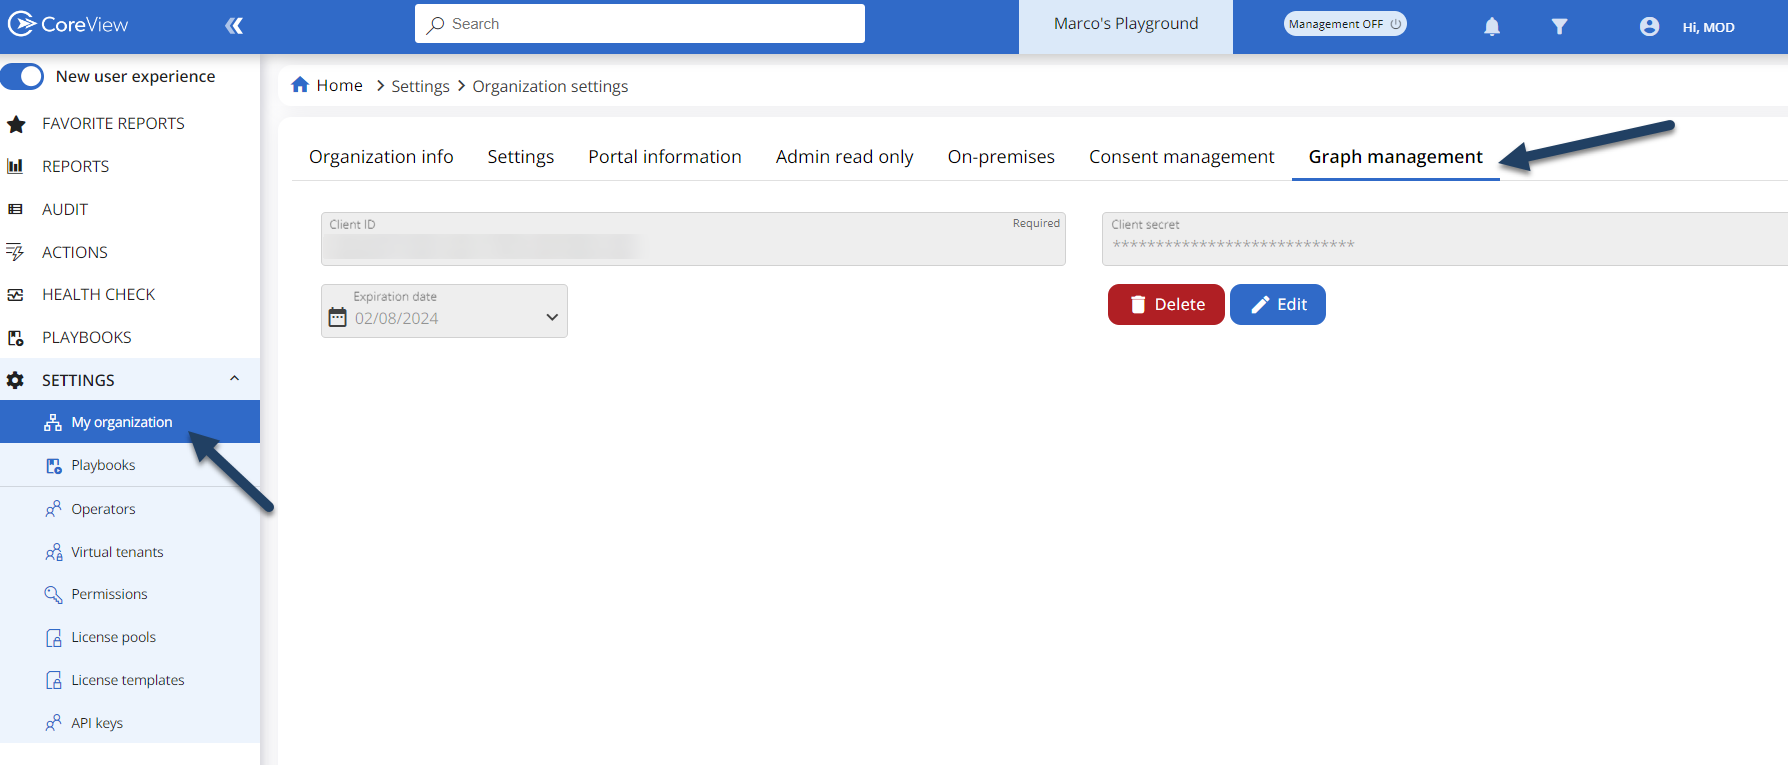
Add information
Once you have saved your configuration, you’ll have the ability to update the client secret when needed or delete the configuration entirely.
Client ID matches the Application ID from Azure Entra ID:

And the Client Secret is also pulled from Azure Entra ID: