Avec l’application Partenaire, vous pouvez ajouter et gérer de nouveaux clients en activant leurs processus d’intégration et en gérant le statut de leur abonnement. Cet article présente les principales fonctionnalités d’intégration et de gestion des clients :
- Ajouter de nouveaux clients
- Suivre l’intégration et l’importation des clients
- Convertir un client en compte « Production »
- Modifier les SKU et les dates d’expiration des clients
Ajouter de nouveaux clients
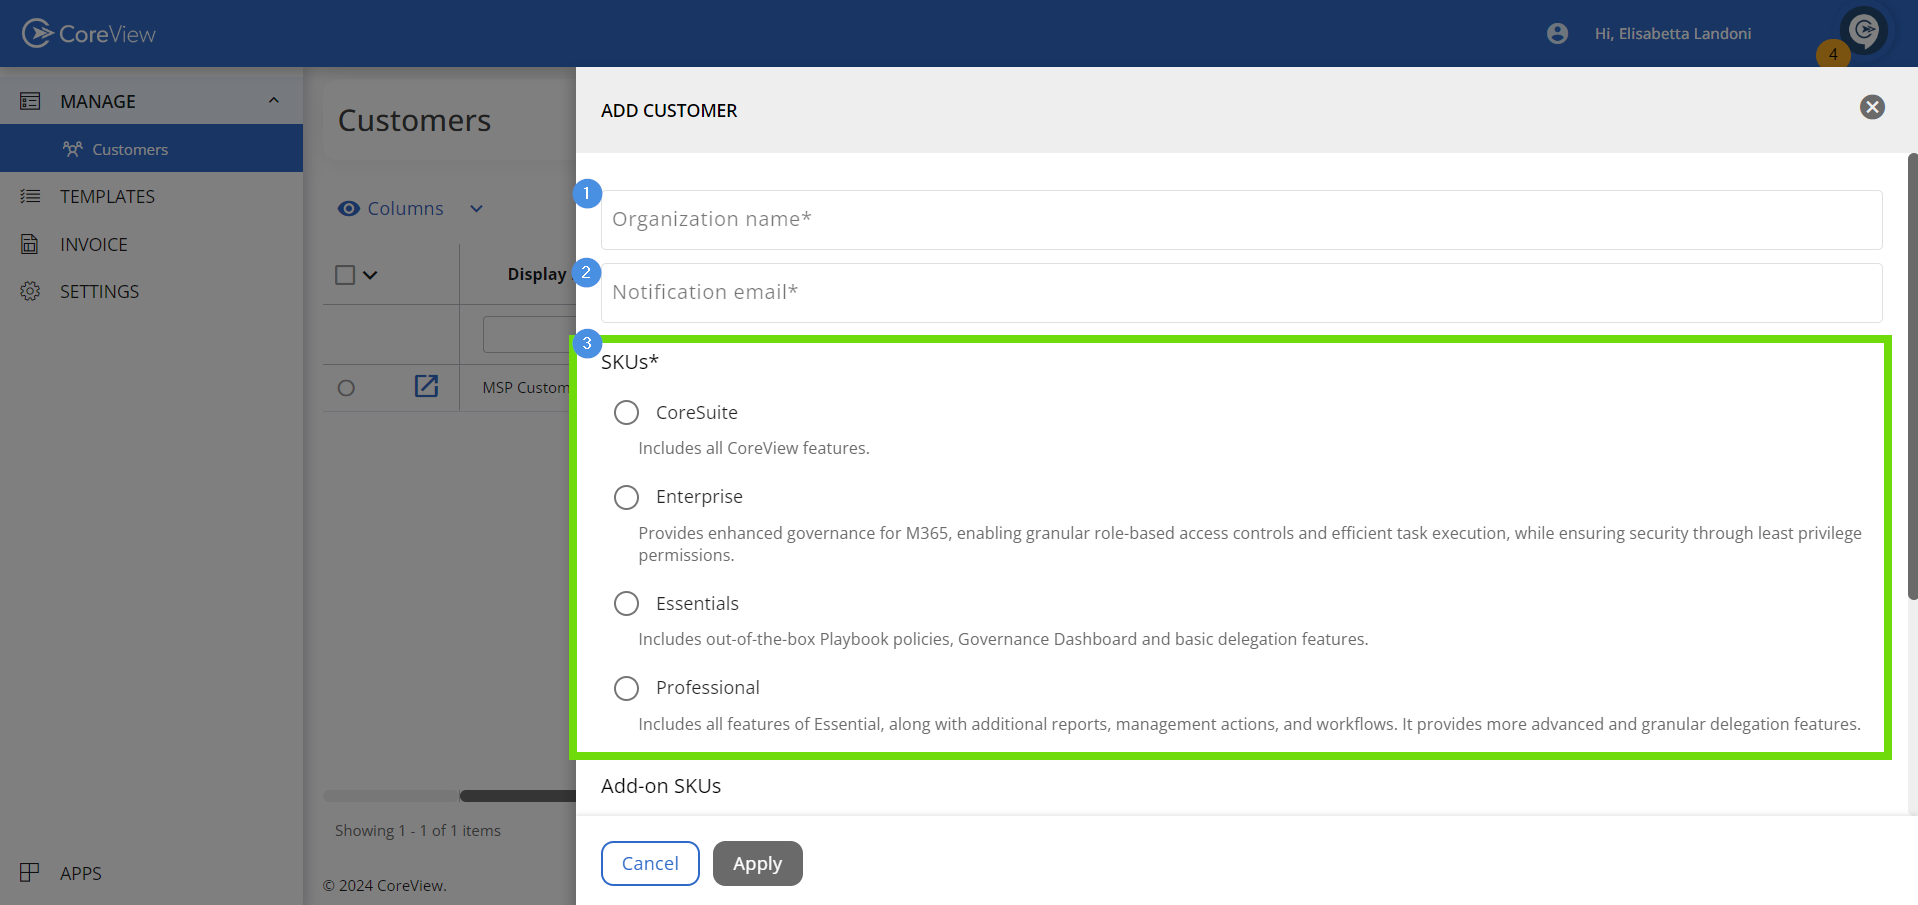
Pour créer un client, vous pouvez utiliser l’option « Ajouter un client », disponible dans le menu « Action » de la page « Clients ».

Lors du lancement du processus, vous devez saisir les informations suivantes :
- Nom de l’organisation : saisissez le nom de l’organisation du client.
- Email de notification : indiquez l’adresse email à laquelle le lien d’activation CoreView sera envoyé.
- Attribution du SKU : définissez le SKU à attribuer au client. Un SKU doit être sélectionné.
- Attribution d’add-on : éventuellement, définissez l’add-on à attribuer au client.


Une fois toutes les informations requises saisies, cliquez sur le bouton « Appliquer » pour créer le tenant client et envoyer le lien d’activation à l’adresse email spécifiée.
Le tenant client est initialement créé en tant que compte TRIAL sur CoreView et sera mis à niveau vers la production après deux semaines.
Suivre l’intégration des clients
Après avoir ajouté un client, il apparaîtra dans l’onglet « Clients en attente ». Cet onglet offre un emplacement pour suivre la progression de l’intégration client et effectuer les actions nécessaires.

Voici ce que vous pouvez faire depuis l’onglet « Client en attente » :
Copier le lien d’activation
Dans la première colonne du tableau, vous trouverez un bouton pour copier le lien d’activation.
Ce lien peut être partagé avec le client pour démarrer le processus d’intégration, par exemple en l’envoyant par email.
Surveiller le statut d’importation
Les colonnes « Erreurs d’importation » et « Messages du journal des événements » sont particulièrement utiles pour résoudre tous les problèmes pouvant survenir lors du processus d’intégration.
Ces colonnes fournissent des informations précieuses sur l’avancement et le statut de l’importation. Si des problèmes surviennent, vous pouvez les identifier rapidement et agir en conséquence.
Une fois le processus d’intégration terminé avec succès, le client sera déplacé dans l’onglet « Clients ».
Gérer la période TRIAL
Une fois le client intégré, il bénéficiera d’une période d’essai de 14 jours (TRIAL).
Après ces 14 jours, le compte du client passera automatiquement à la PRODUCTION. Voici ce que vous pouvez faire pour gérer cette période de transition.
Prolonger la période TRIAL
Vous pouvez prolonger la période d’essai de votre client pour lui accorder 7 jours d’évaluation supplémentaires.
Procédez simplement comme suit :
- Accédez à « Gérer > Clients » ou à « Facturation > Partenaires » dans le menu latéral.
- Cochez la case du client pour lequel vous souhaitez prolonger l’essai.

- Cliquez sur « Actions > + Prolonger l’essai ».

- Vous pouvez prolonger l’essai trois jours avant la date d’expiration. Si cela n’est pas possible, le bouton sera grisé (désactivé et non cliquable). Une étiquette sous la zone de texte indique la date à partir de laquelle il est possible de prolonger l’essai.

- Si, à l’inverse, il est possible de prolonger l’essai (trois jours avant expiration) pour sept jours supplémentaires, le bouton sera bleu (actif et cliquable).

- Cliquez sur « Appliquer » pour confirmer les modifications.
Veuillez noter que si vous êtes un distributeur, vous ne pouvez pas prolonger la période d’essai pour les clients de vos MSP.
Empêcher la mise à niveau automatique
Après la période d’essai, le compte sera automatiquement mis à niveau vers le statut PRODUCTION. Vous serez averti par email avant cette modification.
Vous pouvez empêcher la mise à niveau automatique du compte en utilisant l’option « Gérer la mise à niveau de l’abonnement ».
Convertir un client en compte PRODUCTION
Cette option n’est pas disponible pour les MSP en essai, mais uniquement pour ceux en production.
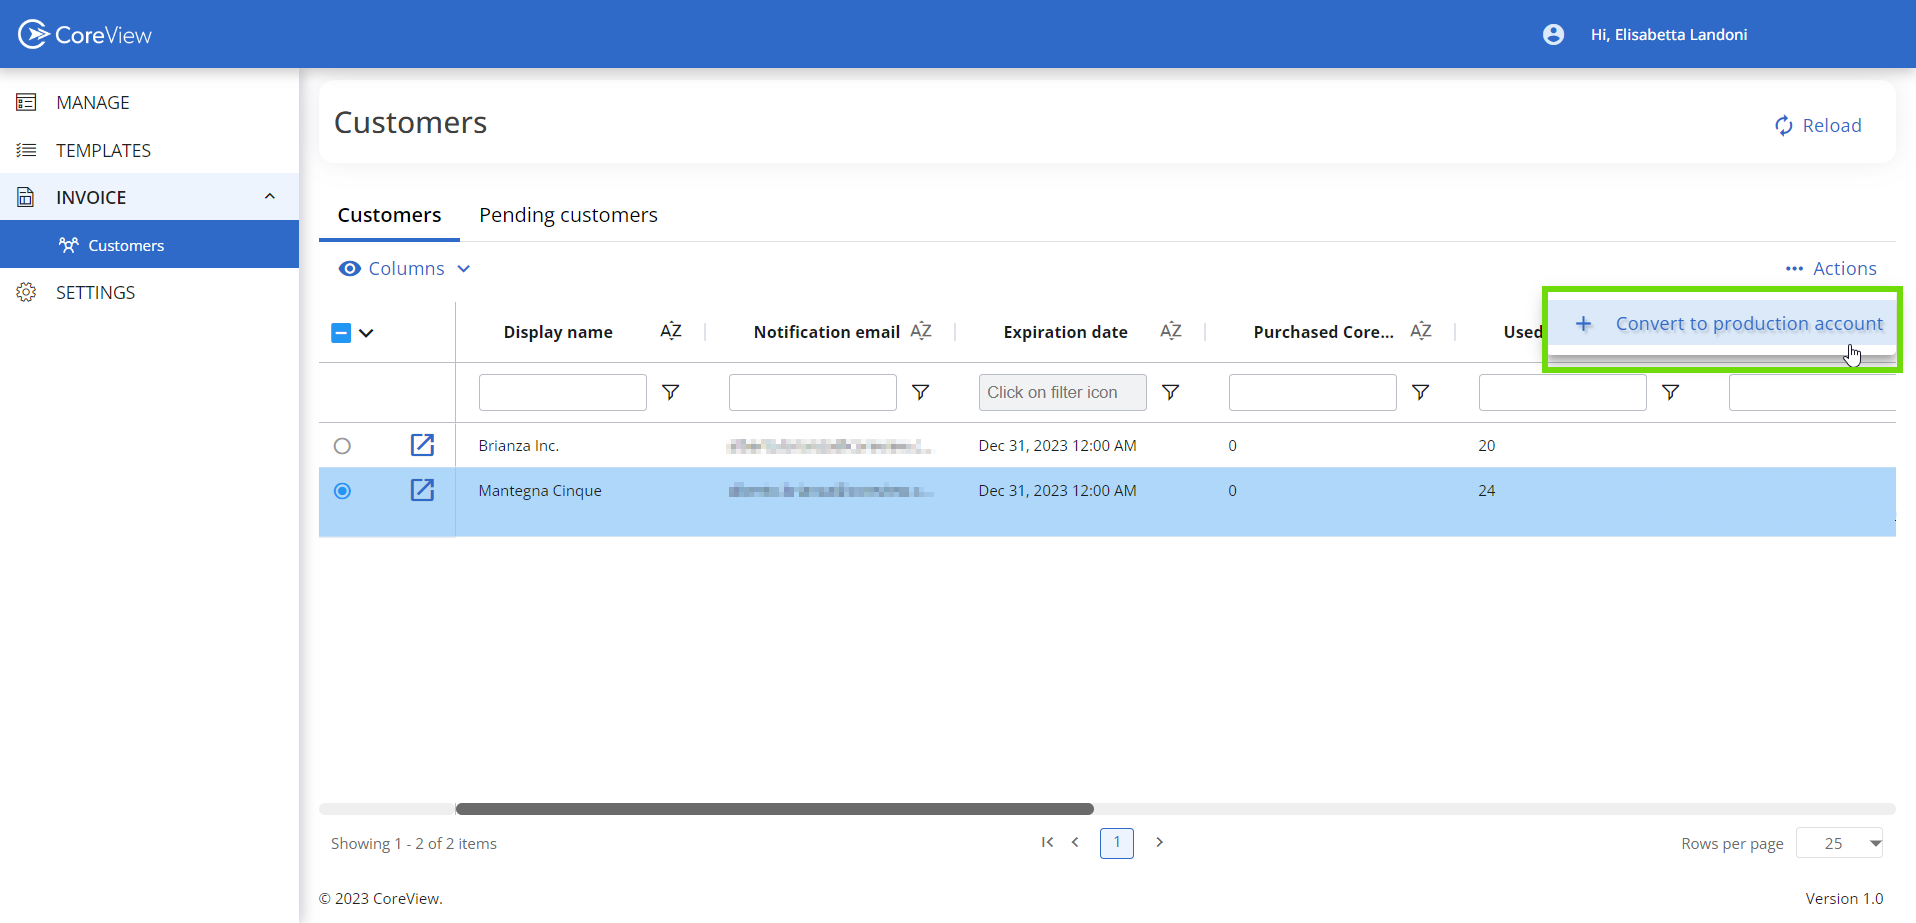
Pour convertir manuellement un client en compte PRODUCTION, utilisez l’action « Convertir en compte production ».

Voici les étapes :
- Sélectionnez le client (le champ « Source » doit être égal à « MSP »).
- Dans le menu d’action, choisissez « Convertir en compte production ».
- Dans le panneau qui s’ouvre, vous pouvez fixer une nouvelle date d’expiration et modifier les SKU associés au client.

En convertissant un client en compte PRODUCTION, vous prolongez son accès au-delà de la période d’essai et lui donnez un accès complet aux fonctionnalités et capacités de CoreView.
```
