This article describes the procedure for migrating a CoreView Hybrid Connector single-forest configuration to an Active Directory multi-forest topology.
If this is the first time you are installing CoreView Hybrid Connector, then this is not a migration, but a first-time installation, so please refer to this article: Hybrid Connector installation.
If, on the contrary, you've previously configured the Hybrid Connector for one of your Active Directory forests and now need to add more, transitioning from a single-forest to a multi-forest configuration, then the following procedure is for you.
Please note that the migration process detailed in this article involves a downtime period when you'll need to implement the new configuration. Because of this, we recommend scheduling this activity during a planned maintenance window.
Keep in mind that downtime will affect on-premises management actions, both custom and native. So, during migration, it's crucial to ensure that the management session is appropriately switched off (as we'll describe in the following steps).
Lastly, remember that the multi-forest configuration is only supported on Windows 2022 and 2019. So, if your CoreView Hybrid Connector is running on a Windows 2016 server, you'll need to plan for setting up a new server with the supported version. Make sure to test all the necessary network enablements described here: Hybrid Connector: requirements.
Service accounts
The structure of the multi-forest version of the CoreView Hybrid Connector echoes that of Microsoft AD Connect. While there will be a single on-premises server hosting the agent, this server needs to be able to reach the chosen domain controller for each forest you aim to integrate.
The connection technology consistently relies on Remoting PowerShell (you can find more information in this Microsoft article). Therefore, it's necessary to equip each forest's domain controller with a dedicated service account. This means there's no need for Active Directory Trust or Enterprise Admins.
If a forest has more than one Exchange server, we suggest assigning an additional service account to each extra Exchange organization.
Just like with the single-forest version, we recommend using a domain controller from each forest that has the Global Catalog role assigned. This is because of the requirement to import group members spanning multiple domains and forests. Without a connection to a Global Catalog, these couldn't be imported.
For forests arranged in parent-child relationships, you only need a domain controller from the parent domain. CoreView's data import process can discover each child domain and import the related data.
Pre-checks
Just like with the single-forest version, setting up a multi-forest topology involves careful preparation and verification of network rules and account permissions for each forest.
These articles provide instructions for using the CoreView Hybrid Connector's diagnostic tool: Diagnostic Tool.
We suggest running all tests for each service account in every forest that will be part of the new multi-forest configuration. If you're also planning to change the server running the CoreView Hybrid Connector, we recommend running all tests on the new server before proceeding with the migration steps outlined in the next section. This way, you can simulate the same behavior as the Hybrid Connector and validate network connections using the same source IP address. This is because Docker RTE for Windows uses NAT by design, leveraging the same IP as the host machine to connect to the network.
Migration
If you're setting up on a new server, ensure you download and install the most recent version of the Hybrid Connector package.
However, if you need to upgrade the single-forest version of the Hybrid Connector on the same server, you should uninstall the current version and reinstall it.
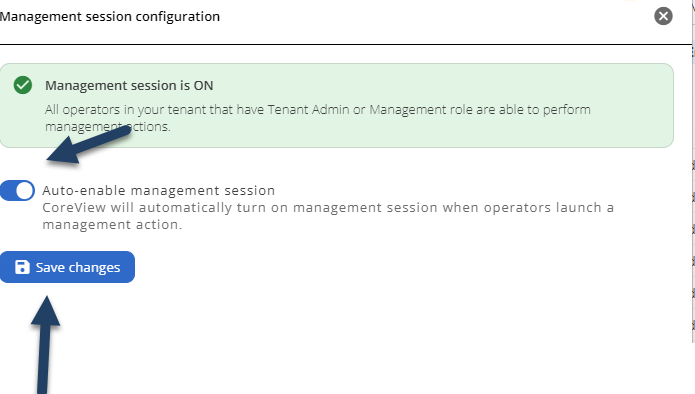
Before you uninstall, make sure to disable the “Auto-enable management session” feature, as shown below:

Next, turn off the Management:

Now, go to: C:\Temp
and open the following file: Forward365.Service.PowershellService.Agent.exe.config
You'll need to copy and paste all the custom key settings found in the appSettings section into the same file on your Windows 2019 Server.
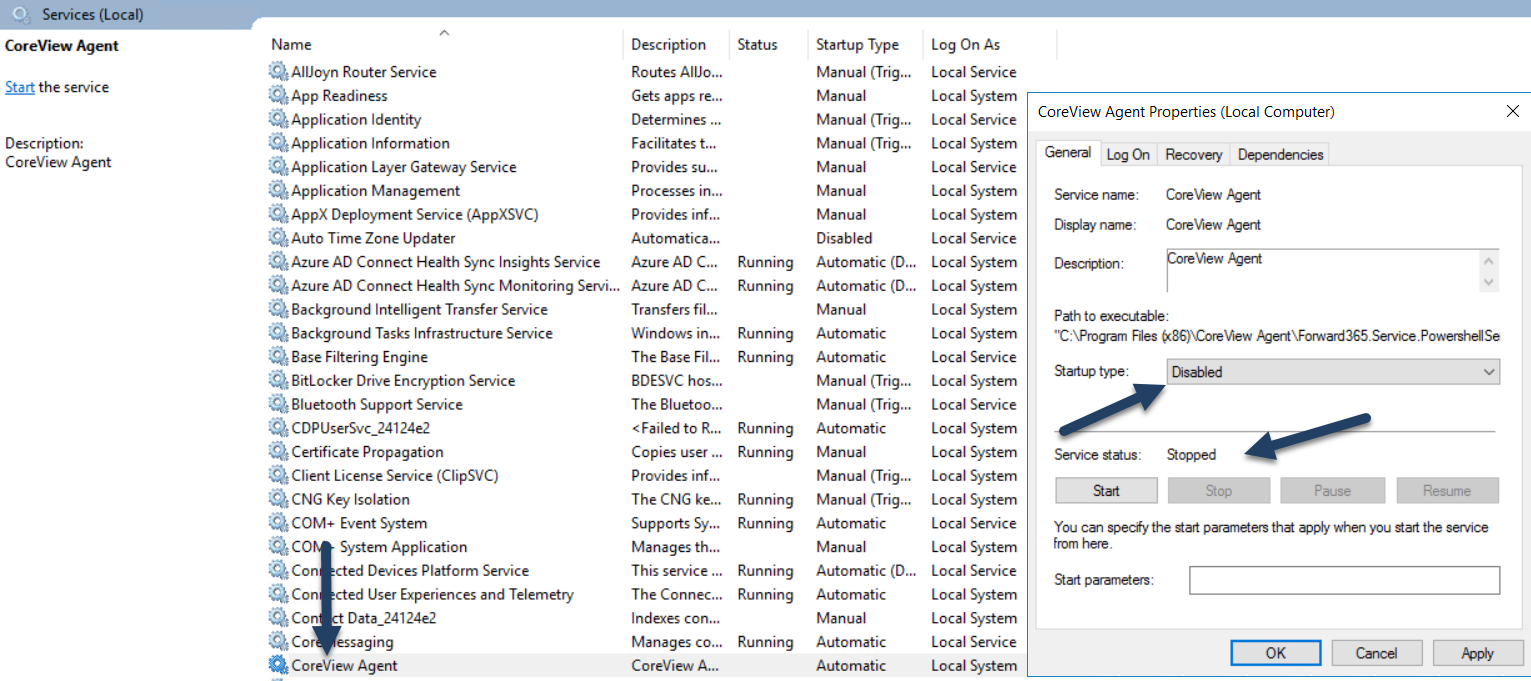
If the single-forest Hybrid Connector is running on another server, it is now necessary to stop the “CoreView Agent” service on the on-premise machine and set it to disabled:
Now, you need to connect to the CoreView portal, go to “Settings” > “My organization” > ”On-premises” section, and click on the “delete configuration” button:

From here, you'll need to reach out to your CoreView contact to request the reconfiguration of your tenant to the multi-forest version (FT:MULTIFOREST). If you were previously using the 2016 version, make sure you've updated to the 2019 operating system version on the backend (FT:HYBRIDOS2019).
Next, install the latest version of the Hybrid Connector package on the target server. If you're using the same server as the single-forest configuration, you'll first need to uninstall the agent version via Control panel > Programs & features:

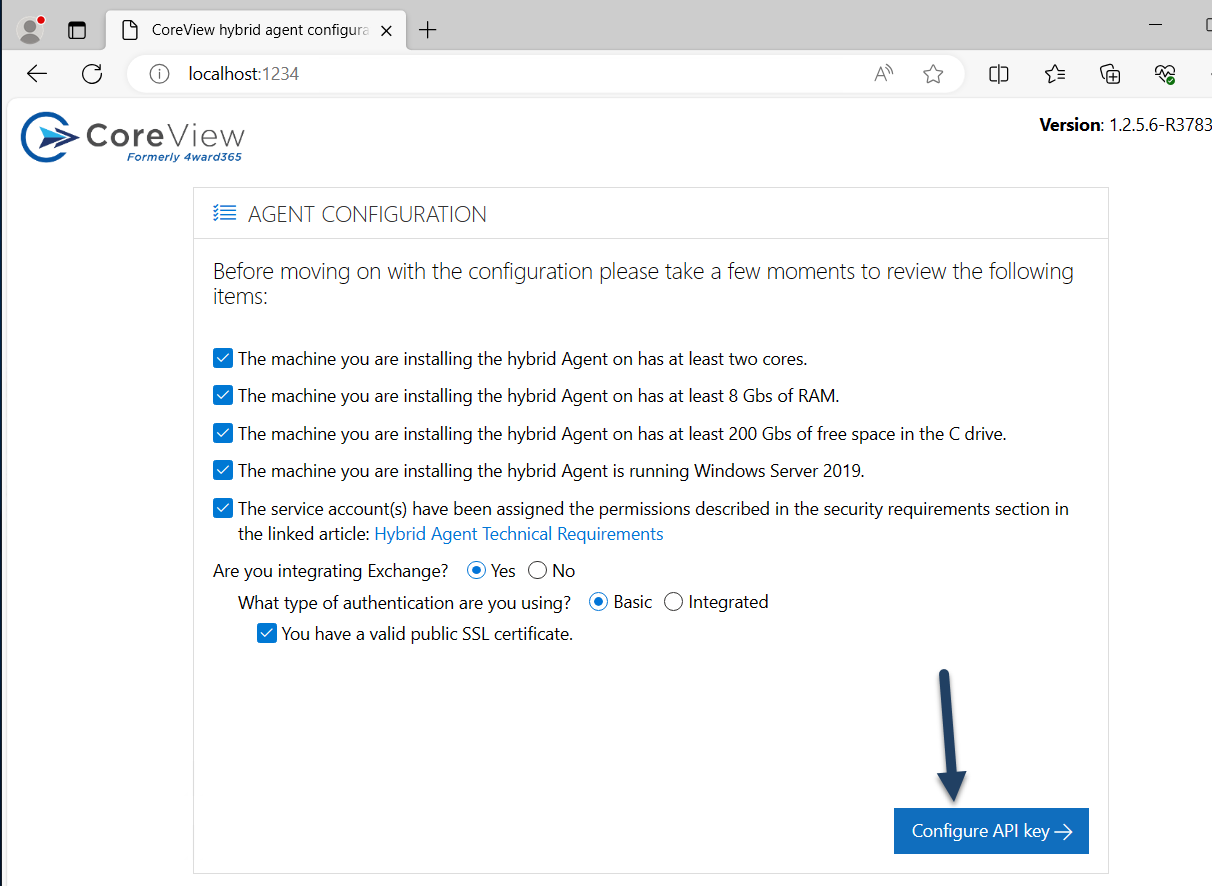
After you've successfully installed the latest package version, a page will automatically open on your server at localhost:1234. This is an agent configuration page that will be used exclusively at this stage to configure the API Key, which will be generated in the next step.
The configuration page only supports Chrome and Edge, so please make sure to use a supported browser.
Next, ensure that you meet all the requirements listed on the page that you can review here. Once you've done so, click on “Configure API key” button:
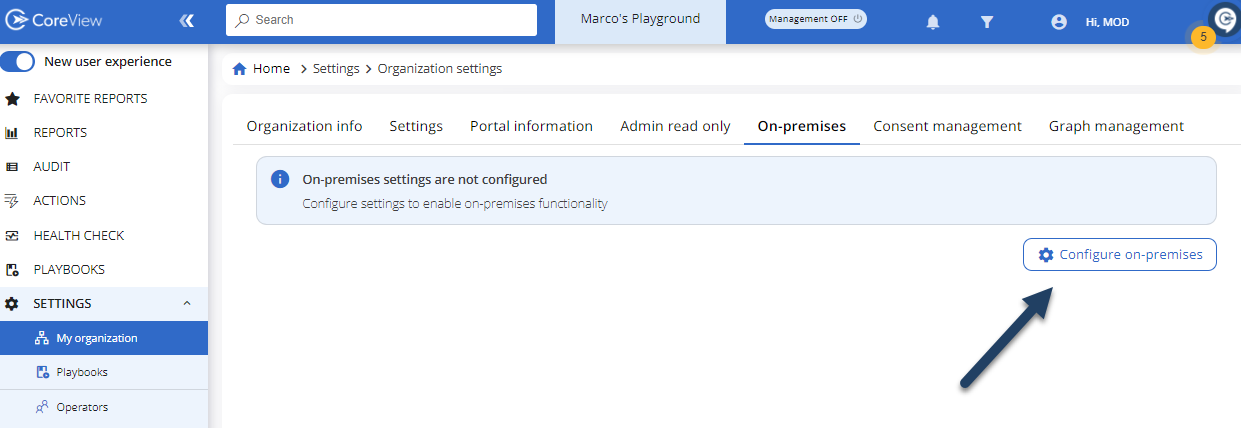
Log out from your CoreView Portal and log back in. After that, navigate to “Settings” > “My organization” > ”On-premises” and click on the “Configure on-premises” button.
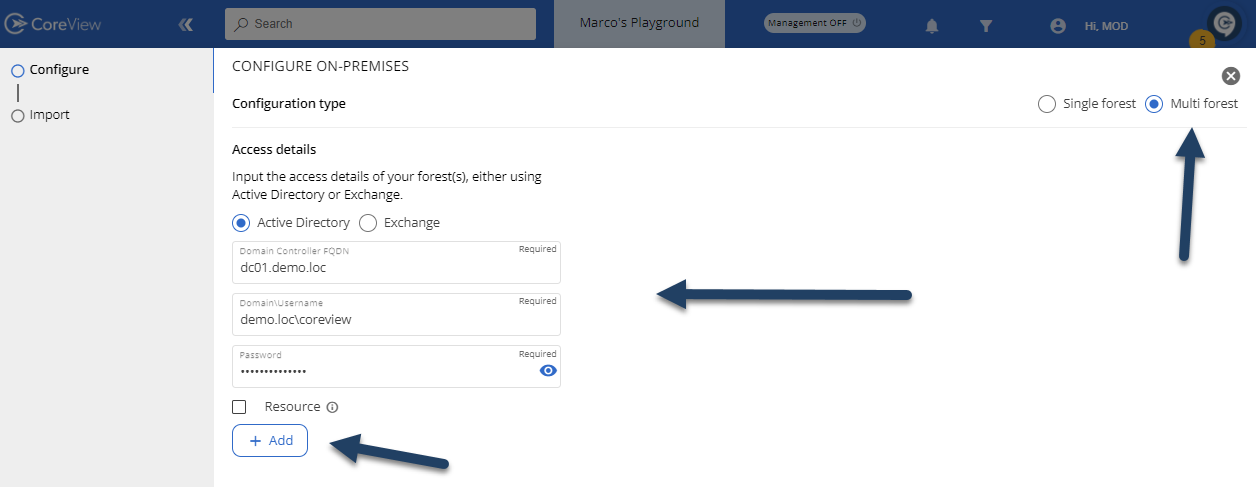
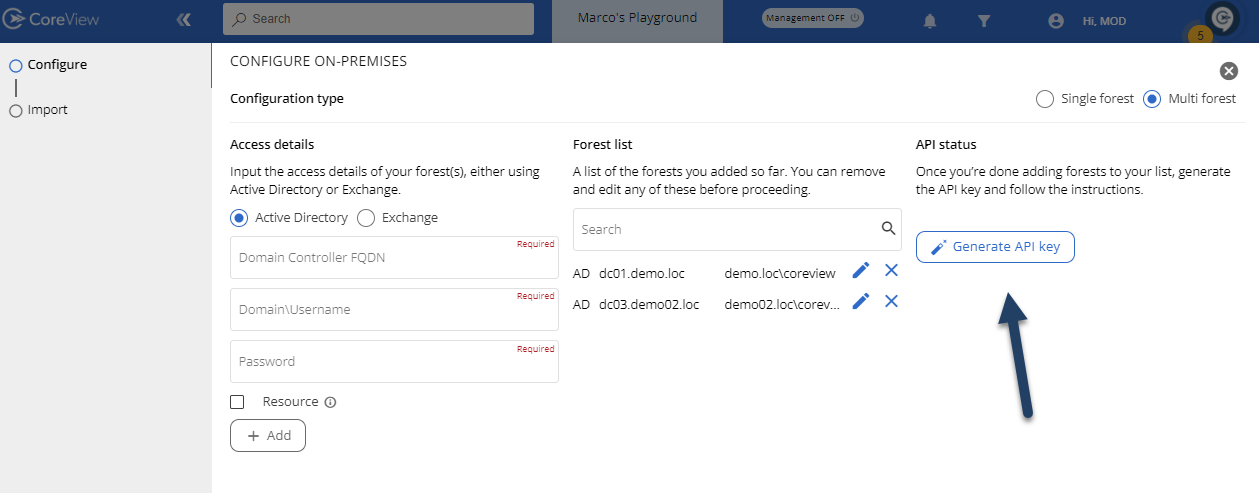
Select the “Multi forest” option at the top right and proceed with entering the addresses of the domain controllers, exchange servers for each forest, and the service accounts created appropriately for each forest to connect. Press the “Add” button to enter the next forest or exchange server to integrate:
Once you've added all the domain controllers and exchange servers for each forest, you can click on the “Generate API key” button, copy the key, and insert it into the designated section of the on-premises server awaiting configuration:


If you see the message “Your API key is already configured”, you can proceed to the next step:

From this point on, you can continue only on the portal. So, please disconnect from the on-premises server and close all unnecessary configuration windows.
Now, from the portal, press the “Verify session” button to complete the configuration process and move on to setting up the “Import” process.

This phase is successfully completed if the message “Verified” is displayed. If not, you'll need to troubleshoot the issue described in the log available in the on-premises server directory at c:\temp\logs before proceeding with the configuration again.

Import configuration
Now, it's necessary to configure the import of the objects from the configured forests. Please note, without this step, creating new objects won't be possible as CoreView won't be aware of the OU structure where management actions are to be performed.
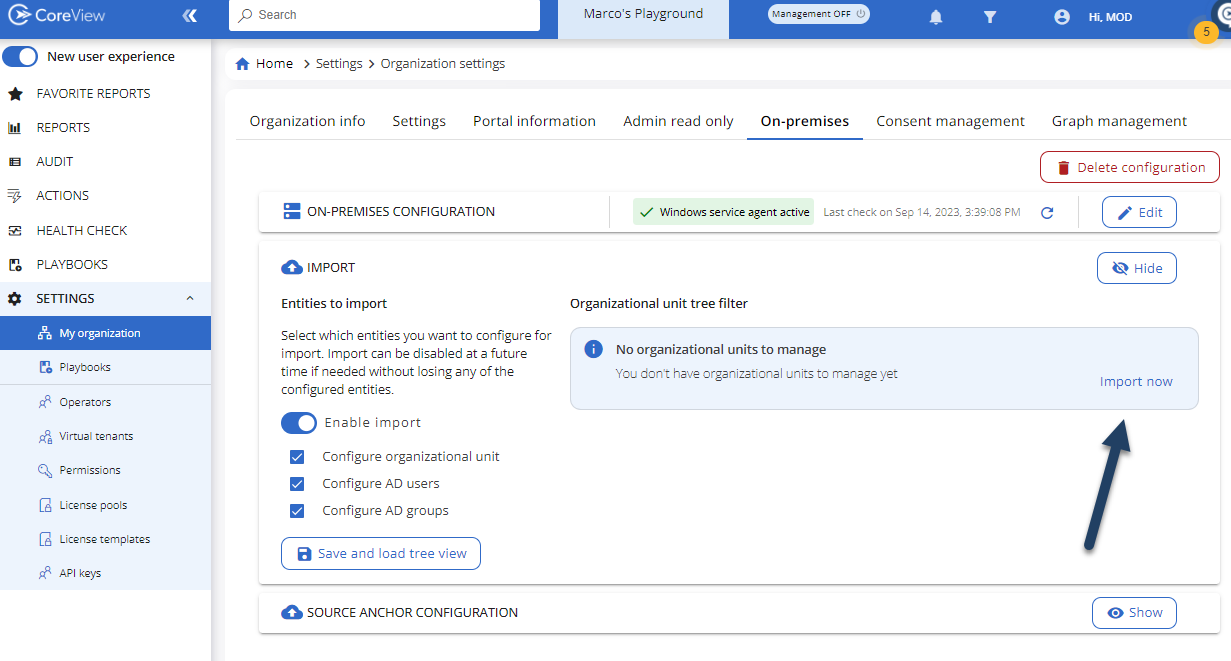
Navigate to “Settings” > “My organization” > ”On-premises” and expand the “Import” section. Then, select “Enable Import” and choose the types of objects to import. As mentioned, without at least the Organizational Units selected, creating new objects won't be possible. Press “Save and load tree view” once you've selected the necessary object types:

Now, click on the “Import now” button to inventory the OUs of each domain in each configured forest. Depending on the size of each domain and forest, you may need to wait for a shorter or longer period.
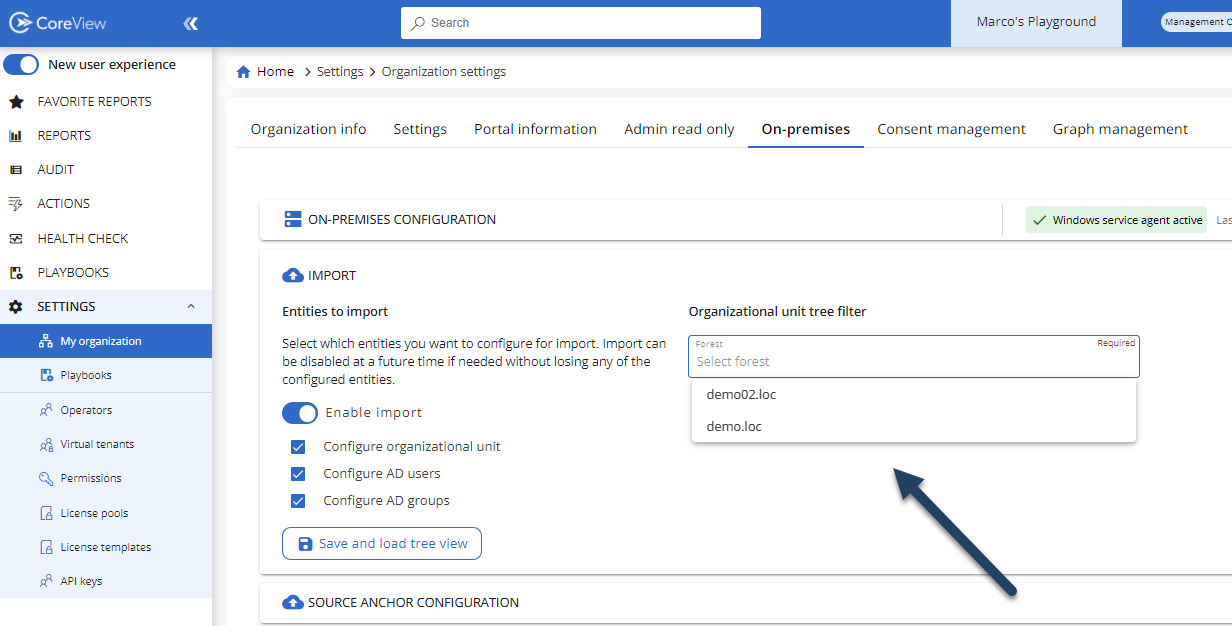
Once the inventory is done, the portal will display the OUs of each domain and forest after you've selected the reference forest from the dropdown menu:
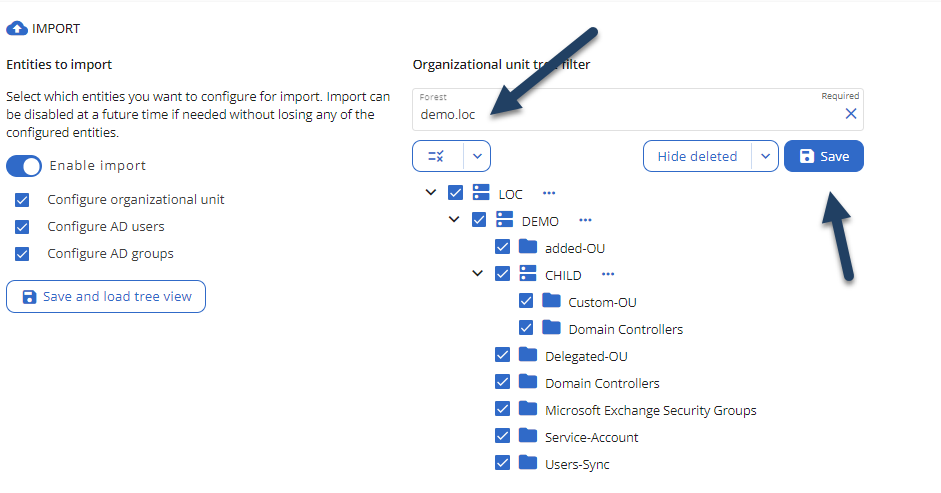
Select the forests one by one and choose the OUs of interest. After that, hit “Save” for each forest:

You can now turn on the Management session:

Once you see the “Management ON” message, you can reconfigure the auto-enable session and click on the “Save changes” button:
The migration is complete.
Limitations
The multi-forest architecture doesn't support gMSA. You can find more information here: Hardening your hybrid environment.
Existing custom actions within your CoreView tenant that target on-premises environments will need to be rewritten. This is because the command interpreter of the multi-forest hybrid agent can't distinguish the target forest without a specific indication. These indications are addressed using the “scriptblock” technique.
For all the custom actions already present within your tenant, you'll need to implement the following configuration. If it doesn't already exist, create a file and name it “config.json” within the installation directory: C:\Temp
 {
"BackwardCompatibility.SingleForest.ActiveDirectory": "Your.domaincontroller.fqdn",
"BackwardCompatibility.SingleForest.Exchange": "https://yourexchangeserver.something.local/powershell"
}
This configuration will apply the target domain and exchange defined in these settings to all existing custom actions within your tenant. No custom action implemented with the “legacy” logic (i.e., without scriptblock) will be able to target forests different from those declared.
It's highly recommended that all previously created on-premises custom actions be migrated to the new logic.
Below are the necessary instructions for creating custom actions using the “scriptblock” logic.
Multi-forest custom action
Constraint:
Given that each runspace is opened for a specific forest, we need to determine where to execute the custom action code.
Solution:
We've introduced the concept of “scriptblock”, which are portions of the script that can be run against one runspace at a time. You can execute multiple scriptblocks within your custom action, depending on the forest and environments you want to target. Each scriptblock can only be associated with one runspace. So, if you need to perform two actions - one for the Active Directory of Forest Alpha and the second one for the on-premises Exchange of the same forest - you'll need two scriptblocks.
Invoke-CvCommand
SYNOPSIS
An Invoke-Command wrapper with integrated remote session management.
PARAMETER typeEnv
The Environment to invoke the command on. It accepts two values: ActiveDirectory and Exchange.
PARAMETER scriptBlock
The code to execute.
PARAMETER argumentLists
Specifies the arguments to be passed into the script block.
PARAMETER source
Specifies a source which is used to open the proper remote PowerShell session. The source can be:
•a distinguished name,
•a security identifier (SID)
•or a fully qualified domain name (Fqdn).
You can now use the function Invoke-CvCommand to handle multiple scriptblocks and pass variables between them.
scriptblock = {
    param()
        Get-AdUser -Identity "CN=test,OU=OU_1,DC=ALPHA,DC=LOC" | Select-Object UserPrincipalName
    }

    $job = Invoke-CvCommand -typeEnv ActiveDirectory -scriptBlock $scriptblock -source "CN=test,OU=OU_1,DC=ALPHA,DC=LOC"
    return $job
sb = {
    param()
        Get-AdUser -Identity "CN=test,OU=OU_1,DC=ALPHA,DC=LOC" | Select-Object UserPrincipalName
    }

    $job = Invoke-CvCommand -typeEnv ActiveDirectory -scriptBlock $sb -source "CN=test,OU=OU_1,DC=ALPHA,DC=LOC"
    return $job
To bypass the double-hop issue, it's enough to specify a parameter called $cred within the script block parameters.
$userDn = "CN=test,OU=OU_1,DC=ALPHA,DC=LOC"
$UserSid = "S-1-5-21-507672319-2510724776-1356001139-3178"

    $sb = {
    param($userDn, [System.Management.Automation.PSCredential]$cred)
        Get-AdUser -Identity $userDn -Credential $cred | Select-Object UserPrincipalName
    }

    $job = Invoke-CvCommand -typeEnv ActiveDirectory -scriptBlock $sb -argumentLists $userDn -source $userSid
    return $job
When the typeEnv is set to Exchange, you must prefix the on-premises cmdlets with "onprem". For example, the cmdlet Get-User becomes Get-onpremUser
$userDn = "CN=user test,OU=OU_1,DC=ALPHA,DC=LOC"

    $sb = {
        $user = Get-onpremUser -Identity "user test" | Select-Object DistinguishedName
        Get-onpremRemoteMailbox -Identity $user.DistinguishedName | Select-Object RecipientTypeDetails
    }

    $job = Invoke-CvCommand -typeEnv Exchange -scriptBlock $sb -source $userDn
    return $job