The Diagnostic Tool serves as a pivotal asset, emulating the client management. In other words, it's a “tool” that can simulate what happens when you open a management session (Powershell session) via the CoreView portal.
This article explores how it enables you to test their Powershell scripts/custom actions.
Requirements
- The test script should not contain any internal functions provided by CoreView.
- This guide is suitable for environments that have a single forest.
- This guide is applicable to hybrid environments, regardless of whether they are based on version 2016 or 2019.
- The guide provides step-by-step instructions using the latest version of the Diagnostic Tool (1.0). However, it's important to note that these steps remain identical, even with the older version of the tool.
Tutorial
Follow these steps to test PowerShell scripts using the Diagnostic Tool:
Step 1: open PowerShell runspace

Step 2: create a script module
Create a script module file (.psm1) and save it in the directory:
c:\tempA script module file can contain any valid PowerShell code. Include at least two functions that interact with Active Directory and on-premises Exchange. Below are examples of the functions for connecting to Active Directory (connect-ad) and on-premises Exchange (connect-ex). You can customize these functions as needed.
function connect-ad {
  $AdPwd = "here password"
  $AdUsername = "here username"
  $ADConnectionUri = "here fqdn server"

  $Name = "OnPrem-AD-Session"

  $Pwd = $AdPwd | ConvertTo-SecureString -AsPlainText -Force
  $Credentials = new-object -typename System.Management.Automation.PSCredential -argumentlist $AdUsername, $Pwd
  $Credential = Get-Credential -Credential $Credentials
  $Session = New-PSSession -ComputerName $ADConnectionUri -Credential $Credential -Name $Name -ErrorAction Stop

  Invoke-Command -Session $Session -ScriptBlock { Import-Module ActiveDirectory }
  Import-PSSession -Session $Session -Module ActiveDirectory -AllowClobber
}
function connect-ex {
  $AdPwd = "here password"
  $AdUsername = "here username"
  $ConnectionUri = "here connection URI"
  $Name = "OnPrem-EX-Session"

  $Pwd = $AdPwd | ConvertTo-SecureString -AsPlainText -Force
  $Credentials = new-object -typename System.Management.Automation.PSCredential -argumentlist $AdUsername, $Pwd
  $Credential = Get-Credential -Credential $Credentials
  $pso = New-PSSessionOption -IdleTimeoutMSec 60000
  $Session = New-PSSession -ConfigurationName Microsoft.Exchange -ConnectionUri $ConnectionUri -Credential $Credential -Authentication Kerberos -Name $Name -SessionOption $pso -ErrorAction Stop
  #https
  #$Session = New-PSSession -ConfigurationName Microsoft.Exchange -ConnectionUri $ConnectionUri -Credential $Credential -Authentication Basic -Name $Name -SessionOption $pso -ErrorAction Stop
  Import-PSSession -Session $Session -AllowClobber -Prefix O365
}
Step 3: encapsulate statements in functions
For the statements you want to test, encapsulate them within functions and save them in the module file. For instance, if you need to try the following custom action:
param($dn, $server)
$user = Get-AdUser -Identity $dn -Server $server
if ($null -ne $user) {
    Write-Host "Well done"
}
Encapsulate it within a function like this:
function my-function($dn, $server) {
    $user = Get-AdUser -Identity $dn -Server $server
    if ($null -ne $user) {
        Write-Host "Well done!!!"
    }
}
A similar process applies to interacting with on-premises Exchange:
param($dn, $routing)
Enable-o365RemoteMailbox -Identity $dn -DomainController "test.contoso" -RemoteRoutingAddress $routing
Encapsulate it within a function as shown below:
function my-function($dn, $routing) {
    Enable-o365RemoteMailbox -Identity $dn -DomainController "test.contoso" -RemoteRoutingAddress $routing
}
Step 4: import the PowerShell module
Once the module file is saved, you need to import it using the following command in the Diagnostic Tool:
Import-Module C:\temp\namemodule.psm1
Step 5: Invoke the functions
With the PowerShell module file successfully imported, you can now invoke the functions saved within the file. For example:
my-function -dn "cn=user,OU=test,DC=contoso,DC=local" -server "contoso.local"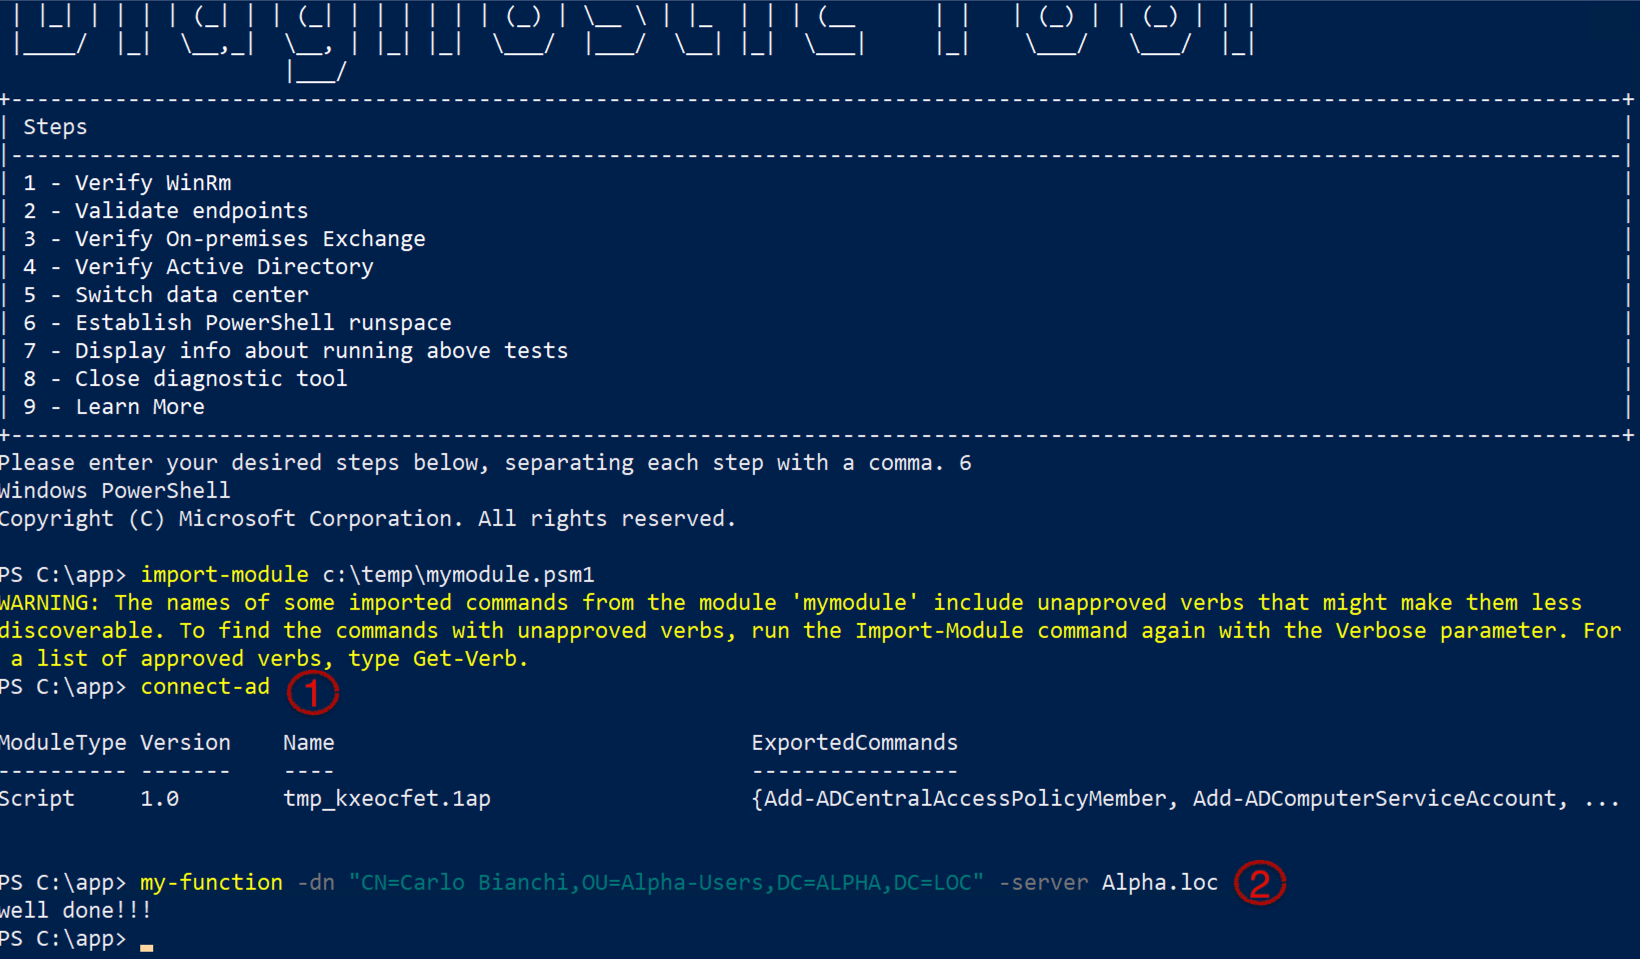
Step 6: modifying the module
In case you need to make changes to the PowerShell script module, make the necessary modifications to the file and save it. Before running a function again, you have to remove the current module using:
Remove-module namemodulethen you can import the PowerShell script module again (Step 4).