Configuration Manager SaaS is hosted on CoreView's cloud infrastructure, so no access to Azure DevOps required. This article does not apply to Configuration Manager SaaS.
Configuration Manager uses Azure Pipelines to run Syncs.
By default, Azure Pipelines run on Microsoft cloud-hosted agents. These agents are supplied by Microsoft, run on Windows, and are not customizable. Microsoft agents are limited to one parallel job and 1800 free minutes per month, or you can pay for unlimited minutes and an additional parallel job for $40/month.
Microsoft provides the ability to use self-hosted agents. These agents are not hosted by Microsoft but instead need to be hosted by the client using a physical server or a virtual machine (VM). Self-hosted agents afford more flexibility at a lower cost.
- Self-hosted agents are provided with unlimited minutes per month.
- Visual Studio Enterprise subscribers receive one free parallel job per subscriber.
- Additional parallel jobs require $15/mo billing per job.
- Self-hosted agents can be used with a static IP address and fixed location.
- Self-hosted agents can be customized with hardware and software configurations to meet your needs.
Prerequisites to use self-hosted agents with Configuration Manager
Operative system and hardware
Configuration Manager supports Windows and Linux agents. Windows agents need to run on Windows 10 or higher. For Linux, Ubuntu is recommended.
- Debian-based distributions other than Ubuntu may work but have not been tested. Certain Linux agents require Ubuntu, such as using scale set agents.
- Other distributions based on RHEL such as Fedora, CentOS, SUSE, etc. have not been tested and may require additional configuration on the user's part and may not be supported by Configuration Manager.
To get started, you will need the following:
- To review and understand the Windows prerequisites or Linux prerequisites.
- A VM or server running Windows or Linux with at least 2 CPU cores and 8 GB of RAM.
More CPU cores and RAM allow the agent to perform more actions faster, while too few resources can crash the agent and result in failed Syncs. The number of parallel jobs, configurations being Synced, etc. will determine the hardware requirements. Microsoft-hosted agents run with 2 CPU cores and 7 GB RAM, for reference.
Network requirements
Self-hosted agents must be configured to access certain resources required by Configuration Manager and Microsoft. This includes connections to Azure DevOps, Microsoft 365, and Configuration Manager endpoints. If you are configuring a firewall on your agent or your agent's network, the following steps may be necessary.
Azure DevOps:
Azure DevOps agents must be configured to allow outbound connections to specific Microsoft IP addresses and URLs.
For a list of Azure DevOps IPs and other network requirements for self-hosted agents, please review the Allowed IP addresses and domain URLs guide on Microsoft Learn.
Microsoft 365:
Access to Microsoft 365 relies on several different groups of URLs and IP addresses. For information on accessing Microsoft 365, please review the Microsoft 365 URLs and IP address ranges guide.
In addition, some providers may have specific API endpoints that must be accessible by the agent if you wish to manage those configurations. Please ensure your agent can reach the following endpoint:
Microsoft Defender:
https://wdatpprd-us3.securitycenter.windows.com/api/Configuration Manager:
In addition, you will need to ensure your agent can connect to the following Configuration Manager API management IP address:
20.112.227.84and the Configuration Manager GitHub package feed:
https://nuget.pkg.github.com/simeoncloudInstall and configure the agent pool
Install Configuration Manager dependencies
To run Configuration Manager, users will need to install the following software onto the agent:
- Git
Git long path support should be enabled by running the following script on the agent:
# Set git config to allow long paths
Write-Host "Setting git long paths."
git config --system core.longpaths true- PowerShell Core
-
.NET 8 SDK
- .NET 8 SDK is mandatory beginning October 2024. Any agent installed prior to October must be updated to .NET 8 to avoid disruptions in the Sync.
- NuGet
- Azure Command-Line Interface (CLI)
Configuring the agent
Once the agent machine has been configured, users will need to provision a user account with permissions for the agent. Directions can be found in the Self-hosted Windows agents guide and the Self-hosted Linux agents guide.
Step 1: create the agent pool
To create an agent pool, do the following:
- Access to Azure DevOps.
- Navigate to “Organization settings”.
- Find “Agent pools” under “Pipelines”.
- Select “Add pool” in the top right of the screen.
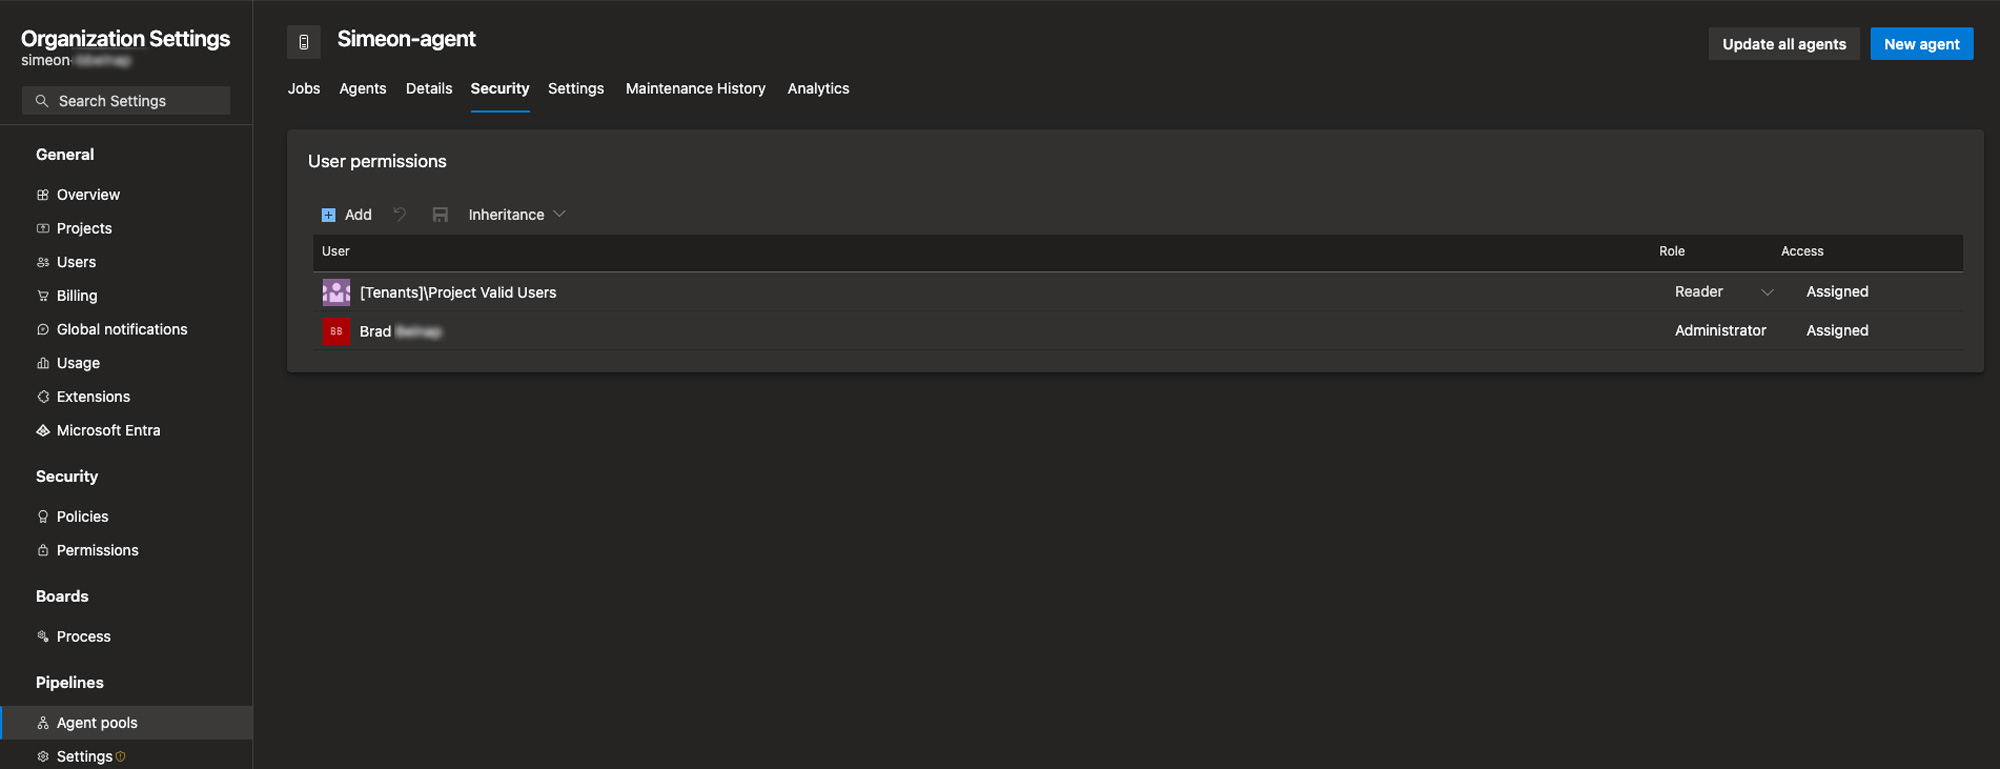
Step 2: set permissions
Ensure the appropriate permissions have been configured for Configuration Manager. Do the following:
- In “Agent pools” select the agent pool you've just created
- Select the “Security” tab
- The DevOps
owner/adminas well as the[Tenants]/Project Valid Usersgroup should be configured like this:
Step 3: set authentication access
Set up authentication access.
There are several options outlined in the Self-hosted agent authentication options guide. Personal Access Tokens can be configured using the Register an agent using a personal access token (PAT) guide.
Step 4: create the agent
Once you have a user set up with an authentication method, create the agent.
- In “Agent pools” select the agent created earlier
- From the top right click “New agent”
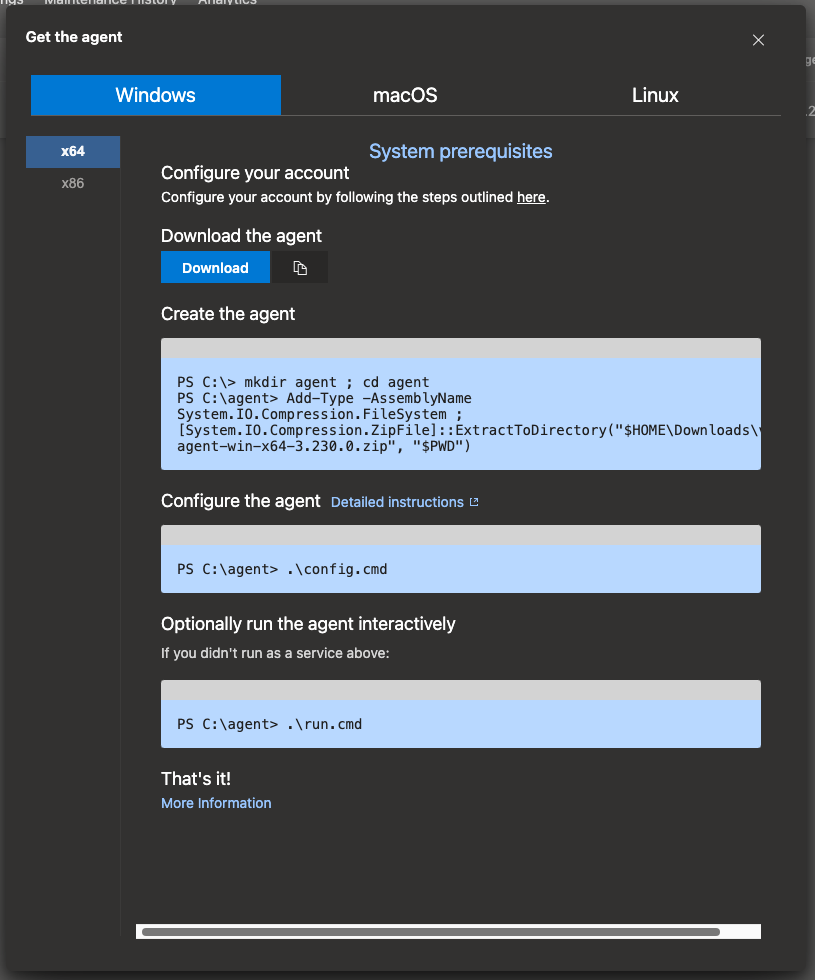
Step 5: download and run the agent
Download the agent configuration script and run it on the self-hosted machine.
Select the OS and system architecture that matches your agent and download the file or copy the URL to download directly onto the machine.
Running the agent
Once the agent has been configured, it is time to run the agent.
- You can start the agent by following:
- the Run the agent section in the “Self-hosted Windows agents” guide
- or the Run interactively section in the “Self-hosted Linux agents” guide.
- After the agent is up and running, you should see the agent appear in the agent pool agent settings in DevOps.
Configure Configuration Manager pipelines to use the agent pool
Once the agent has been configured and is ready for use, you can proceed to select it within the Configuration Manager application or change it manually in Azure DevOps.
Via the Configuration Manager application
You can select it during the installation process under “Advanced Settings” or select it via “Sync settings” > “Agent pool”. Refer to the “Select agent pool in Install” or “Select agent pool in Sync” sections in our “Agent pool selection” guide to understand the process.
In addition to your custom self-hosted agent pools you will see two standard options:
- Default: this option is an empty agent pool provided by Microsoft as a space to create your own self-hosted agents. By default, this pool has no agents and is not in use.
- Azure Pipelines: this option represents the default Microsoft-hosted Azure agent pool. Selecting this option will ensure the tenant Sync runs on the default Microsoft-hosted agent.
Manually via the Sync.yml file
To manually select the custom agent pool, please refer to the “Change agent pool manually via the Sync.yml file” section in our “Agent pool selection” guide.
Additional considerations
Microsoft supports a variety of architectures for running self-hosted agents, including scale set agents, Docker agents, and AKS agents. These different architectures may require additional setup and configuration that is not covered in this guide and may not be supported by Configuration Manager in all cases.
Scale set agents
Using scale set agents may require additional configuration. If you are looking to use a scale set agent, please follow the steps in the Azure Virtual Machine Scale Set agents guide.
Docker agents
Docker agents are known to work with Configuration Manager. If you are interested in configuring Docker agents, please see the Run a self-hosted agent in Docker guide.
Kubernetes / Azure Kubernetes Service (AKS)
Microsoft supports running Azure DevOps agents in AKS. For information regarding AKS agents, please see the Use Azure Kubernetes Service cluster section in the “Run a self-hosted agent in Docker” article.
Windows Registry Key
When running a Windows agent, you may experience the following error:
Failed to set registry key for long paths. If using a static sync agent please run the following command: "New-ItemProperty -Path 'HKLM:\SYSTEM\CurrentControlSet\Control\FileSystem' -Name 'LongPathsEnabled' -Value 1 -PropertyType DWORD -Force".In this case, you can run the following script to set this registry key:
if ($env:OS -like "Windows_NT*") {
       Write-Host "Running on Windows, will try to set registry key for long paths."
       New-ItemProperty -Path "HKLM:\SYSTEM\CurrentControlSet\Control\FileSystem" -Name "LongPathsEnabled" -Value 1 -PropertyType DWORD -Force
   }
   else {
       Write-Host "Not running on Windows."
   }